
Cluster Maintenance
Cluster Maintenance
1. Core Concepts
Before performing cluster maintenance operations, you need to understand concepts related to the IoTDB cluster architecture, series partitions, time partitions, and other related concepts.
1.1 Glossary
| Term | Type | Explanation |
|---|---|---|
| ConfigNode | Node Role | Management node, responsible for managing cluster information, including recording partition information, load balancing, operation scheduling, and node management. |
| DataNode | Node Role | Data node, responsible for providing data read/write services for clients, and comprehensively managing data and metadata. Data nodes form different replica groups. |
| Database | Metadata | Database, where data in different databases is physically isolated. |
| DeviceId | Device Name | The full path from the root to the second-to-last level in the metadata tree represents a DeviceId. |
| SeriesSlot | Series Partition Slot | Each Database corresponds to a fixed number of series slots, containing the metadata of the series within it. |
| SeriesTimeSlot | A Time Partition Slot of a Series Slot | Corresponds to the data of all series within a SeriesSlot for one time partition. |
| SchemaRegion | A Set of Metadata Partitions | A collection of multiple SeriesSlots. The metadata management engine on a DataNode, providing read/write operations for metadata. |
| DataRegion | A Set of Data Partitions | A collection of multiple SeriesTimeSlots. The data management engine on a DataNode, providing data read/write operations. |
| ConfigNodeGroup | Logical Concept (Consensus Group) | Composed of all ConfigNode nodes in the cluster, maintaining consistent partition table information through a consensus protocol. |
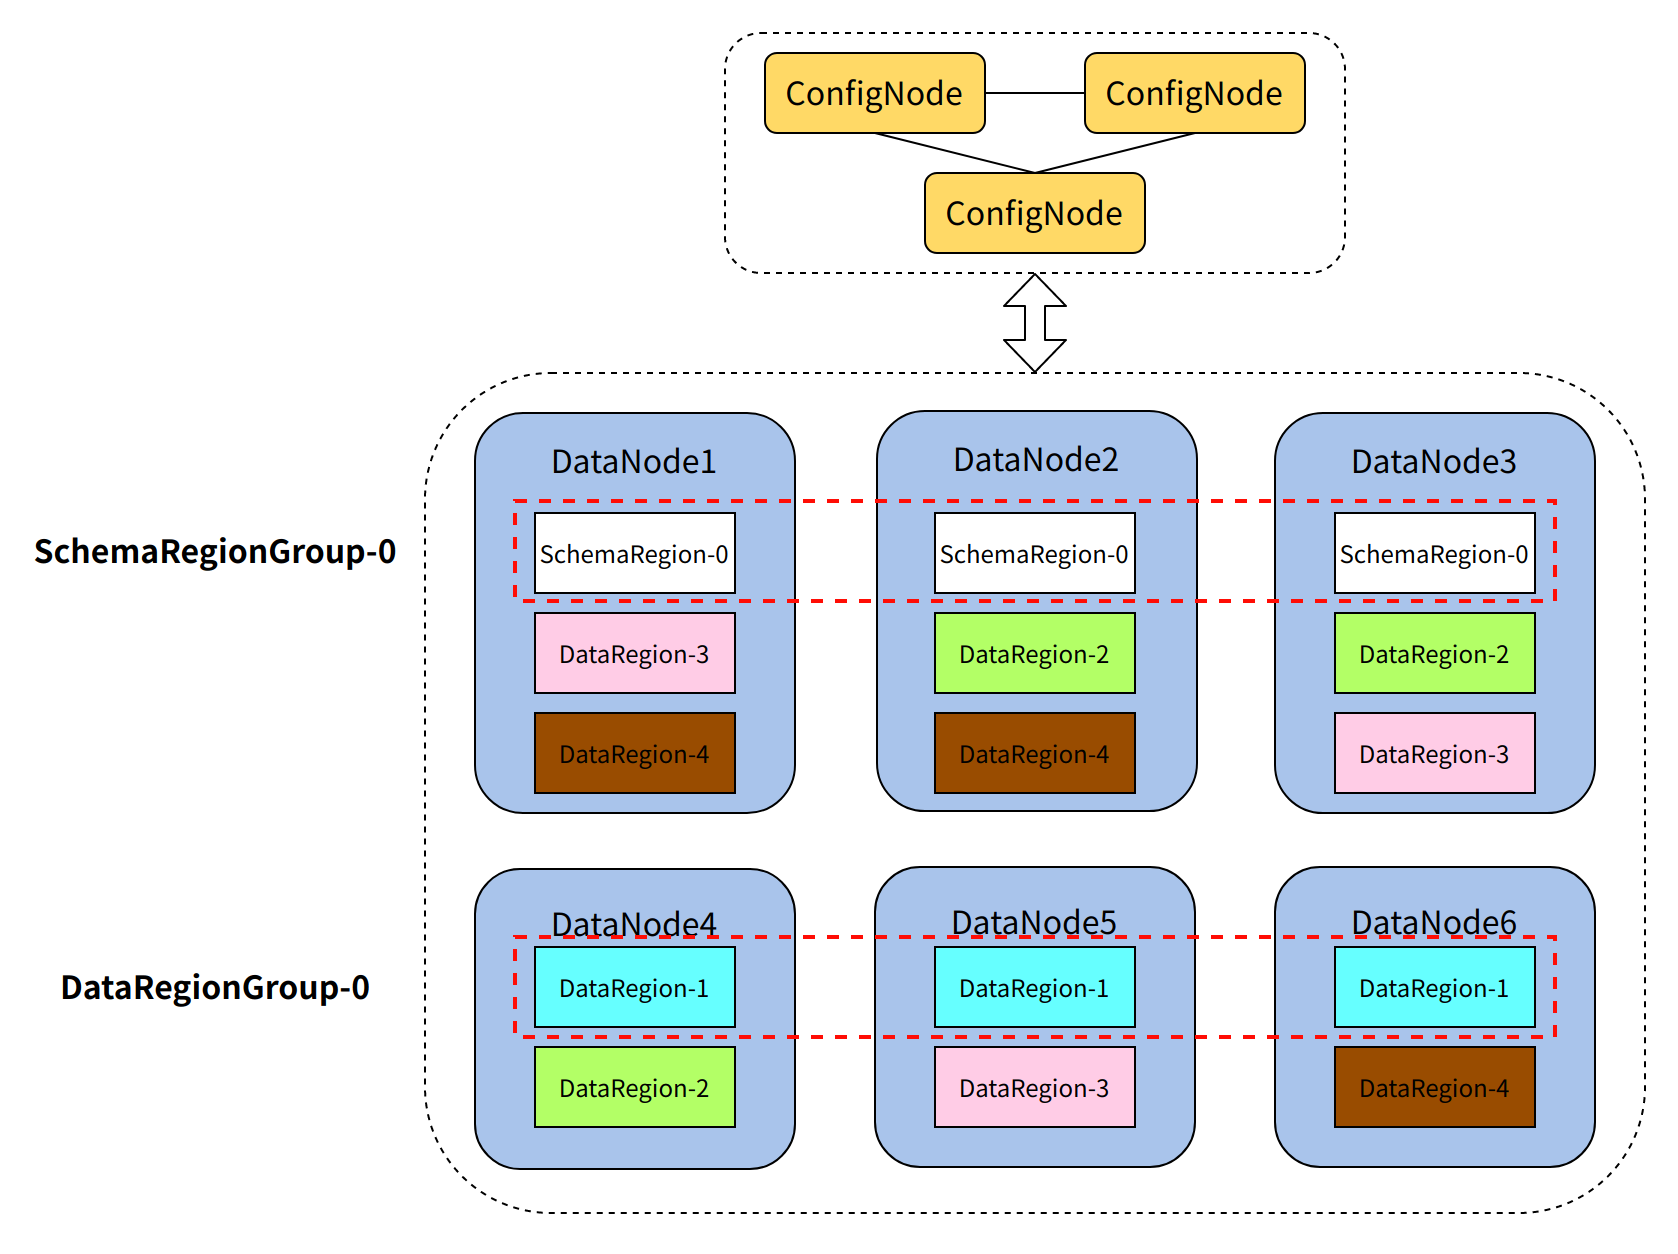
| SchemaRegionGroup | Logical Concept (Consensus Group) | Metadata replica group, containing the same number of SchemaRegions as the metadata replica count. It manages the same metadata, serving as backups for each other. |
| DataRegionGroup | Logical Concept (Consensus Group) | Data replica group, containing the same number of DataRegions as the data replica count. It manages the same data, serving as backups for each other. It is the fundamental unit of the IoTDB cluster's throughput capacity. |
1.2 Cluster Architecture
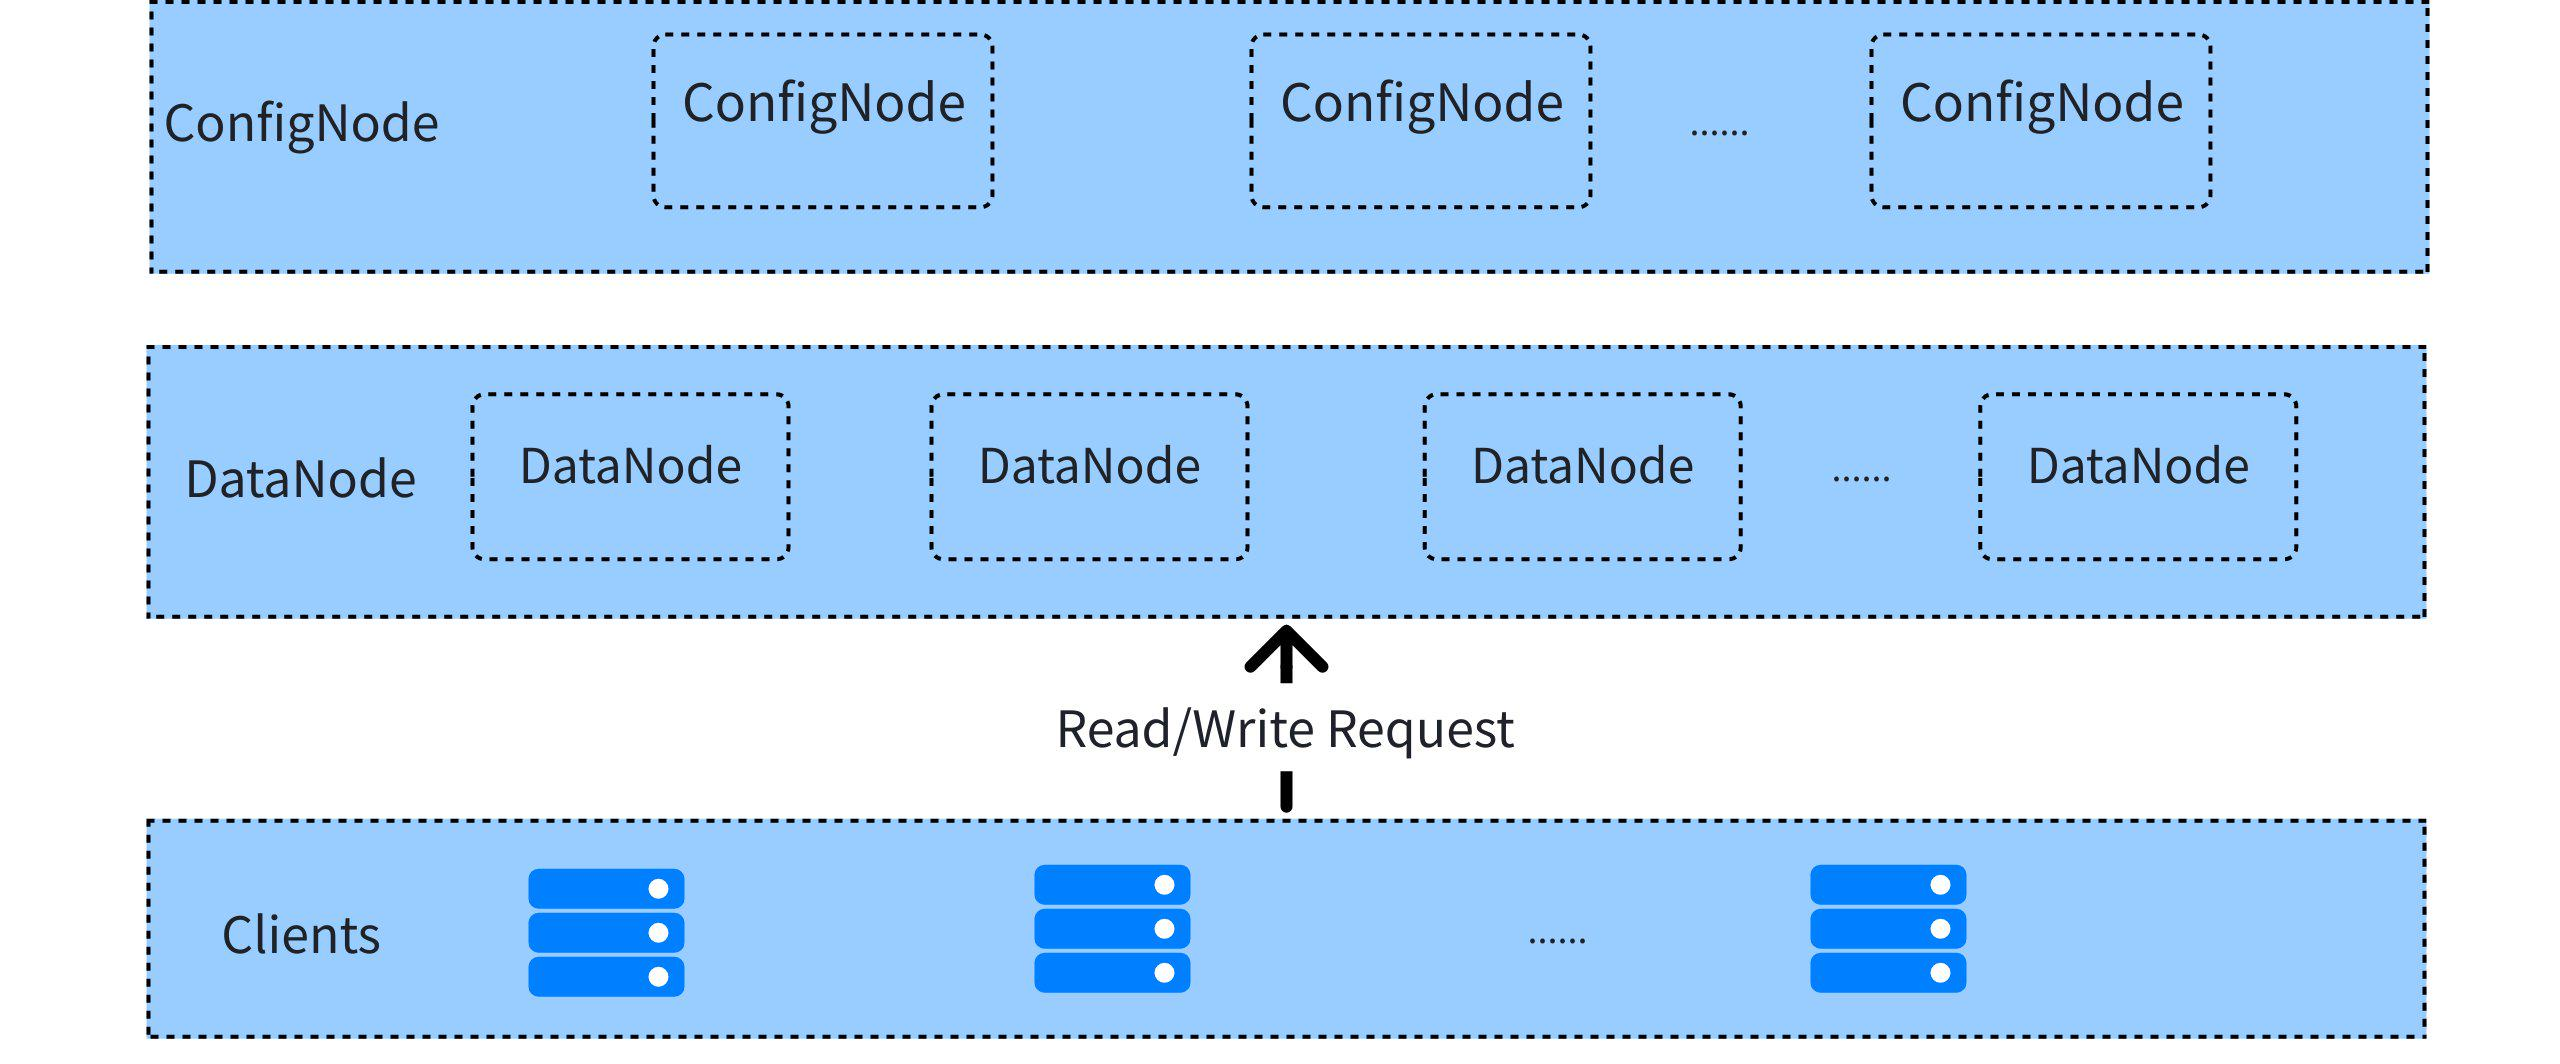
The IoTDB cluster consists of management nodes (ConfigNode) and data nodes (DataNode), employing an MPP architecture to achieve large-scale parallel processing. Its core feature lies in partitioning metadata at the device level and partitioning data in two dimensions (device and time), ensuring comprehensive scalability.
1.3 Partition Management
1.3.1 Cluster Consensus Groups
In IoTDB, data partition groups (DataRegionGroup) and metadata partition groups (SchemaRegionGroup) are the smallest units for read/write load, ensuring data consistency through the consensus group mechanism. Therefore, the essence of cluster scaling is to increase data partitions to enhance concurrent processing capability and throughput.
1.3.2 Partition Slot Mechanism
To support scaling and efficient distributed management, IoTDB introduces two core slot mechanisms for partitioning and load scheduling.
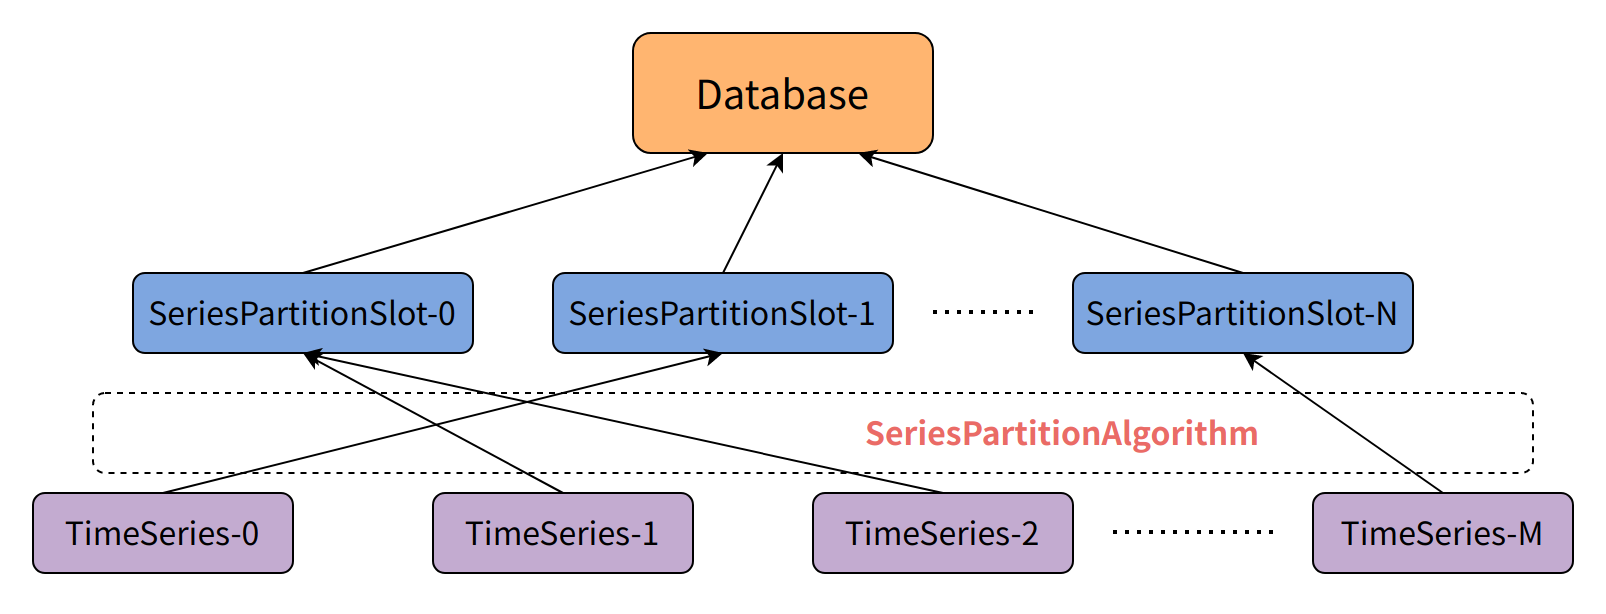
The first is the Series Partition Slot, a mechanism for vertically managing time series. Each database holds a fixed number of series partition slots (default 1000). Each time series is assigned to a unique series partition slot via a series partitioning algorithm. Using series partition slots avoids directly recording partition information at the device or time series level, significantly reducing ConfigNode memory overhead.
The second is the Time Partition Slot, used for horizontally splitting time series data. Each data partition consists of the combination of a series partition slot and a time partition slot. When a specific series partition slot has data within a particular time partition slot, the corresponding data partition is generated.
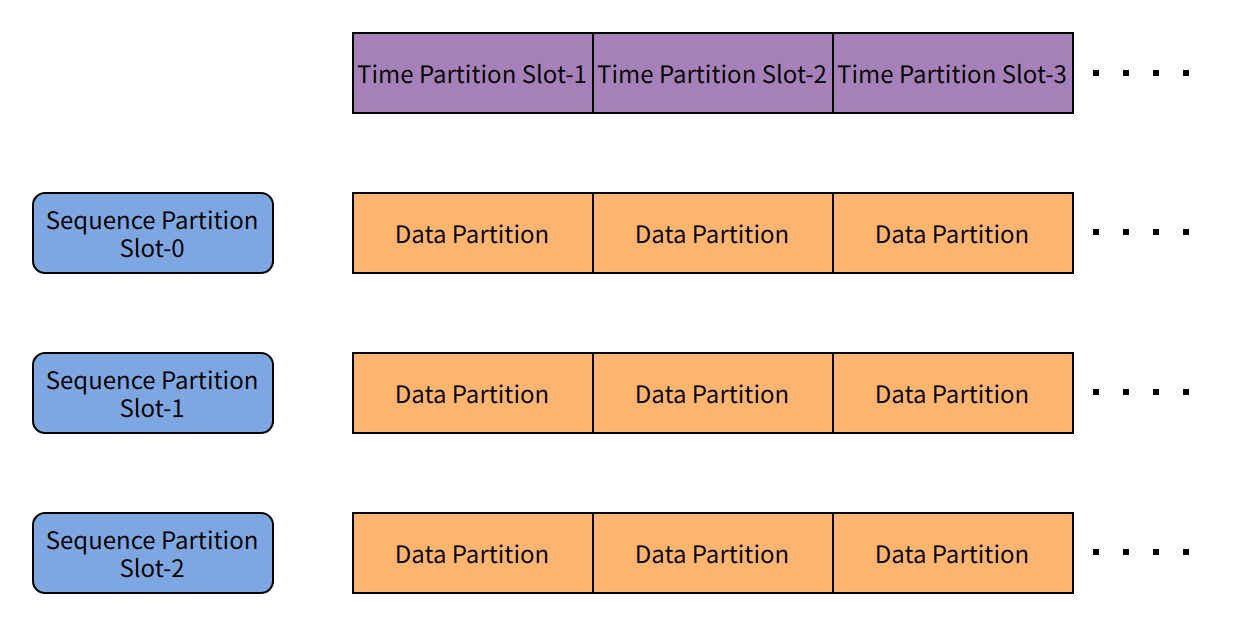
Through the combination of series partition slots and time partition slots, IoTDB can flexibly increase data partition groups during scaling, achieving balanced data distribution and efficient read/write operations, thereby enhancing the entire cluster's throughput capacity and scalability.
2. Cluster Scaling
When an IoTDB cluster encounters resource bottlenecks such as CPU, memory, disk, or network due to a surge in data volume or access pressure, you can perform horizontal scaling based on this guide to improve the overall performance and capacity of the cluster.
2.1 Implementation Principle
The core of IoTDB cluster scaling is adding DataNode nodes, as DataNodes are the primary nodes handling read/write requests. The internal data partitions (DataRegions) are the key units bearing the load. The essence of scaling is to increase the cluster's concurrent processing capability and throughput by adding data partition groups.
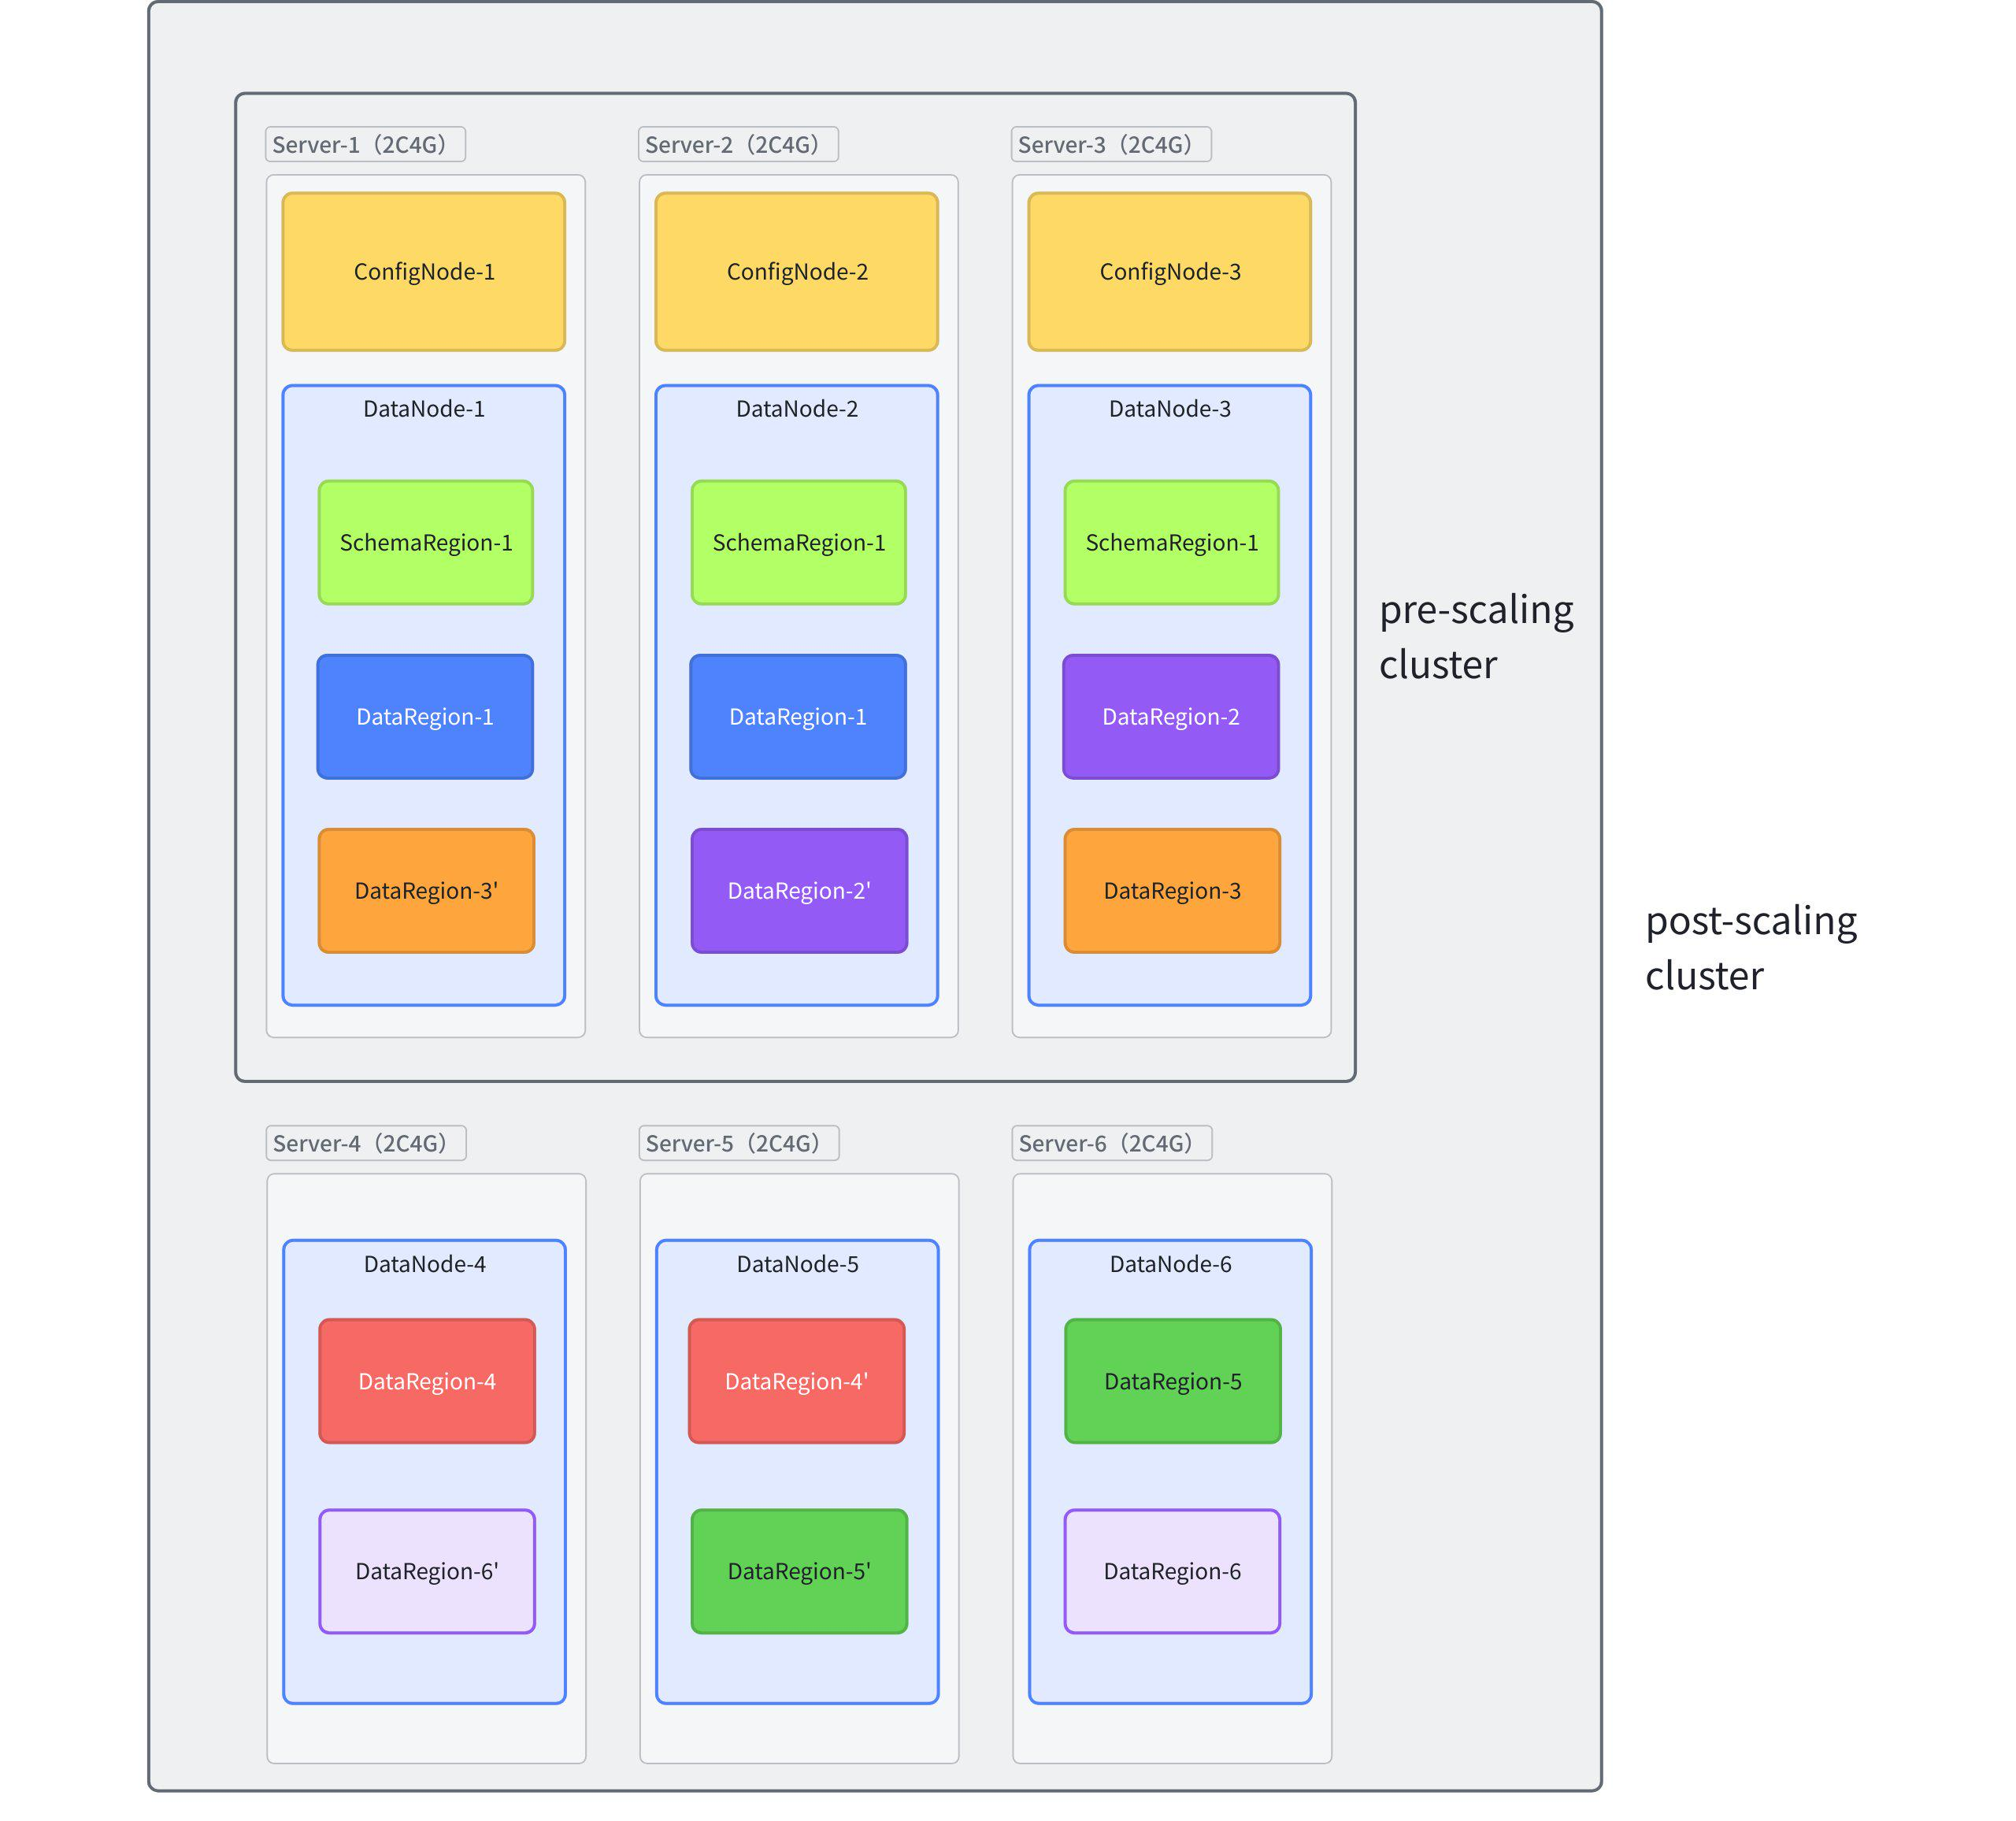
By default, assuming the cluster's metadata replica count is three and the data replica count is two, the number of data partitions created upon initial startup is half the total number of cluster cores. For example, in a cluster of three 2-core servers, assuming the processing capacity of each data replica group is 1, the total throughput capacity of this cluster (containing 3 data replica groups) is 3. Therefore, scaling the number of servers from three to six expands the cluster from three to six data replica groups, effectively doubling the total throughput capacity.
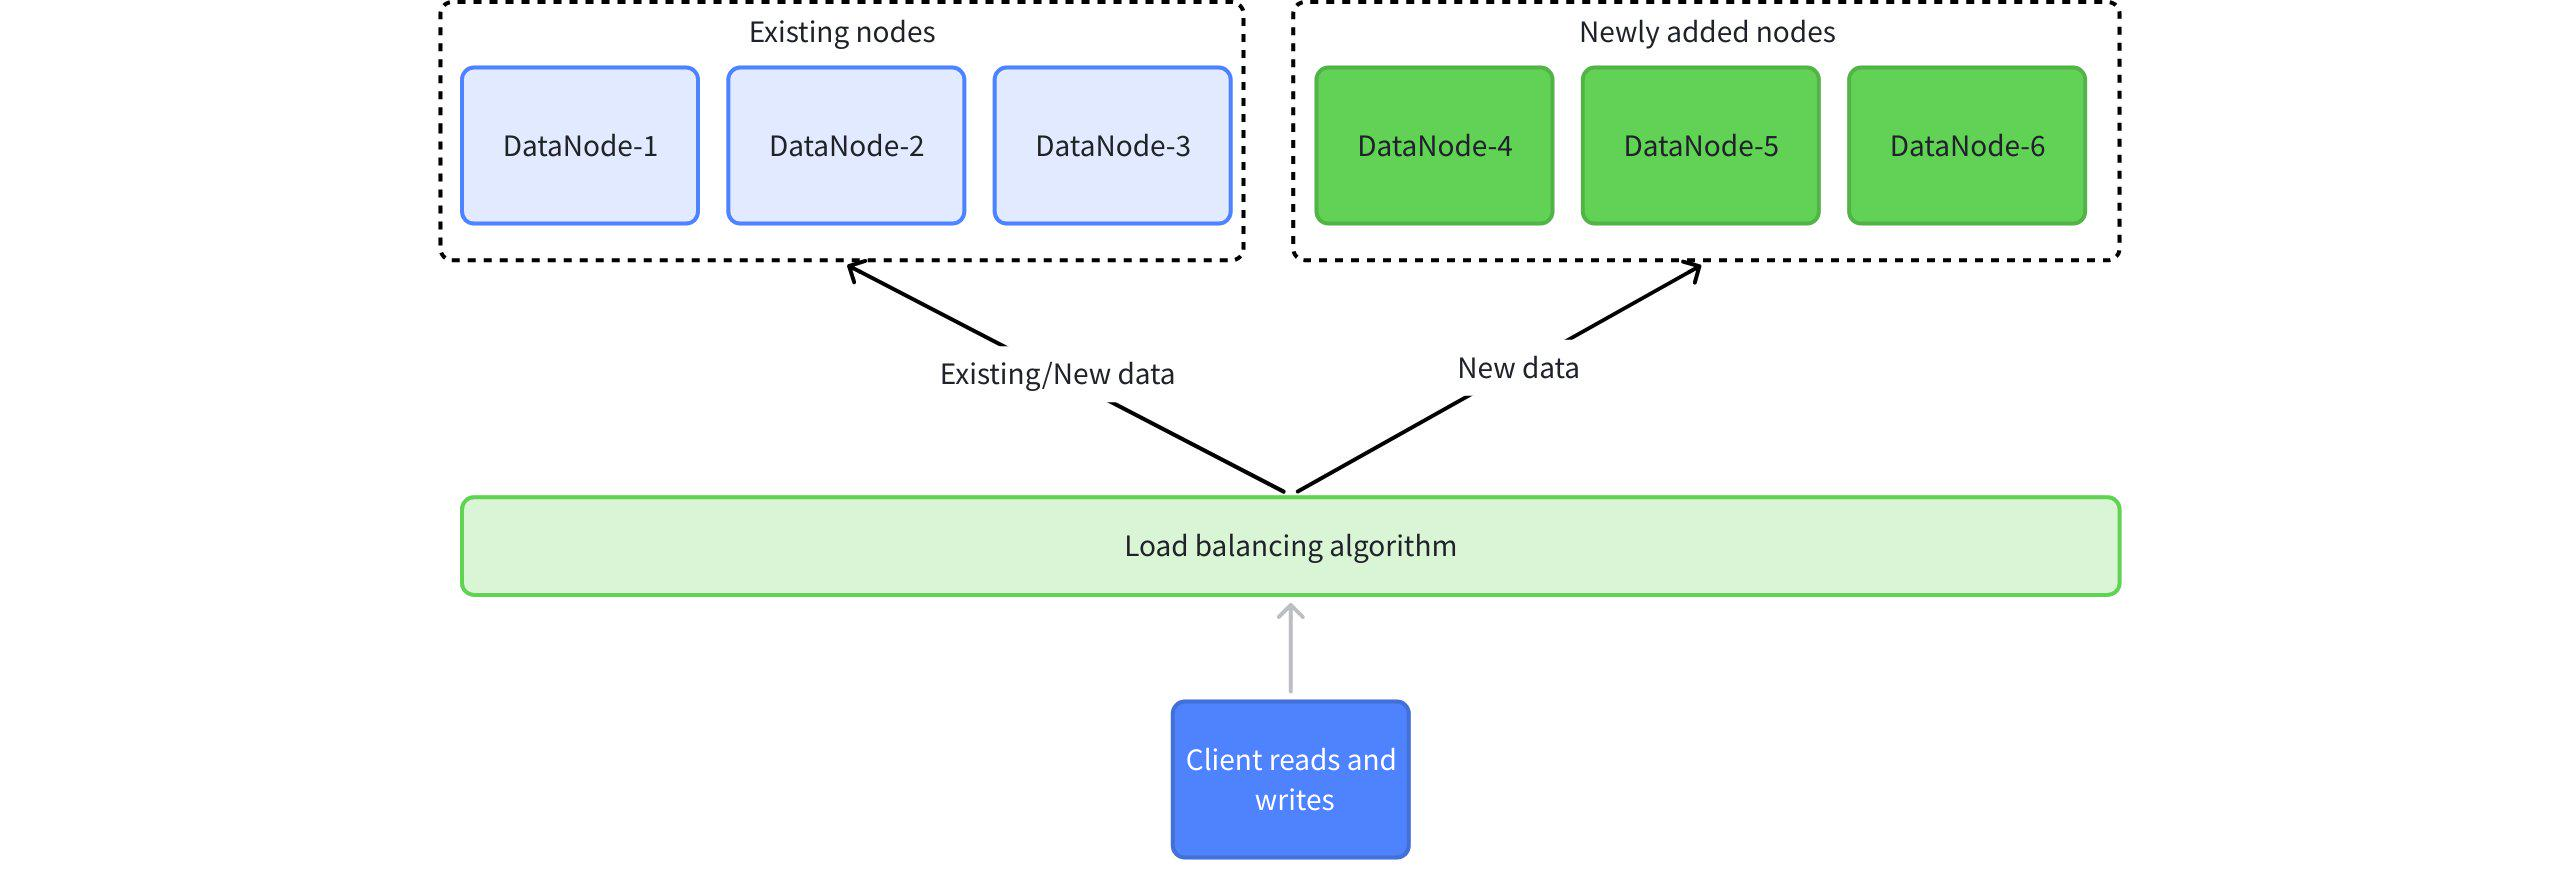
After scaling, the load balancing rule for client read/write requests is that existing nodes may handle data reads and writes for both old data (data belonging to DeviceIds already existing in the cluster) and new data (data belonging to DeviceIds not previously existing in the cluster), while newly added nodes will only receive requests for the new data. The existing nodes do not automatically rebalance the original replica groups. Data load balancing typically occurs when a new time partition is created, scheduled by default for 8 AM every Thursday. Its core principle involves the load balancing algorithm operating on series partition slots and time partition slots to determine which node's partition handles the data.
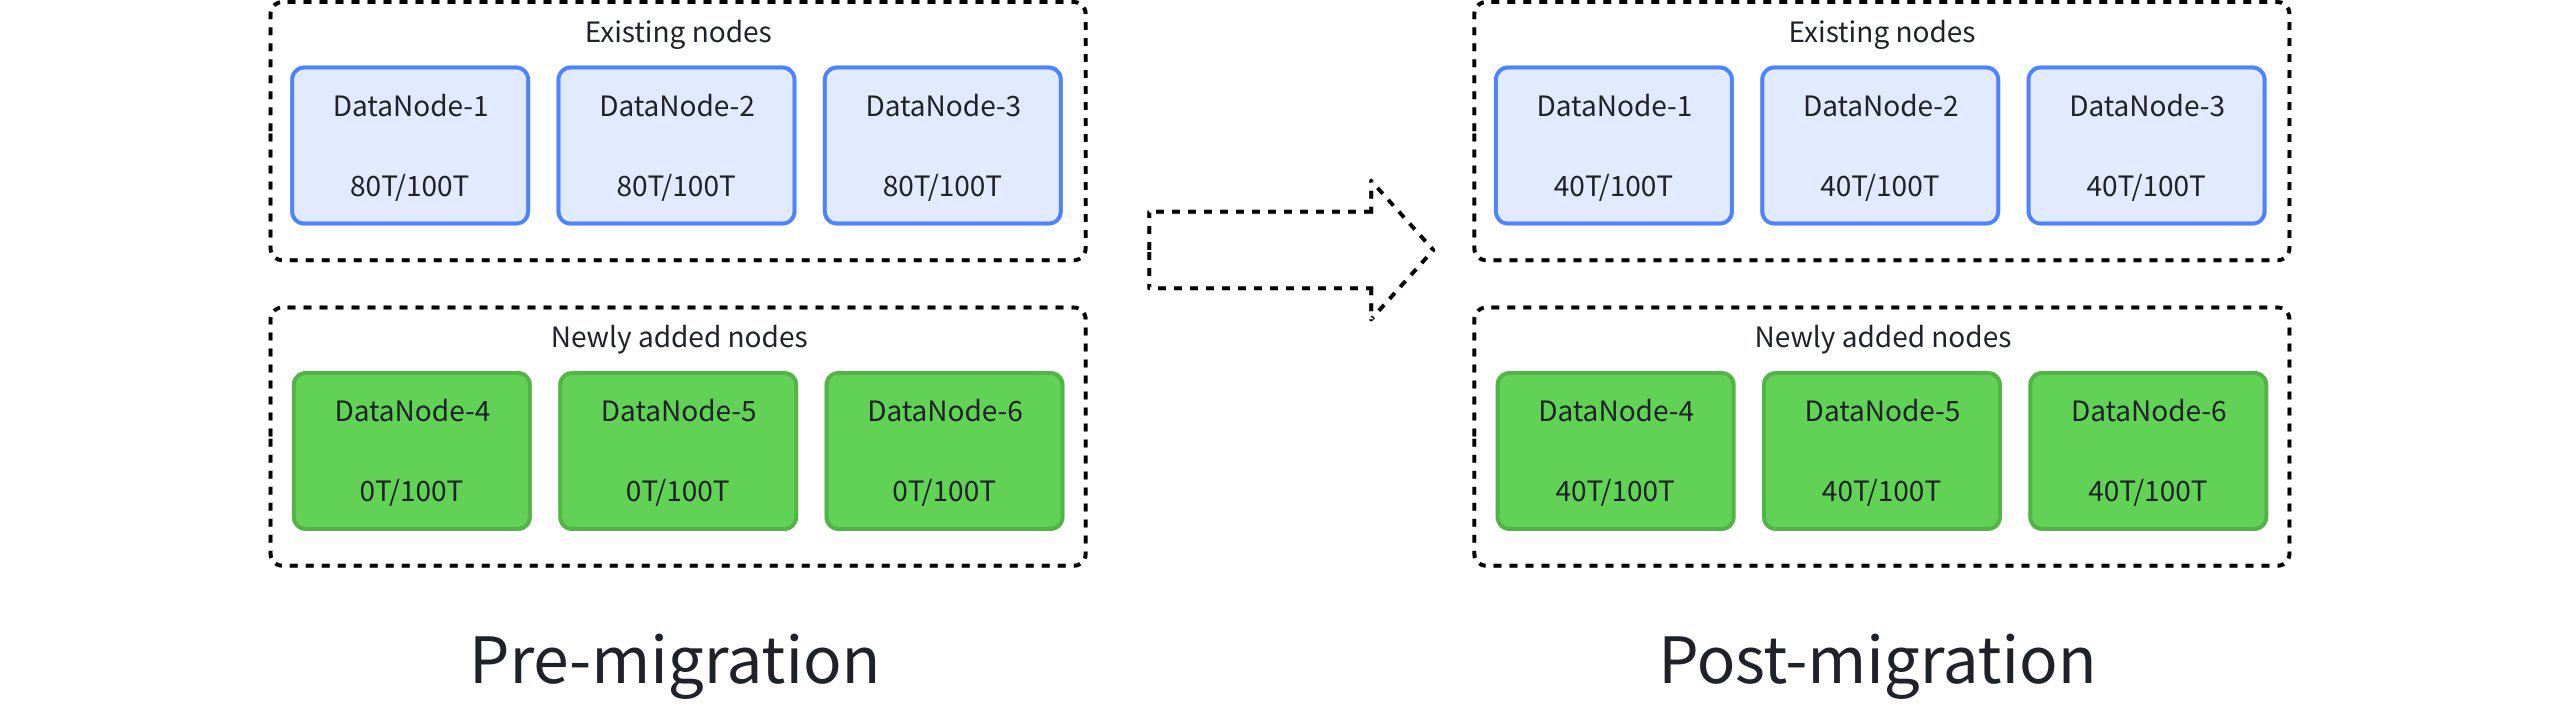
If you want to further balance historical data after scale-out, you can execute Region migration or Region rebalancing as needed. If you need to precisely specify the Region, source DataNode, and target DataNode, see 4. Manual Region Migration. If you want the system to automatically calculate the migration plan and complete the overall balancing process, see 5. Automatic Region Rebalancing.
2.2 Operational Steps
2.2.1 Prerequisites
Check the server environment. It is recommended that the operating system version matches that of the original cluster.
Verify the database version. It is recommended to use the same version as the original cluster.
Check the OS environment to ensure required ports are not occupied. DataNode uses ports 6667, 10730, 10740, 10750, 10760, 9090, 9190, 3000. Ensure these ports are free.
# If the command has output, the port is occupied.
lsof -i:6667   or  netstat -tunp | grep 6667
lsof -i:10710  or  netstat -tunp | grep 10710
lsof -i:10720  or  netstat -tunp | grep 10720
Check the data directory. Ensure the server has mounted a data disk; it is recommended to place the installation package in the data disk directory.
Software Dependency: Install Java Runtime Environment (JRE), version >= 1.8. Ensure the JDK/JRE environment variables are set.
Domain Configuration: It is recommended to prioritize using hostnames for IP configuration during deployment. This can prevent issues with the database failing to start due to later changes in the host IP. To set the hostname, configure
/etc/hostson the target server. For example, if the local IP is 192.168.1.3 and the hostname isiotdb-1, you can set the server's hostname using the following command. Then, use the hostname to configure IoTDB'scn_internal_address,dn_internal_address, anddn_rpc_address.
# Note: Both the new server and the original cluster nodes need domain configuration.
echo "192.168.1.3  iotdb-1" >> /etc/hosts
2.2.2 Scaling Operation
- To ensure the IoTDB installation package you obtained is complete and correct, it is recommended to perform an SHA512 checksum before installation and deployment.
- Unzip the installation package and enter the installation directory.
unzip  apache-iotdb-{version}-bin.zip
cd apache-iotdb-{version}-bin- Modify the relevant configuration.
cd  apache-iotdb-{version}-bin/conf
vim iotdb-system.properties| Configuration Item | Description | Default | Remarks |
|---|---|---|---|
dn_seed_config_node | The ConfigNode address (format:cn_internal_address:cn_internal_port) that a node connects to when registering to join the cluster. | 127.0.0.1:10710 | Extremely important. You must modify this item to the address of the primary ConfigNode in the original cluster. |
dn_rpc_address | Address for the client RPC service. | 0.0.0.0 | Modify as needed; restart service to take effect. |
dn_rpc_port | Port for the client RPC service. | 6667 | Modify as needed; restart service to take effect. |
dn_internal_address | Address used by the DataNode for internal cluster communication. | 127.0.0.1 | Modify as needed; cannot be changed after the first startup. |
dn_internal_port | Port used by the DataNode for internal cluster communication. | 10730 | Modify as needed; cannot be changed after the first startup. |
dn_mpp_data_exchange_port | Port used by the DataNode for receiving data streams. | 10740 | Modify as needed; restart service to take effect. |
dn_data_region_consensus_port | Port used by the DataNode for consensus protocol communication of data replicas. | 10750 | Modify as needed; restart service to take effect. |
dn_schema_region_consensus_port | Port used by the DataNode for consensus protocol communication of metadata replicas. | 10760 | Modify as needed; restart service to take effect. |
- Start the DataNode.
Navigate to the sbindirectory under IoTDB and start the datanode:
# Unix/OS X
./sbin/start-datanode.sh -d    # The "-d" parameter starts the process in the background.

# Windows
# Before version V2.0.4.x
.\sbin\start-datanode.bat

# V2.0.4.x and later versions
.\sbin\windows\start-datanode.bat- Connect to the original cluster via CLI command for post-scaling verification.
# Linux or macOS
  ./apache-iotdb-{version}-bin/sbin/start-cli.sh

  # Windows
  # Before version V2.0.4.x
  .\apache-iotdb-{version}-bin\sbin\start-cli.bat

  # V2.0.4.x and later versions
.\apache-iotdb-{version}-bin\sbin\windows\start-cli.bat- Execute commands for verification.
Execute the show datanodescommand for verification. The expected result is that the newly added node appears in the list with a status of Running.
IoTDB> show datanodes
+------+-------+----------+-------+-------------+---------------+
|NodeID| Status|RpcAddress|RpcPort|DataRegionNum|SchemaRegionNum|
+------+-------+----------+-------+-------------+---------------+
|     1|Running|   0.0.0.0|   6667|            0|              0|
|     2|Running|   0.0.0.0|   6668|            1|              1|
|     3|Running|   0.0.0.0|   6669|            1|              0|
|     4|Running|   0.0.0.0|   6669|            1|              0| # Newly added node
+------+-------+----------+-------+-------------+---------------+
Total line number = 4
It costs 0.110s- Repeat the above steps for other nodes. It is important to note that for a new node to join the original cluster successfully, the original cluster must have sufficient allowance for additional DataNode nodes.
2.2.3 Manual Load Balancing (Optional)
By default, historical data is not automatically migrated after scale-out. If you need to further balance data distribution across nodes, you can choose one of the following methods:
Manual Region migration: suitable when the Region, source DataNode, and target DataNode to be migrated are already clear. For details, see 4. Manual Region Migration.
Automatic Region rebalancing: suitable when you want the system to automatically select the migration plan and balance historical data after scale-out. For details, see 5. Automatic Region Rebalancing.
3. Node Management
Node management is mainly used to remove and add ConfigNodes and DataNodes in a cluster. It is a basic operation to ensure cluster high availability and achieve load balancing.
3.1 ConfigNode Maintenance
ConfigNode maintenance includes two operations: adding and removing ConfigNodes. There are two common usage scenarios:
- Cluster scaling: When there is only 1 ConfigNode in the cluster and you want to increase the high availability of ConfigNodes, you can add 2 more ConfigNodes so that the cluster has 3 ConfigNodes.
- Cluster fault recovery: When the machine hosting a ConfigNode fails and the ConfigNode cannot run properly, you can remove the faulty ConfigNode and add a new ConfigNode to the cluster.
❗️ Note: After completing ConfigNode maintenance, ensure the cluster has 1 or 3 normally running ConfigNodes.
2 ConfigNodes do not provide high availability, and more than 3 ConfigNodes will cause performance degradation.
3.1.1 Adding a ConfigNode
Script commands:
# Linux / MacOS
# First switch to the IoTDB root directory
sbin/start-confignode.sh

# Windows
# First switch to the IoTDB root directory
# Before V2.0.4.x
sbin\start-confignode.bat

# V2.0.4.x and later
sbin\windows\start-confignode.bat
Parameter description:
| Param | Description | Required |
|---|---|---|
| -v | Show version information | No |
| -f | Run the script in the foreground, not in the background | No |
| -d | Start in daemon mode (run in the background) | No |
| -p | Specify a file to store the process ID for process management | No |
| -c | Specify the path of the configuration folder to load configuration files | No |
| -g | Print detailed garbage collection (GC) information | No |
| -H | Specify the path for Java heap dump files on JVM out-of-memory | No |
| -E | Specify the path for JVM error log files | No |
| -D | Define system properties in the format key=value | No |
| -X | Directly pass -XX parameters to the JVM | No |
| -h | Show help | No |
3.1.2 Removing a ConfigNode
First connect to the cluster via CLI and use show confignodes to confirm the NodeID of the ConfigNode to be removed:
IoTDB> show confignodes
+------+-------+---------------+------------+--------+
|NodeID| Status|InternalAddress|InternalPort|    Role|
+------+-------+---------------+------------+--------+
|     0|Running|      127.0.0.1|       10710|  Leader|
|     1|Running|      127.0.0.1|       10711|Follower|
|     2|Running|      127.0.0.1|       10712|Follower|
+------+-------+---------------+------------+--------+
Total line number = 3
It costs 0.030s
Then remove the ConfigNode using the following SQL command:
REMOVE CONFIGNODE [confignode_id];3.2 DataNode Maintenance
There are two common scenarios for DataNode maintenance:
- Cluster scaling: Add new DataNodes to the cluster to expand cluster capacity.
- Cluster fault recovery: When the machine hosting a DataNode fails and the DataNode cannot run properly, remove the faulty DataNode and add a new DataNode to the cluster.
❗️ Note: To ensure normal cluster operation, during and after DataNode maintenance, the number of normally running DataNodes must not be less than the data replication factor (usually 2) or the metadata replication factor (usually 3).
3.2.1 Adding a DataNode
Script commands:
# Linux / MacOS
# First switch to the IoTDB root directory
sbin/start-datanode.sh

# Windows
# First switch to the IoTDB root directory
# Before V2.0.4.x
sbin\start-datanode.bat

# V2.0.4.x and later
sbin\windows\start-datanode.bat
Parameter description:
| Param | Description | Required |
|---|---|---|
| -v | Show version information | No |
| -f | Run the script in the foreground, not in the background | No |
| -d | Start in daemon mode (run in the background) | No |
| -p | Specify a file to store the process ID for process management | No |
| -c | Specify the path of the configuration folder to load configuration files | No |
| -g | Print detailed garbage collection (GC) information | No |
| -H | Specify the path for Java heap dump files on JVM out-of-memory | No |
| -E | Specify the path for JVM error log files | No |
| -D | Define system properties in the format key=value | No |
| -X | Directly pass -XX parameters to the JVM | No |
| -h | Show help | No |
Note: After adding a DataNode, as new writes arrive (and old data expires if TTL is set), the cluster load will gradually balance toward the new DataNode, eventually achieving balanced storage and computing resources across all nodes.
3.2.2 Removing a DataNode
First connect to the cluster via CLI and use show datanodes to confirm the NodeID of the DataNode to be removed:
IoTDB> show datanodes
+------+-------+----------+-------+-------------+---------------+
|NodeID| Status|RpcAddress|RpcPort|DataRegionNum|SchemaRegionNum|
+------+-------+----------+-------+-------------+---------------+
|     1|Running|   0.0.0.0|   6667|            0|              0|
|     2|Running|   0.0.0.0|   6668|            1|              1|
|     3|Running|   0.0.0.0|   6669|            1|              0|
+------+-------+----------+-------+-------------+---------------+
Total line number = 3
It costs 0.110s
Then remove the DataNode using the following SQL command:
REMOVE DATANODE [datanode_id];4. Manual Region Migration
Region migration belongs to advanced operations and maintenance functions, which have certain operational costs. It is recommended to read the entire document before using this function. If you have any questions about the solution design, please contact the IoTDB team for technical support.
4.1 Feature Introduction
IoTDB is a distributed database, and Region is the basic unit for distributed storage in an IoTDB cluster. When the cluster is running normally, IoTDB automatically balances newly written data. In scenarios such as adding new DataNodes to the cluster or recovering data after a disk failure on the machine where a DataNode is located, you can use manual Region migration to fine-tune cluster load and O&M behavior.
4.2 Notes
- It is recommended to only use the Region Migration feature on IoTDB 1.3.3 and higher versions.
- Region migration is only supported when the consensus protocol is IoTConsensus or Ratis (in iotdb-system.properties, the
schema_region_consensus_protocol_classanddata_region_consensus_protocol_class). - Region migration consumes system resources such as disk space and network bandwidth. It is recommended to perform the migration during periods of low business load.
- Under ideal circumstances, Region migration does not affect user-side read or write operations. In special cases, Region migration may block writes. For detailed identification and handling of such situations, please refer to the user guide.
4.3 Usage
Grammar definition :
Submit an asynchronous task to migrate a region from one DataNode to another.
  migrateRegion
      : MIGRATE REGION regionId=INTEGER_LITERAL FROM fromId=INTEGER_LITERAL TO toId=INTEGER_LITERAL
      ;
Example :
Migrating region 1 from DataNode 2 to DataNode 3:
  IoTDB> migrate region 1 from 2 to 3
  Msg: The statement is executed successfully.
"The statement is executed successfully" only represents the successful submission of the region migration task, not the completion of execution. The execution status of the task can be viewed through the CLI command
show regions.Related configuration :
- Migration speed control : modify
iotdb-system.propertiesparametersregion_migration_speed_limit_bytes_per_secondcontrol region migration speed.
- Migration speed control : modify
Time cost estimation :
- If there are no concurrent writes during the migration process, the time consumption can be simply estimated by dividing the region data volume by the data transfer speed. For example, for a 1TB region, the hard disk internet bandwidth and speed limit parameters jointly determine that the data transfer speed is 100MB/s, so it takes about 3 hours to complete the migration.
- If there are concurrent writes in the migration process, the time consumption will increase, and the specific time consumption depends on various factors such as write pressure and system resources. It can be simply estimated as
no concurrent write time × 1.5.
Migration progress observation : During the migration process, the state changes can be observed through the CLI command
show regions. Taking the 2 replicas as an example, the state of the consensus group where the region is located will go through the following process:- Before migration starts:
Running,Running. - Expansion phase:
Running,Running,Adding. Due to the large number of file transfers involved, it may take a long time. If using IoTConsensus, the specific file transfer progress can be searched in the DataNode log[SNAPSHOT TRANSMISSION]. - Stages:
Removing,Running,Running. - Migration complete:
Running,Running.
Taking the expansion phase as an example, the result of
show regionsmay be:IoTDB> show regions +--------+------------+-------+--------+-------------+-----------+----------+----------+-------+---------------+--------+-----------------------+ |RegionId| Type| Status|Database|SeriesSlotNum|TimeSlotNum|DataNodeId|RpcAddress|RpcPort|InternalAddress| Role| CreateTime| +--------+------------+-------+--------+-------------+-----------+----------+----------+-------+---------------+--------+-----------------------+ | 0|SchemaRegion|Running| root.ln| 1| 0| 1| 0.0.0.0| 6668| 127.0.0.1| Leader|2024-04-15T18:55:17.691| | 0|SchemaRegion|Running| root.ln| 1| 0| 2| 0.0.0.0| 6668| 127.0.0.1| Leader|2024-04-15T18:55:17.691| | 0|SchemaRegion|Running| root.ln| 1| 0| 3| 0.0.0.0| 6668| 127.0.0.1| Leader|2024-04-15T18:55:17.691| | 1| DataRegion|Running| root.ln| 1| 1| 1| 0.0.0.0| 6667| 127.0.0.1| Leader|2024-04-15T18:55:19.457| | 1| DataRegion|Running| root.ln| 1| 1| 2| 0.0.0.0| 6668| 127.0.0.1|Follower|2024-04-15T18:55:19.457| | 1| DataRegion| Adding| root.ln| 1| 1| 3| 0.0.0.0| 6668| 127.0.0.1|Follower|2024-04-15T18:55:19.457| +--------+------------+-------+--------+-------------+-----------+----------+----------+-------+---------------+--------+-----------------------+ Total line number = 3 It costs 0.003s- Before migration starts:
Block Write:
The region migration in IoTConsensus does not directly block writes. However, since the process requires suspending the cleanup of WAL files, if the accumulated WAL files exceed the threshold defined by wal_throttle_threshold_in_byte, the current DataNode will pause writing until the WAL files fall below the threshold.If a write error occurs during the migration due to the WAL exceeding the threshold (e.g., an error message like “The write is rejected because the wal directory size has reached the threshold”), you can increase the wal_throttle_threshold_in_byte value to 500GB or more to allow continued writing. Use the following SQL statement:
  IoTDB> set configuration "wal_throttle_threshold_in_byte"="536870912000"
  Msg: The statement is executed successfully.
4.4 Scenario Example
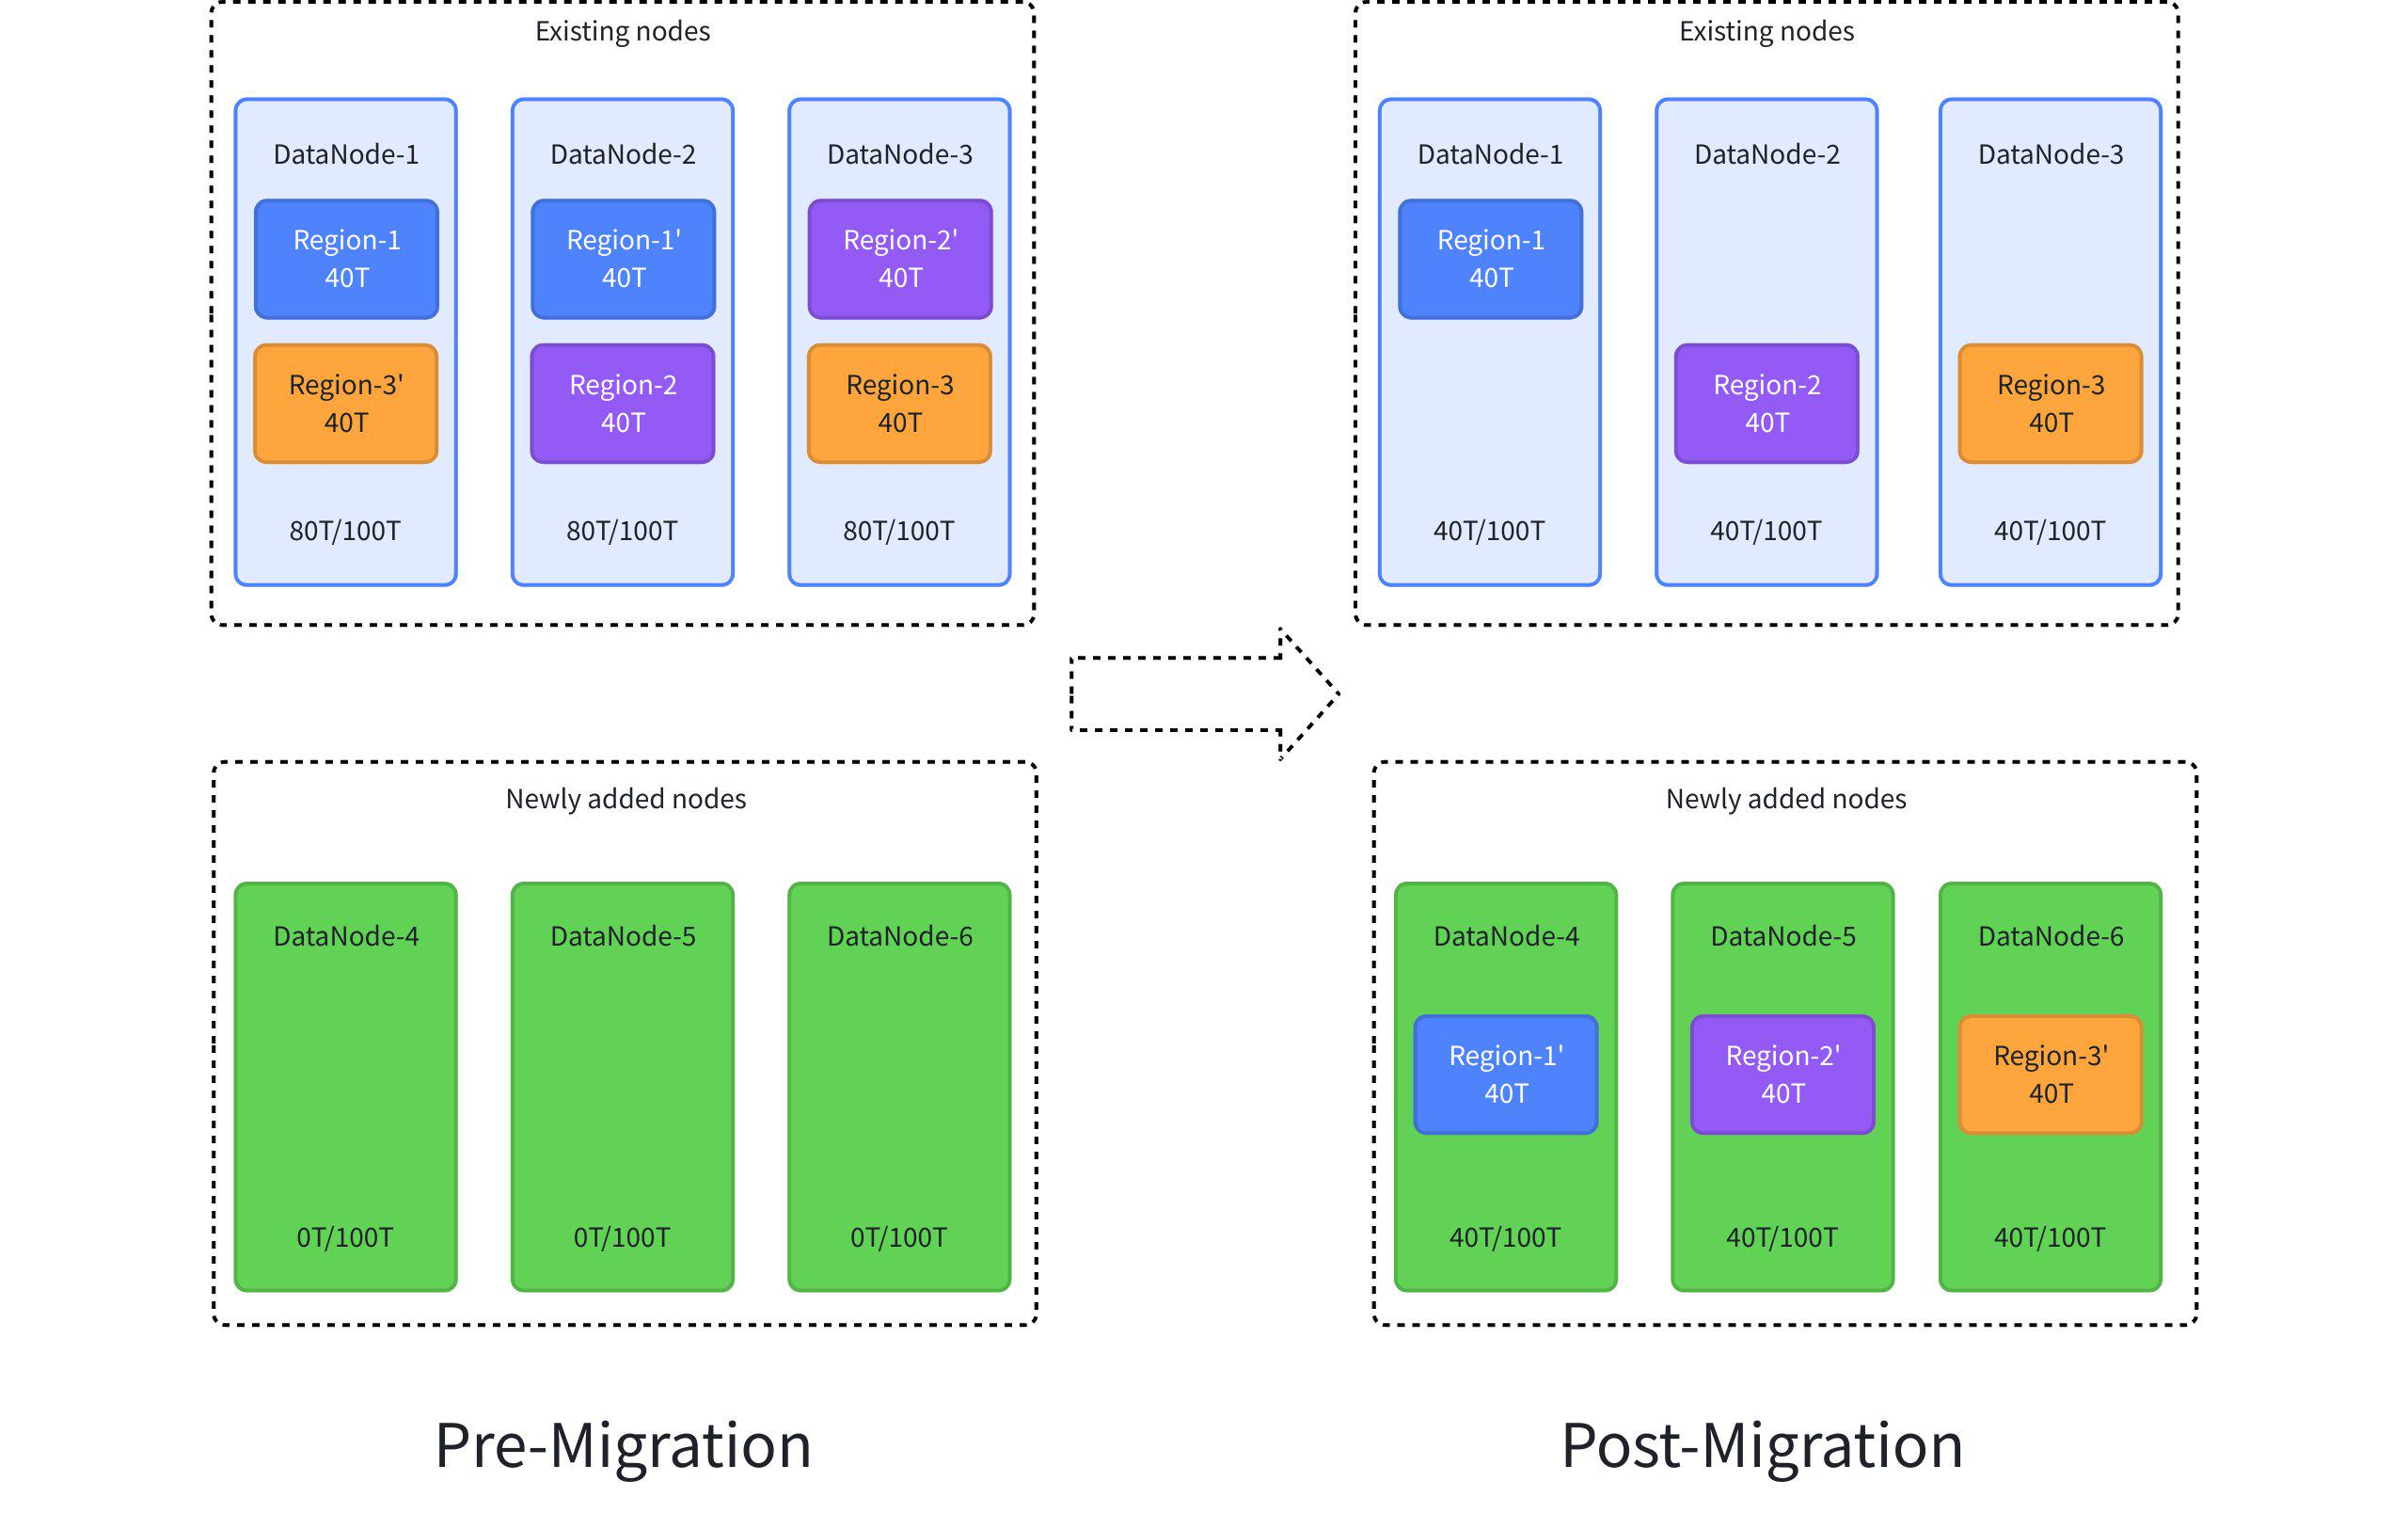
By default, historical data is not automatically migrated after scale-out. If you need to balance data distribution across nodes, you can manually migrate Regions. As shown in the following figure, suppose 80 TB of data load on old nodes needs to be balanced to new nodes. If each Region contains 1 TB of data and the transfer speed is 100 MB/s, each migration takes about 3 hours.
The operations are as follows:
-- 1. Migrate the replica data of Region-1 from DataNode-2 to DataNode-4.
migrate region 1 from 2 to 4

-- 2. Migrate the replica data of Region-2 from DataNode-3 to DataNode-5.
migrate region 2 from 3 to 5

-- 3. Migrate the replica data of Region-3 from DataNode-1 to DataNode-6.
migrate region 3 from 1 to 6
After the migration is complete, Region data in the system is redistributed between old nodes and new nodes, balancing disk space usage and optimizing resource utilization.
4.5 Supplementary Syntax (Not Recommended)
Note:
EXTEND REGIONandREMOVE REGIONare high-risk O&M statements and are not recommended for routine use. Use them with caution in production environments. In general, useMIGRATE REGIONfor Region migration andRECONSTRUCT REGIONfor Region reconstruction.
4.5.1 Extend Region
Extend one or more Regions to a specified DataNode.
Syntax:
extendRegion
    : EXTEND REGION regionIds+=INTEGER_LITERAL (COMMA regionIds+=INTEGER_LITERAL)* TO targetDataNodeId=INTEGER_LITERAL
    ;
Example:
Extend Region 1 to DataNode 3:
IoTDB> extend region 1 to 3
Msg: The statement is executed successfully.
4.5.2 Remove Region
Remove one or more Region replicas from a specified DataNode.
Syntax:
removeRegion
    : REMOVE REGION regionIds+=INTEGER_LITERAL (COMMA regionIds+=INTEGER_LITERAL)* FROM targetDataNodeId=INTEGER_LITERAL
    ;
Example:
Remove Region 1 from DataNode 2:
IoTDB> remove region 1 from 2
Msg: The statement is executed successfully.
5. Automatic Region Rebalancing
Region rebalancing is an advanced O&M feature and has certain operational costs. Read this section carefully before using it. If you have any questions, contact the IoTDB team for technical support.
Supported since V2.0.10
5.1 Feature Introduction
Region rebalancing allows you to submit a rebalance task with a single SQL statement. The system calculates a Region migration plan in the background by using the scale-out balancing algorithm, and ConfigNode schedules the plan for execution. This feature is not limited to scale-out scenarios. You can also use it when Region sizes are uneven, disk usage is imbalanced across nodes, or write load is concentrated on only a few Regions even if no scale-out or scale-in has occurred.
LOAD BALANCE automatically generates and executes a group of Region migration tasks, which makes it suitable for global rebalancing. migrate region is more suitable when you already know the exact RegionId, source DataNode, and target DataNode for fine-grained migration. After an automatic rebalance task is submitted, you can use SHOW MIGRATIONS to view the generated migration tasks and their execution progress.
Applicable scenarios: migrating historical Regions to newly added nodes after scale-out; obvious imbalance in disk usage across nodes; high write pressure on some DataNodes that requires global Region distribution adjustment.
Scenarios requiring caution: avoid running this feature during business peak hours or when network or disk I/O resources are tight. Evaluate the resource usage caused by migration in advance. If you need to precisely control the migration path of a specific Region, use manual Region migration instead.
5.2 LOAD BALANCE
-- Trigger system load balancing. The system automatically selects target nodes.
LOAD BALANCE;

-- Specify target DataNode IDs and execute load balancing.
LOAD BALANCE TO DATANODES(*DataNodeId,DataNodeId*);- Mechanism
This statement submits an asynchronous global or partial distributed balancing task to ConfigNode. After the task is triggered, DataNodes in the cluster are divided into two role pools, and physical data migration follows a strict one-way constraint:
From nodes: the source node pool that provides Region data to be migrated.
To nodes: the target node pool that receives migrated data.
One-way migration rule: data can only be migrated from From nodes to To nodes.
Parameters
| Parameter | Required | Description |
|---|---|---|
| TO DATANODES | No | Explicitly passes one or more DataNodeId values separated by commas. The specified nodes are marked as the To node pool that receives data, and all other nodes automatically become the From node pool that provides data. |
- Default behavior
| Execution mode | Behavior |
|---|---|
Without parameters (LOAD BALANCE) | The system selects the node with the smallest current disk usage as the only To node by default. |
With parameters (LOAD BALANCE TO DATANODES(...)) | The specified nodes are forcibly marked as the To node pool, and all other nodes are marked as From nodes. |
- Expected result
After the command is executed, the console immediately returns Msg: The statement is executed successfully.. This only means that ConfigNode has accepted the load balancing task and enqueued the generated subtasks. Large-scale physical migration then runs asynchronously in the background.
- Configuration
In iotdb-system.properties, the region_migration_speed_limit_bytes_per_second parameter controls the Region migration transfer limit for each DataNode in bytes/s. The default value is 50331648, about 48 MiB/s. You can lower the value during busy business periods and increase it during off-peak hours. Do not set it too low, otherwise migration may take significantly longer or even become blocked. A value less than or equal to 0 means no speed limit. This parameter only takes effect for the IoTConsensus protocol and supports hot loading.
5.3 SHOW MIGRATIONS
Because a balancing task may involve hundreds of GB of files transferred across nodes, IoTDB provides the following SQL statement to query a global view with fine-grained status indicators. The statement returns the list of background migration tasks that are currently running in the cluster and displays task status, elapsed time, and migration progress in a structured table.
SHOW MIGRATIONS- Result set
| Column | Description |
|---|---|
| ProcedureId | Unique Procedure identifier. |
| RegionId | Region ID. |
| Type | Region type. |
| FromNodeId | Source DataNode ID. |
| ToNodeId | Target DataNode ID. |
| CurrentState | Current state, such as REGION_MIGRATE_PREPARE, ADD_REGION_PEER, or REMOVE_REGION_PEER. |
| ProcedureStatus | Procedure status, such as RUNNING, FINISHED, or FAILED. |
| SubmittedTime | Task submission time. |
| LastUpdateTime | Last update time. |
| Duration | Elapsed time. |
| Progress | Migration progress, shown as migrated files / total files. |
Example:
IoTDB> show migrations
+-----------+--------+----------+----------+--------+---------------------+---------------+-----------------------+-----------------------+----------------+---------------------------------+
|ProcedureId|RegionId|      Type|FromNodeId|ToNodeId|         CurrentState|ProcedureStatus|          SubmittedTime|         LastUpdateTime|        Duration|                         Progress|
+-----------+--------+----------+----------+--------+---------------------+---------------+-----------------------+-----------------------+----------------+---------------------------------+
|         11|       5|DataRegion|         2|       3|CHECK_ADD_REGION_PEER|        WAITING|2026-06-03T15:47:35.840|2026-06-03T15:47:35.966|31 second 169 ms|files 1/3, size 15.52 KB/15.61 KB|
+-----------+--------+----------+----------+--------+---------------------+---------------+-----------------------+-----------------------+----------------+---------------------------------+
Total line number = 1
It costs 0.004s- Observing state changes with Show Regions
During migration, the status of related Regions also changes. For a cluster with two replicas, when SHOW MIGRATIONS shows that a task is running, show regions can show the following state transitions for the Region:
Stable state before migration:
Running,Running.Replication expansion transition:
Running,Running,Adding. The target To node creates a new Region replica and receives the snapshot. TheAddingreplica does not provide services.Safe removal transition:
Removing,Running,Running. The target node has caught up and becomesRunning, while the original From node becomesRemovingfor deletion and cleanup.New stable state after migration: the old Region is deleted successfully and the replicas return to
Running,Running.
5.4 Scenario Example
The following example simulates a real industrial scenario. As business data continues to grow, the original two core DataNode architecture needs to be expanded to a three DataNode architecture with higher throughput and more storage headroom, while using two replicas for redundancy. In other words, the cluster is smoothly scaled from 1C2D to 1C3D. The cluster initially has one ConfigNode and two DataNodes. After DataNode 3 is added, automatic Region rebalancing lets the new node take over some historical Regions and relieves storage pressure on the existing nodes.

The following SQL results are used only to illustrate the key process. Some outputs are abbreviated. Actual results depend on the cluster size, number of Regions, database names, time partitions, node addresses, and other factors.
- Before scale-out, use
show clusterto view the cluster nodes. The cluster only has DataNode 1 and DataNode 2.
IoTDB> show cluster
+------+----------+-------+---------------+------------+--------+---------+
|NodeID|  NodeType| Status|InternalAddress|InternalPort| Version|BuildInfo|
+------+----------+-------+---------------+------------+--------+---------+
|     0|ConfigNode|Running|   confignode-1|       10710|  2.0.10|   53e***|
|     1|  DataNode|Running|     datanode-1|       10730|  2.0.10|   53e***|
|     2|  DataNode|Running|     datanode-2|       10730|  2.0.10|   53e***|
+------+----------+-------+---------------+------------+--------+---------+- After scale-out, use
show clusterto confirm that DataNode 3 has joined the cluster and is Running.
IoTDB> show cluster
+------+----------+-------+---------------+------------+--------+---------+
|NodeID|  NodeType| Status|InternalAddress|InternalPort| Version|BuildInfo|
+------+----------+-------+---------------+------------+--------+---------+
|     0|ConfigNode|Running|   confignode-1|       10710|  2.0.10|   53e***|
|     1|  DataNode|Running|     datanode-1|       10730|  2.0.10|   53e***|
|     2|  DataNode|Running|     datanode-2|       10730|  2.0.10|   53e***|
|     3|  DataNode|Running|     datanode-3|       10730|  2.0.10|   53e***|
+------+----------+-------+---------------+------------+--------+---------+- Execute
LOAD BALANCEto submit the rebalance task. A successful response only means that ConfigNode has accepted the task. To explicitly use the new node as the migration target, specify the target DataNodeId withTO DATANODES.
IoTDB> LOAD BALANCE;

-- Or specify DataNode 3 as the target node.
IoTDB> LOAD BALANCE TO DATANODES(3);- Use
show migrationsto observe background migration tasks. The console may show queued and running subtasks, for example multiple Region replicas being migrated from DataNode 1 and DataNode 2 to DataNode 3.
IoTDB> show migrations
+-----------+--------+------------+----------+--------+------------------------+---------------+-----------------------+-----------------------+----------------+---------------------------------+
|ProcedureId|RegionId|        Type|FromNodeId|ToNodeId|            CurrentState|ProcedureStatus|          SubmittedTime|         LastUpdateTime|        Duration|                         Progress|
+-----------+--------+------------+----------+--------+------------------------+---------------+-----------------------+-----------------------+----------------+---------------------------------+
|        101|       3|  DataRegion|         1|       3|   CHECK_ADD_REGION_PEER|        WAITING|2026-06-03T16:29:25.051|2026-06-03T16:29:25.159| 2 second 897 ms|files 8/96, size 24 GB/280 GB    |
|        102|       5|  DataRegion|         2|       3|   CHECK_ADD_REGION_PEER|        WAITING|2026-06-03T16:29:25.059|2026-06-03T16:29:25.163| 2 second 889 ms|files 5/72, size 18 GB/210 GB    |
|        103|       4|SchemaRegion|         1|       3|CHECK_REMOVE_REGION_PEER|        WAITING|2026-06-03T16:29:25.067|2026-06-03T16:29:26.807| 2 second 876 ms|                                 |
+-----------+--------+------------+----------+--------+------------------------+---------------+-----------------------+-----------------------+----------------+---------------------------------+- During migration, use
show regionsto observe Regions on the target node entering theAddingstate. At this point, DataNode 3 creates the corresponding Region directory in its local file system. The source DataNode packages local persistent TsFiles as a snapshot and sends it to DataNode 3 through cross-node RPC. The following output only shows the DataRegion rows related to this rebalance task.
IoTDB> show regions
+--------+----------+-------+--------------+-------------+-----------+----------+----------+-------+---------------+--------+-----------------------+----------+----------------+
|RegionId|      Type| Status|      Database|SeriesSlotNum|TimeSlotNum|DataNodeId|RpcAddress|RpcPort|InternalAddress|    Role|             CreateTime|TsFileSize|CompressionRatio|
+--------+----------+-------+--------------+-------------+-----------+----------+----------+-------+---------------+--------+-----------------------+----------+----------------+
|       3|DataRegion|Running|root.industry|            8|          1|         1|     host1|   6667|     datanode-1|Follower|2026-06-03T16:26:45.691|    280 GB|            3.24|
|       3|DataRegion|Running|root.industry|            8|          1|         2|     host2|   6667|     datanode-2|  Leader|2026-06-03T16:26:45.691|    280 GB|            3.24|
|       3|DataRegion| Adding|root.industry|            8|          1|         3|     host3|   6667|     datanode-3|Follower|2026-06-03T16:26:45.691|   Unknown|             NaN|
+--------+----------+-------+--------------+-------------+-----------+----------+----------+-------+---------------+--------+-----------------------+----------+----------------+- After DataNode 3 receives the snapshot and replays the WAL generated during migration, the new replica enters the
Runningstate. At the same time, the corresponding Region replica on the original node is marked asRemovingand is deleted. Whenshow migrationsreturns an empty result, migration has finished and no migration tasks are running.
IoTDB> show migrations
+-----------+--------+----+----------+--------+------------+---------------+-------------+--------------+--------+--------+
|ProcedureId|RegionId|Type|FromNodeId|ToNodeId|CurrentState|ProcedureStatus|SubmittedTime|LastUpdateTime|Duration|Progress|
+-----------+--------+----+----------+--------+------------+---------------+-------------+--------------+--------+--------+
+-----------+--------+----+----------+--------+------------+---------------+-------------+--------------+--------+--------+- Query
show regionsagain to confirm that the related Regions have been migrated to the target node and returned to theRunningstate. In this example, after some Region replicas are migrated to DataNode 3, DataNode 1, DataNode 2, and DataNode 3 all continue to host historical DataRegions. The following output still only shows the DataRegion rows related to this rebalance task.
IoTDB> show regions
+--------+----------+-------+--------------+-------------+-----------+----------+----------+-------+---------------+--------+-----------------------+----------+----------------+
|RegionId|      Type| Status|      Database|SeriesSlotNum|TimeSlotNum|DataNodeId|RpcAddress|RpcPort|InternalAddress|    Role|             CreateTime|TsFileSize|CompressionRatio|
+--------+----------+-------+--------------+-------------+-----------+----------+----------+-------+---------------+--------+-----------------------+----------+----------------+
|       3|DataRegion|Running|root.industry|            8|          1|         2|     host2|   6667|     datanode-2|Follower|2026-06-03T16:26:45.691|    280 GB|            3.24|
|       3|DataRegion|Running|root.industry|            8|          1|         3|     host3|   6667|     datanode-3|  Leader|2026-06-03T16:26:45.691|    280 GB|            3.24|
|       5|DataRegion|Running|root.industry|            6|          1|         1|     host1|   6667|     datanode-1|  Leader|2026-06-03T16:26:45.698|    210 GB|            2.86|
|       5|DataRegion|Running|root.industry|            6|          1|         3|     host3|   6667|     datanode-3|Follower|2026-06-03T16:26:45.698|    210 GB|            2.86|
|       7|DataRegion|Running|root.industry|            7|          1|         1|     host1|   6667|     datanode-1|Follower|2026-06-03T16:26:45.717|    240 GB|            3.10|
|       7|DataRegion|Running|root.industry|            7|          1|         2|     host2|   6667|     datanode-2|  Leader|2026-06-03T16:26:45.717|    240 GB|            3.10|
+--------+----------+-------+--------------+-------------+-----------+----------+----------+-------+---------------+--------+-----------------------+----------+----------------+