Database Programming
TRIGGER
Instructions
The trigger provides a mechanism for listening to changes in time series data. With user-defined logic, tasks such as alerting and data forwarding can be conducted.
The trigger is implemented based on the reflection mechanism. Users can monitor data changes by implementing the Java interfaces. IoTDB allows users to dynamically register and drop triggers without restarting the server.
The document will help you learn to define and manage triggers.
Pattern for Listening
A single trigger can be used to listen for data changes in a time series that match a specific pattern. For example, a trigger can listen for the data changes of time series root.sg.a
, or time series that match the pattern root.sg.*
. When you register a trigger, you can specify the path pattern that the trigger listens on through an SQL statement.
Trigger Type
There are currently two types of triggers, and you can specify the type through an SQL statement when registering a trigger:
- Stateful triggers: The execution logic of this type of trigger may depend on data from multiple insertion statement . The framework will aggregate the data written by different nodes into the same trigger instance for calculation to retain context information. This type of trigger is usually used for sampling or statistical data aggregation for a period of time. information. Only one node in the cluster holds an instance of a stateful trigger.
- Stateless triggers: The execution logic of the trigger is only related to the current input data. The framework does not need to aggregate the data of different nodes into the same trigger instance. This type of trigger is usually used for calculation of single row data and abnormal detection. Each node in the cluster holds an instance of a stateless trigger.
Trigger Event
There are currently two trigger events for the trigger, and other trigger events will be expanded in the future. When you register a trigger, you can specify the trigger event through an SQL statement:
- BEFORE INSERT: Fires before the data is persisted. Please note that currently the trigger does not support data cleaning and will not change the data to be persisted itself.
- AFTER INSERT: Fires after the data is persisted.
How to Implement a Trigger
You need to implement the trigger by writing a Java class, where the dependency shown below is required. If you use Maven, you can search for them directly from the Maven repository.
Dependency
<dependency>
<groupId>org.apache.iotdb</groupId>
<artifactId>iotdb-server</artifactId>
<version>1.0.0</version>
<scope>provided</scope>
</dependency>
Note that the dependency version should be correspondent to the target server version.
Interface Description
To implement a trigger, you need to implement the org.apache.iotdb.trigger.api.Trigger
class.
import org.apache.iotdb.trigger.api.enums.FailureStrategy;
import org.apache.iotdb.tsfile.write.record.Tablet;
public interface Trigger {
/**
* This method is mainly used to validate {@link TriggerAttributes} before calling {@link
* Trigger#onCreate(TriggerAttributes)}.
*
* @param attributes TriggerAttributes
* @throws Exception e
*/
default void validate(TriggerAttributes attributes) throws Exception {}
/**
* This method will be called when creating a trigger after validation.
*
* @param attributes TriggerAttributes
* @throws Exception e
*/
default void onCreate(TriggerAttributes attributes) throws Exception {}
/**
* This method will be called when dropping a trigger.
*
* @throws Exception e
*/
default void onDrop() throws Exception {}
/**
* When restarting a DataNode, Triggers that have been registered will be restored and this method
* will be called during the process of restoring.
*
* @throws Exception e
*/
default void restore() throws Exception {}
/**
* Overrides this method to set the expected FailureStrategy, {@link FailureStrategy#OPTIMISTIC}
* is the default strategy.
*
* @return {@link FailureStrategy}
*/
default FailureStrategy getFailureStrategy() {
return FailureStrategy.OPTIMISTIC;
}
/**
* @param tablet see {@link Tablet} for detailed information of data structure. Data that is
* inserted will be constructed as a Tablet and you can define process logic with {@link
* Tablet}.
* @return true if successfully fired
* @throws Exception e
*/
default boolean fire(Tablet tablet) throws Exception {
return true;
}
}
This class provides two types of programming interfaces: Lifecycle related interfaces and data change listening related interfaces. All the interfaces in this class are not required to be implemented. When the interfaces are not implemented, the trigger will not respond to the data changes. You can implement only some of these interfaces according to your needs.
Descriptions of the interfaces are as followed.
Lifecycle Related Interfaces
Interface | Description |
---|---|
default void validate(TriggerAttributes attributes) throws Exception {} | When you creates a trigger using the CREATE TRIGGER statement, you can specify the parameters that the trigger needs to use, and this interface will be used to verify the correctness of the parameters。 |
default void onCreate(TriggerAttributes attributes) throws Exception {} | This interface is called once when you create a trigger using the CREATE TRIGGER statement. During the lifetime of each trigger instance, this interface will be called only once. This interface is mainly used for the following functions: helping users to parse custom attributes in SQL statements (using TriggerAttributes ). You can create or apply for resources, such as establishing external links, opening files, etc. |
default void onDrop() throws Exception {} | This interface is called when you drop a trigger using the DROP TRIGGER statement. During the lifetime of each trigger instance, this interface will be called only once. This interface mainly has the following functions: it can perform the operation of resource release and can be used to persist the results of trigger calculations. |
default void restore() throws Exception {} | When the DataNode is restarted, the cluster will restore the trigger instance registered on the DataNode, and this interface will be called once for stateful trigger during the process. After the DataNode where the stateful trigger instance is located goes down, the cluster will restore the trigger instance on another available DataNode, calling this interface once in the process. This interface can be used to customize recovery logic. |
Data Change Listening Related Interfaces
Listening Interface
/**
* @param tablet see {@link Tablet} for detailed information of data structure. Data that is
* inserted will be constructed as a Tablet and you can define process logic with {@link
* Tablet}.
* @return true if successfully fired
* @throws Exception e
*/
default boolean fire(Tablet tablet) throws Exception {
return true;
}
When the data changes, the trigger uses the Tablet as the unit of firing operation. You can obtain the metadata and data of the corresponding sequence through Tablet, and then perform the corresponding trigger operation. If the fire process is successful, the return value should be true. If the interface returns false or throws an exception, we consider the trigger fire process as failed. When the trigger fire process fails, we will perform corresponding operations according to the listening strategy interface.
When performing an INSERT operation, for each time series in it, we will detect whether there is a trigger that listens to the path pattern, and then assemble the time series data that matches the path pattern listened by the same trigger into a new Tablet for trigger fire interface. Can be understood as:
Map<PartialPath, List<Trigger>> pathToTriggerListMap => Map<Trigger, Tablet>
Note that currently we do not make any guarantees about the order in which triggers fire.
Here is an example:
Suppose there are three triggers, and the trigger event of the triggers are all BEFORE INSERT:
- Trigger1 listens on
root.sg.*
- Trigger2 listens on
root.sg.a
- Trigger3 listens on
root.sg.b
Insertion statement:
insert into root.sg(time, a, b) values (1, 1, 1);
The time series root.sg.a
matches Trigger1 and Trigger2, and the sequence root.sg.b
matches Trigger1 and Trigger3, then:
- The data of
root.sg.a
androot.sg.b
will be assembled into a new tablet1, and Trigger1.fire(tablet1) will be executed at the corresponding Trigger Event. - The data of
root.sg.a
will be assembled into a new tablet2, and Trigger2.fire(tablet2) will be executed at the corresponding Trigger Event. - The data of
root.sg.b
will be assembled into a new tablet3, and Trigger3.fire(tablet3) will be executed at the corresponding Trigger Event.
Listening Strategy Interface
When the trigger fails to fire, we will take corresponding actions according to the strategy set by the listening strategy interface. You can set org.apache.iotdb.trigger.api.enums.FailureStrategy
. There are currently two strategies, optimistic and pessimistic:
- Optimistic strategy: The trigger that fails to fire does not affect the firing of subsequent triggers, nor does it affect the writing process, that is, we do not perform additional processing on the sequence involved in the trigger failure, only log the failure to record the failure, and finally inform user that data insertion is successful, but the trigger fire part failed.
- Pessimistic strategy: The failure trigger affects the processing of all subsequent Pipelines, that is, we believe that the firing failure of the trigger will cause all subsequent triggering processes to no longer be carried out. If the trigger event of the trigger is BEFORE INSERT, then the insertion will no longer be performed, and the insertion failure will be returned directly.
/**
* Overrides this method to set the expected FailureStrategy, {@link FailureStrategy#OPTIMISTIC}
* is the default strategy.
*
* @return {@link FailureStrategy}
*/
default FailureStrategy getFailureStrategy() {
return FailureStrategy.OPTIMISTIC;
}
Example
If you use Maven, you can refer to our sample project trigger-example.
You can find it here.
Here is the code from one of the sample projects:
/*
* Licensed to the Apache Software Foundation (ASF) under one
* or more contributor license agreements. See the NOTICE file
* distributed with this work for additional information
* regarding copyright ownership. The ASF licenses this file
* to you under the Apache License, Version 2.0 (the
* "License"); you may not use this file except in compliance
* with the License. You may obtain a copy of the License at
*
* http://www.apache.org/licenses/LICENSE-2.0
*
* Unless required by applicable law or agreed to in writing,
* software distributed under the License is distributed on an
* "AS IS" BASIS, WITHOUT WARRANTIES OR CONDITIONS OF ANY
* KIND, either express or implied. See the License for the
* specific language governing permissions and limitations
* under the License.
*/
package org.apache.iotdb.trigger;
import org.apache.iotdb.db.storageengine.trigger.sink.alertmanager.AlertManagerConfiguration;
import org.apache.iotdb.db.storageengine.trigger.sink.alertmanager.AlertManagerEvent;
import org.apache.iotdb.db.storageengine.trigger.sink.alertmanager.AlertManagerHandler;
import org.apache.iotdb.trigger.api.Trigger;
import org.apache.iotdb.trigger.api.TriggerAttributes;
import org.apache.iotdb.tsfile.file.metadata.enums.TSDataType;
import org.apache.iotdb.tsfile.write.record.Tablet;
import org.apache.iotdb.tsfile.write.schema.MeasurementSchema;
import org.slf4j.Logger;
import org.slf4j.LoggerFactory;
import java.io.IOException;
import java.util.HashMap;
import java.util.List;
public class ClusterAlertingExample implements Trigger {
private static final Logger LOGGER = LoggerFactory.getLogger(ClusterAlertingExample.class);
private final AlertManagerHandler alertManagerHandler = new AlertManagerHandler();
private final AlertManagerConfiguration alertManagerConfiguration =
new AlertManagerConfiguration("http://127.0.0.1:9093/api/v2/alerts");
private String alertname;
private final HashMap<String, String> labels = new HashMap<>();
private final HashMap<String, String> annotations = new HashMap<>();
@Override
public void onCreate(TriggerAttributes attributes) throws Exception {
alertname = "alert_test";
labels.put("series", "root.ln.wf01.wt01.temperature");
labels.put("value", "");
labels.put("severity", "");
annotations.put("summary", "high temperature");
annotations.put("description", "{{.alertname}}: {{.series}} is {{.value}}");
alertManagerHandler.open(alertManagerConfiguration);
}
@Override
public void onDrop() throws IOException {
alertManagerHandler.close();
}
@Override
public boolean fire(Tablet tablet) throws Exception {
List<MeasurementSchema> measurementSchemaList = tablet.getSchemas();
for (int i = 0, n = measurementSchemaList.size(); i < n; i++) {
if (measurementSchemaList.get(i).getType().equals(TSDataType.DOUBLE)) {
// for example, we only deal with the columns of Double type
double[] values = (double[]) tablet.values[i];
for (double value : values) {
if (value > 100.0) {
LOGGER.info("trigger value > 100");
labels.put("value", String.valueOf(value));
labels.put("severity", "critical");
AlertManagerEvent alertManagerEvent =
new AlertManagerEvent(alertname, labels, annotations);
alertManagerHandler.onEvent(alertManagerEvent);
} else if (value > 50.0) {
LOGGER.info("trigger value > 50");
labels.put("value", String.valueOf(value));
labels.put("severity", "warning");
AlertManagerEvent alertManagerEvent =
new AlertManagerEvent(alertname, labels, annotations);
alertManagerHandler.onEvent(alertManagerEvent);
}
}
}
}
return true;
}
}
Trigger Management
You can create and drop a trigger through an SQL statement, and you can also query all registered triggers through an SQL statement.
We recommend that you stop insertion while creating triggers.
Create Trigger
Triggers can be registered on arbitrary path patterns. The time series registered with the trigger will be listened to by the trigger. When there is data change on the series, the corresponding fire method in the trigger will be called.
Registering a trigger can be done as follows:
- Implement a Trigger class as described in the How to implement a Trigger chapter, assuming the class's full class name is
org.apache.iotdb.trigger.ClusterAlertingExample
- Package the project into a JAR package.
- Register the trigger with an SQL statement. During the creation process, the
validate
andonCreate
interfaces of the trigger will only be called once. For details, please refer to the chapter of How to implement a Trigger.
The complete SQL syntax is as follows:
// Create Trigger
createTrigger
: CREATE triggerType TRIGGER triggerName=identifier triggerEventClause ON pathPattern AS className=STRING_LITERAL uriClause? triggerAttributeClause?
;
triggerType
: STATELESS | STATEFUL
;
triggerEventClause
: (BEFORE | AFTER) INSERT
;
uriClause
: USING URI uri
;
uri
: STRING_LITERAL
;
triggerAttributeClause
: WITH LR_BRACKET triggerAttribute (COMMA triggerAttribute)* RR_BRACKET
;
triggerAttribute
: key=attributeKey operator_eq value=attributeValue
;
Below is the explanation for the SQL syntax:
- triggerName: The trigger ID, which is globally unique and used to distinguish different triggers, is case-sensitive.
- triggerType: Trigger types are divided into two categories, STATELESS and STATEFUL.
- triggerEventClause: when the trigger fires, BEFORE INSERT and AFTER INSERT are supported now.
- pathPattern:The path pattern the trigger listens on, can contain wildcards * and **.
- className:The class name of the Trigger class.
- jarLocation: Optional. When this option is not specified, by default, we consider that the DBA has placed the JAR package required to create the trigger in the trigger_root_dir directory (configuration item, default is IOTDB_HOME/ext/trigger) of each DataNode node. When this option is specified, we will download and distribute the file resource corresponding to the URI to the trigger_root_dir/install directory of each DataNode.
- triggerAttributeClause: It is used to specify the parameters that need to be set when the trigger instance is created. This part is optional in the SQL syntax.
Here is an example SQL statement to help you understand:
CREATE STATELESS TRIGGER triggerTest
BEFORE INSERT
ON root.sg.**
AS 'org.apache.iotdb.trigger.ClusterAlertingExample'
USING URI '/jar/ClusterAlertingExample.jar'
WITH (
"name" = "trigger",
"limit" = "100"
)
The above SQL statement creates a trigger named triggerTest:
- The trigger is stateless.
- Fires before insertion.
- Listens on path pattern root.sg.**
- The implemented trigger class is named
org.apache.iotdb.trigger.ClusterAlertingExample
- The JAR package URI is http://jar/ClusterAlertingExample.jar
- When creating the trigger instance, two parameters, name and limit, are passed in.
Drop Trigger
The trigger can be dropped by specifying the trigger ID. During the process of dropping the trigger, the onDrop
interface of the trigger will be called only once.
The SQL syntax is:
// Drop Trigger
dropTrigger
: DROP TRIGGER triggerName=identifier
;
Here is an example statement:
DROP TRIGGER triggerTest1
The above statement will drop the trigger with ID triggerTest1.
Show Trigger
You can query information about triggers that exist in the cluster through an SQL statement.
The SQL syntax is as follows:
SHOW TRIGGERS
The result set format of this statement is as follows:
TriggerName | Event | Type | State | PathPattern | ClassName | NodeId |
---|---|---|---|---|---|---|
triggerTest1 | BEFORE_INSERT / AFTER_INSERT | STATELESS / STATEFUL | INACTIVE / ACTIVE / DROPPING / TRANSFFERING | root.** | org.apache.iotdb.trigger.TriggerExample | ALL(STATELESS) / DATA_NODE_ID(STATEFUL) |
Trigger State
During the process of creating and dropping triggers in the cluster, we maintain the states of the triggers. The following is a description of these states:
State | Description | Is it recommended to insert data? |
---|---|---|
INACTIVE | The intermediate state of executing CREATE TRIGGER , the cluster has just recorded the trigger information on the ConfigNode, and the trigger has not been activated on any DataNode. | NO |
ACTIVE | Status after successful execution of CREATE TRIGGE , the trigger is available on all DataNodes in the cluster. | YES |
DROPPING | Intermediate state of executing DROP TRIGGER , the cluster is in the process of dropping the trigger. | NO |
TRANSFERRING | The cluster is migrating the location of this trigger instance. | NO |
Notes
- The trigger takes effect from the time of registration, and does not process the existing historical data. **That is, only insertion requests that occur after the trigger is successfully registered will be listened to by the trigger. **
- The fire process of trigger is synchronous currently, so you need to ensure the efficiency of the trigger, otherwise the writing performance may be greatly affected. You need to guarantee concurrency safety of triggers yourself.
- Please do no register too many triggers in the cluster. Because the trigger information is fully stored in the ConfigNode, and there is a copy of the information in all DataNodes
- It is recommended to stop writing when registering triggers. Registering a trigger is not an atomic operation. When registering a trigger, there will be an intermediate state in which some nodes in the cluster have registered the trigger, and some nodes have not yet registered successfully. To avoid write requests on some nodes being listened to by triggers and not being listened to on some nodes, we recommend not to perform writes when registering triggers.
- When the node holding the stateful trigger instance goes down, we will try to restore the corresponding instance on another node. During the recovery process, we will call the restore interface of the trigger class once.
- The trigger JAR package has a size limit, which must be less than min(
config_node_ratis_log_appender_buffer_size_max
, 2G), whereconfig_node_ratis_log_appender_buffer_size_max
is a configuration item. For the specific meaning, please refer to the IOTDB configuration item description. - It is better not to have classes with the same full class name but different function implementations in different JAR packages. For example, trigger1 and trigger2 correspond to resources trigger1.jar and trigger2.jar respectively. If two JAR packages contain a
org.apache.iotdb.trigger.example.AlertListener
class, whenCREATE TRIGGER
uses this class, the system will randomly load the class in one of the JAR packages, which will eventually leads the inconsistent behavior of trigger and other issues.
Configuration Parameters
Parameter | Meaning |
---|---|
trigger_lib_dir | Directory to save the trigger jar package |
stateful_trigger_retry_num_when_not_found | How many times will we retry to found an instance of stateful trigger on DataNodes if not found |
CONTINUOUS QUERY (CQ)
Introduction
Continuous queries(CQ) are queries that run automatically and periodically on realtime data and store query results in other specified time series.
Users can implement sliding window streaming computing through continuous query, such as calculating the hourly average temperature of a sequence and writing it into a new sequence. Users can customize the RESAMPLE
clause to create different sliding windows, which can achieve a certain degree of tolerance for out-of-order data.
Syntax
CREATE (CONTINUOUS QUERY | CQ) <cq_id>
[RESAMPLE
[EVERY <every_interval>]
[BOUNDARY <execution_boundary_time>]
[RANGE <start_time_offset>[, end_time_offset]]
]
[TIMEOUT POLICY BLOCKED|DISCARD]
BEGIN
SELECT CLAUSE
INTO CLAUSE
FROM CLAUSE
[WHERE CLAUSE]
[GROUP BY(<group_by_interval>[, <sliding_step>]) [, level = <level>]]
[HAVING CLAUSE]
[FILL {PREVIOUS | LINEAR | constant}]
[LIMIT rowLimit OFFSET rowOffset]
[ALIGN BY DEVICE]
END
Note:
- If there exists any time filters in WHERE CLAUSE, IoTDB will throw an error, because IoTDB will automatically generate a time range for the query each time it's executed.
- GROUP BY TIME CLAUSE is different, it doesn't contain its original first display window parameter which is [start_time, end_time). It's still because IoTDB will automatically generate a time range for the query each time it's executed.
- If there is no group by time clause in query, EVERY clause is required, otherwise IoTDB will throw an error.
Descriptions of parameters in CQ syntax
<cq_id>
specifies the globally unique id of CQ.<every_interval>
specifies the query execution time interval. We currently support the units of ns, us, ms, s, m, h, d, w, and its value should not be lower than the minimum threshold configured by the user, which iscontinuous_query_min_every_interval
. It's an optional parameter, default value is set togroup_by_interval
in group by clause.<start_time_offset>
specifies the start time of each query execution asnow()-<start_time_offset>
. We currently support the units of ns, us, ms, s, m, h, d, w.It's an optional parameter, default value is set toevery_interval
in resample clause.<end_time_offset>
specifies the end time of each query execution asnow()-<end_time_offset>
. We currently support the units of ns, us, ms, s, m, h, d, w.It's an optional parameter, default value is set to0
.<execution_boundary_time>
is a date that represents the execution time of a certain cq task.<execution_boundary_time>
can be earlier than, equals to, later than current time.- This parameter is optional. If not specified, it is equal to
BOUNDARY 0
。 - The start time of the first time window is
<execution_boundary_time> - <start_time_offset>
. - The end time of the first time window is
<execution_boundary_time> - <end_time_offset>
. - The time range of the
i (1 <= i)th
window is[<execution_boundary_time> - <start_time_offset> + (i - 1) * <every_interval>, <execution_boundary_time> - <end_time_offset> + (i - 1) * <every_interval>)
. - If the current time is earlier than or equal to
execution_boundary_time
, then the first execution moment of the continuous query isexecution_boundary_time
. - If the current time is later than
execution_boundary_time
, then the first execution moment of the continuous query is the firstexecution_boundary_time + i * <every_interval>
that is later than or equal to the current time .
<every_interval>
,<start_time_offset>
and<group_by_interval>
should all be greater than0
.- The value of
<group_by_interval>
should be less than or equal to the value of<start_time_offset>
, otherwise the system will throw an error.- Users should specify the appropriate
<start_time_offset>
and<every_interval>
according to actual needs.
- If
<start_time_offset>
is greater than<every_interval>
, there will be partial data overlap in each query window.- If
<start_time_offset>
is less than<every_interval>
, there may be uncovered data between each query window.start_time_offset
should be larger thanend_time_offset
, otherwise the system will throw an error.
<start_time_offset>
== <every_interval>
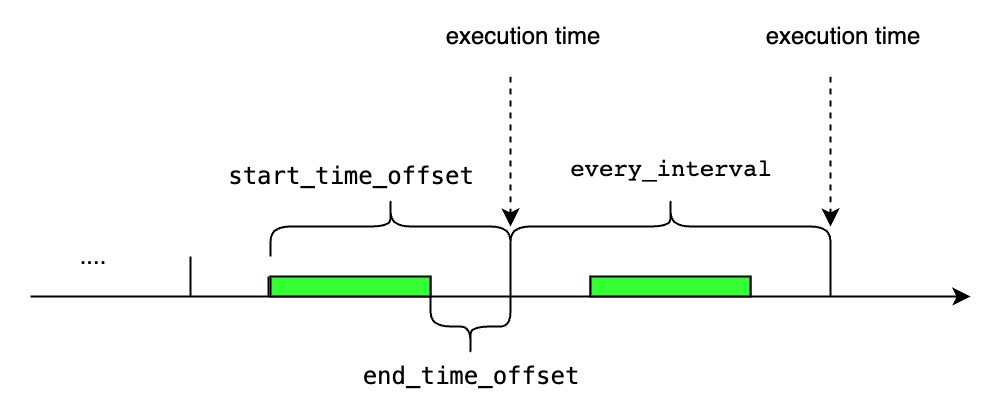
<start_time_offset>
> <every_interval>
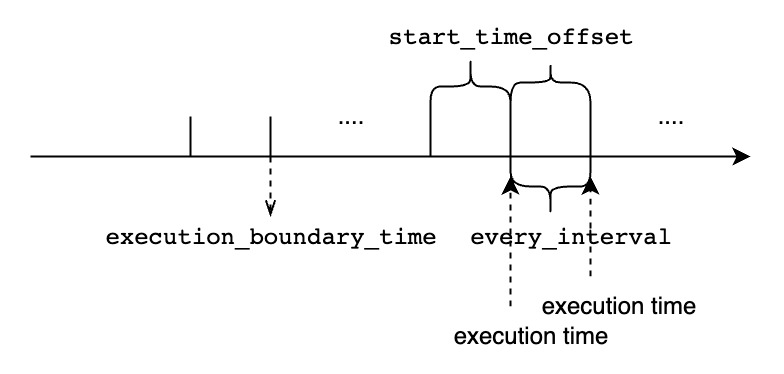
<start_time_offset>
< <every_interval>
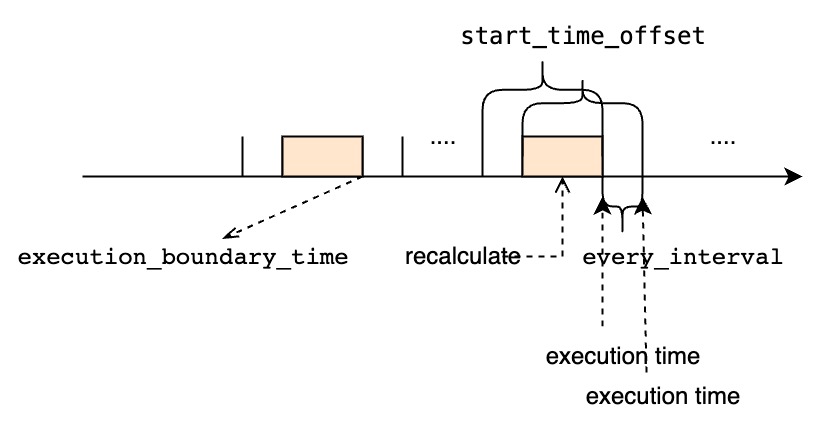
<every_interval>
is not zero
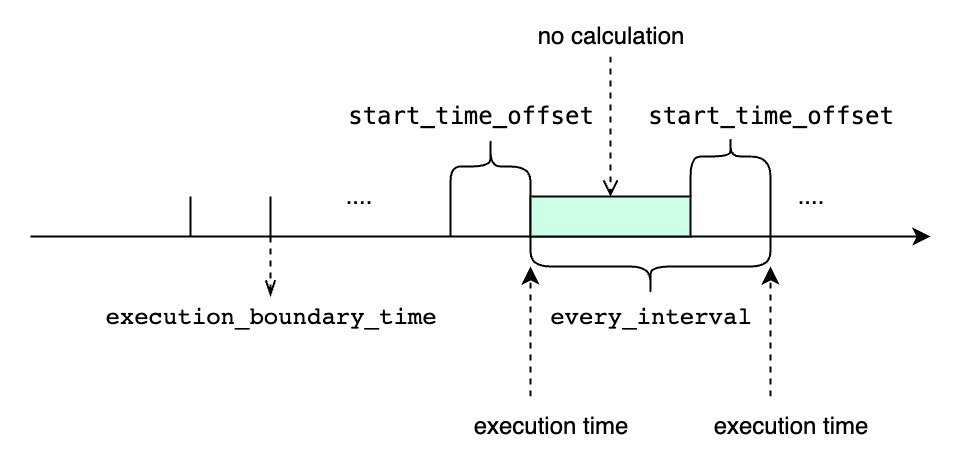
TIMEOUT POLICY
specify how we deal with the cq task whose previous time interval execution is not finished while the next execution time has reached. The default value isBLOCKED
.BLOCKED
means that we will block and wait to do the current cq execution task until the previous time interval cq task finishes. If usingBLOCKED
policy, all the time intervals will be executed, but it may be behind the latest time interval.DISCARD
means that we just discard the current cq execution task and wait for the next execution time and do the next time interval cq task. If usingDISCARD
policy, some time intervals won't be executed when the execution time of one cq task is longer than the<every_interval>
. However, once a cq task is executed, it will use the latest time interval, so it can catch up at the sacrifice of some time intervals being discarded.
Examples of CQ
The examples below use the following sample data. It's a real time data stream and we can assume that the data arrives on time.
+-----------------------------+-----------------------------+-----------------------------+-----------------------------+-----------------------------+
| Time|root.ln.wf02.wt02.temperature|root.ln.wf02.wt01.temperature|root.ln.wf01.wt02.temperature|root.ln.wf01.wt01.temperature|
+-----------------------------+-----------------------------+-----------------------------+-----------------------------+-----------------------------+
|2021-05-11T22:18:14.598+08:00| 121.0| 72.0| 183.0| 115.0|
|2021-05-11T22:18:19.941+08:00| 0.0| 68.0| 68.0| 103.0|
|2021-05-11T22:18:24.949+08:00| 122.0| 45.0| 11.0| 14.0|
|2021-05-11T22:18:29.967+08:00| 47.0| 14.0| 59.0| 181.0|
|2021-05-11T22:18:34.979+08:00| 182.0| 113.0| 29.0| 180.0|
|2021-05-11T22:18:39.990+08:00| 42.0| 11.0| 52.0| 19.0|
|2021-05-11T22:18:44.995+08:00| 78.0| 38.0| 123.0| 52.0|
|2021-05-11T22:18:49.999+08:00| 137.0| 172.0| 135.0| 193.0|
|2021-05-11T22:18:55.003+08:00| 16.0| 124.0| 183.0| 18.0|
+-----------------------------+-----------------------------+-----------------------------+-----------------------------+-----------------------------+
Configuring execution intervals
Use an EVERY
interval in the RESAMPLE
clause to specify the CQ’s execution interval, if not specific, default value is equal to group_by_interval
.
CREATE CONTINUOUS QUERY cq1
RESAMPLE EVERY 20s
BEGIN
SELECT max_value(temperature)
INTO root.ln.wf02.wt02(temperature_max), root.ln.wf02.wt01(temperature_max), root.ln.wf01.wt02(temperature_max), root.ln.wf01.wt01(temperature_max)
FROM root.ln.*.*
GROUP BY(10s)
END
cq1
calculates the 10-second average of temperature
sensor under the root.ln
prefix path and stores the results in the temperature_max
sensor using the same prefix path as the corresponding sensor.
cq1
executes at 20-second intervals, the same interval as the EVERY
interval. Every 20 seconds, cq1
runs a single query that covers the time range for the current time bucket, that is, the 20-second time bucket that intersects with now()
.
Supposing that the current time is 2021-05-11T22:18:40.000+08:00
, we can see annotated log output about cq1
running at DataNode if you set log level to DEBUG:
At **2021-05-11T22:18:40.000+08:00**, `cq1` executes a query within the time range `[2021-05-11T22:18:20, 2021-05-11T22:18:40)`.
`cq1` generate 2 lines:
>
+-----------------------------+---------------------------------+---------------------------------+---------------------------------+---------------------------------+
| Time|root.ln.wf02.wt02.temperature_max|root.ln.wf02.wt01.temperature_max|root.ln.wf01.wt02.temperature_max|root.ln.wf01.wt01.temperature_max|
+-----------------------------+---------------------------------+---------------------------------+---------------------------------+---------------------------------+
|2021-05-11T22:18:20.000+08:00| 122.0| 45.0| 59.0| 181.0|
|2021-05-11T22:18:30.000+08:00| 182.0| 113.0| 52.0| 180.0|
+-----------------------------+---------------------------------+---------------------------------+---------------------------------+---------------------------------+
>
At **2021-05-11T22:19:00.000+08:00**, `cq1` executes a query within the time range `[2021-05-11T22:18:40, 2021-05-11T22:19:00)`.
`cq1` generate 2 lines:
>
+-----------------------------+---------------------------------+---------------------------------+---------------------------------+---------------------------------+
| Time|root.ln.wf02.wt02.temperature_max|root.ln.wf02.wt01.temperature_max|root.ln.wf01.wt02.temperature_max|root.ln.wf01.wt01.temperature_max|
+-----------------------------+---------------------------------+---------------------------------+---------------------------------+---------------------------------+
|2021-05-11T22:18:40.000+08:00| 137.0| 172.0| 135.0| 193.0|
|2021-05-11T22:18:50.000+08:00| 16.0| 124.0| 183.0| 18.0|
+-----------------------------+---------------------------------+---------------------------------+---------------------------------+---------------------------------+
>
cq1
won't deal with data that is before the current time window which is 2021-05-11T22:18:20.000+08:00
, so here are the results:
> SELECT temperature_max from root.ln.*.*;
+-----------------------------+---------------------------------+---------------------------------+---------------------------------+---------------------------------+
| Time|root.ln.wf02.wt02.temperature_max|root.ln.wf02.wt01.temperature_max|root.ln.wf01.wt02.temperature_max|root.ln.wf01.wt01.temperature_max|
+-----------------------------+---------------------------------+---------------------------------+---------------------------------+---------------------------------+
|2021-05-11T22:18:20.000+08:00| 122.0| 45.0| 59.0| 181.0|
|2021-05-11T22:18:30.000+08:00| 182.0| 113.0| 52.0| 180.0|
|2021-05-11T22:18:40.000+08:00| 137.0| 172.0| 135.0| 193.0|
|2021-05-11T22:18:50.000+08:00| 16.0| 124.0| 183.0| 18.0|
+-----------------------------+---------------------------------+---------------------------------+---------------------------------+---------------------------------+
Configuring time range for resampling
Use start_time_offset
in the RANGE
clause to specify the start time of the CQ’s time range, if not specific, default value is equal to EVERY
interval.
CREATE CONTINUOUS QUERY cq2
RESAMPLE RANGE 40s
BEGIN
SELECT max_value(temperature)
INTO root.ln.wf02.wt02(temperature_max), root.ln.wf02.wt01(temperature_max), root.ln.wf01.wt02(temperature_max), root.ln.wf01.wt01(temperature_max)
FROM root.ln.*.*
GROUP BY(10s)
END
cq2
calculates the 10-second average of temperature
sensor under the root.ln
prefix path and stores the results in the temperature_max
sensor using the same prefix path as the corresponding sensor.
cq2
executes at 10-second intervals, the same interval as the group_by_interval
. Every 10 seconds, cq2
runs a single query that covers the time range between now()
minus the start_time_offset
and now()
, that is, the time range between 40 seconds prior to now()
and now()
.
Supposing that the current time is 2021-05-11T22:18:40.000+08:00
, we can see annotated log output about cq2
running at DataNode if you set log level to DEBUG:
At **2021-05-11T22:18:40.000+08:00**, `cq2` executes a query within the time range `[2021-05-11T22:18:00, 2021-05-11T22:18:40)`.
`cq2` generate 4 lines:
>
+-----------------------------+---------------------------------+---------------------------------+---------------------------------+---------------------------------+
| Time|root.ln.wf02.wt02.temperature_max|root.ln.wf02.wt01.temperature_max|root.ln.wf01.wt02.temperature_max|root.ln.wf01.wt01.temperature_max|
+-----------------------------+---------------------------------+---------------------------------+---------------------------------+---------------------------------+
|2021-05-11T22:18:00.000+08:00| NULL| NULL| NULL| NULL|
|2021-05-11T22:18:10.000+08:00| 121.0| 72.0| 183.0| 115.0|
|2021-05-11T22:18:20.000+08:00| 122.0| 45.0| 59.0| 181.0|
|2021-05-11T22:18:30.000+08:00| 182.0| 113.0| 52.0| 180.0|
+-----------------------------+---------------------------------+---------------------------------+---------------------------------+---------------------------------+
>
At **2021-05-11T22:18:50.000+08:00**, `cq2` executes a query within the time range `[2021-05-11T22:18:10, 2021-05-11T22:18:50)`.
`cq2` generate 4 lines:
>
+-----------------------------+---------------------------------+---------------------------------+---------------------------------+---------------------------------+
| Time|root.ln.wf02.wt02.temperature_max|root.ln.wf02.wt01.temperature_max|root.ln.wf01.wt02.temperature_max|root.ln.wf01.wt01.temperature_max|
+-----------------------------+---------------------------------+---------------------------------+---------------------------------+---------------------------------+
|2021-05-11T22:18:10.000+08:00| 121.0| 72.0| 183.0| 115.0|
|2021-05-11T22:18:20.000+08:00| 122.0| 45.0| 59.0| 181.0|
|2021-05-11T22:18:30.000+08:00| 182.0| 113.0| 52.0| 180.0|
|2021-05-11T22:18:40.000+08:00| 137.0| 172.0| 135.0| 193.0|
+-----------------------------+---------------------------------+---------------------------------+---------------------------------+---------------------------------+
>
At **2021-05-11T22:19:00.000+08:00**, `cq2` executes a query within the time range `[2021-05-11T22:18:20, 2021-05-11T22:19:00)`.
`cq2` generate 4 lines:
>
+-----------------------------+---------------------------------+---------------------------------+---------------------------------+---------------------------------+
| Time|root.ln.wf02.wt02.temperature_max|root.ln.wf02.wt01.temperature_max|root.ln.wf01.wt02.temperature_max|root.ln.wf01.wt01.temperature_max|
+-----------------------------+---------------------------------+---------------------------------+---------------------------------+---------------------------------+
|2021-05-11T22:18:20.000+08:00| 122.0| 45.0| 59.0| 181.0|
|2021-05-11T22:18:30.000+08:00| 182.0| 113.0| 52.0| 180.0|
|2021-05-11T22:18:40.000+08:00| 137.0| 172.0| 135.0| 193.0|
|2021-05-11T22:18:50.000+08:00| 16.0| 124.0| 183.0| 18.0|
+-----------------------------+---------------------------------+---------------------------------+---------------------------------+---------------------------------+
>
cq2
won't write lines that are all null. Notice cq2
will also calculate the results for some time interval many times. Here are the results:
> SELECT temperature_max from root.ln.*.*;
+-----------------------------+---------------------------------+---------------------------------+---------------------------------+---------------------------------+
| Time|root.ln.wf02.wt02.temperature_max|root.ln.wf02.wt01.temperature_max|root.ln.wf01.wt02.temperature_max|root.ln.wf01.wt01.temperature_max|
+-----------------------------+---------------------------------+---------------------------------+---------------------------------+---------------------------------+
|2021-05-11T22:18:10.000+08:00| 121.0| 72.0| 183.0| 115.0|
|2021-05-11T22:18:20.000+08:00| 122.0| 45.0| 59.0| 181.0|
|2021-05-11T22:18:30.000+08:00| 182.0| 113.0| 52.0| 180.0|
|2021-05-11T22:18:40.000+08:00| 137.0| 172.0| 135.0| 193.0|
|2021-05-11T22:18:50.000+08:00| 16.0| 124.0| 183.0| 18.0|
+-----------------------------+---------------------------------+---------------------------------+---------------------------------+---------------------------------+
Configuring execution intervals and CQ time ranges
Use an EVERY
interval and RANGE
interval in the RESAMPLE
clause to specify the CQ’s execution interval and the length of the CQ’s time range. And use fill()
to change the value reported for time intervals with no data.
CREATE CONTINUOUS QUERY cq3
RESAMPLE EVERY 20s RANGE 40s
BEGIN
SELECT max_value(temperature)
INTO root.ln.wf02.wt02(temperature_max), root.ln.wf02.wt01(temperature_max), root.ln.wf01.wt02(temperature_max), root.ln.wf01.wt01(temperature_max)
FROM root.ln.*.*
GROUP BY(10s)
FILL(100.0)
END
cq3
calculates the 10-second average of temperature
sensor under the root.ln
prefix path and stores the results in the temperature_max
sensor using the same prefix path as the corresponding sensor. Where possible, it writes the value 100.0
for time intervals with no results.
cq3
executes at 20-second intervals, the same interval as the EVERY
interval. Every 20 seconds, cq3
runs a single query that covers the time range between now()
minus the start_time_offset
and now()
, that is, the time range between 40 seconds prior to now()
and now()
.
Supposing that the current time is 2021-05-11T22:18:40.000+08:00
, we can see annotated log output about cq3
running at DataNode if you set log level to DEBUG:
At **2021-05-11T22:18:40.000+08:00**, `cq3` executes a query within the time range `[2021-05-11T22:18:00, 2021-05-11T22:18:40)`.
`cq3` generate 4 lines:
>
+-----------------------------+---------------------------------+---------------------------------+---------------------------------+---------------------------------+
| Time|root.ln.wf02.wt02.temperature_max|root.ln.wf02.wt01.temperature_max|root.ln.wf01.wt02.temperature_max|root.ln.wf01.wt01.temperature_max|
+-----------------------------+---------------------------------+---------------------------------+---------------------------------+---------------------------------+
|2021-05-11T22:18:00.000+08:00| 100.0| 100.0| 100.0| 100.0|
|2021-05-11T22:18:10.000+08:00| 121.0| 72.0| 183.0| 115.0|
|2021-05-11T22:18:20.000+08:00| 122.0| 45.0| 59.0| 181.0|
|2021-05-11T22:18:30.000+08:00| 182.0| 113.0| 52.0| 180.0|
+-----------------------------+---------------------------------+---------------------------------+---------------------------------+---------------------------------+
>
At **2021-05-11T22:19:00.000+08:00**, `cq3` executes a query within the time range `[2021-05-11T22:18:20, 2021-05-11T22:19:00)`.
`cq3` generate 4 lines:
>
+-----------------------------+---------------------------------+---------------------------------+---------------------------------+---------------------------------+
| Time|root.ln.wf02.wt02.temperature_max|root.ln.wf02.wt01.temperature_max|root.ln.wf01.wt02.temperature_max|root.ln.wf01.wt01.temperature_max|
+-----------------------------+---------------------------------+---------------------------------+---------------------------------+---------------------------------+
|2021-05-11T22:18:20.000+08:00| 122.0| 45.0| 59.0| 181.0|
|2021-05-11T22:18:30.000+08:00| 182.0| 113.0| 52.0| 180.0|
|2021-05-11T22:18:40.000+08:00| 137.0| 172.0| 135.0| 193.0|
|2021-05-11T22:18:50.000+08:00| 16.0| 124.0| 183.0| 18.0|
+-----------------------------+---------------------------------+---------------------------------+---------------------------------+---------------------------------+
>
Notice that cq3
will calculate the results for some time interval many times, so here are the results:
> SELECT temperature_max from root.ln.*.*;
+-----------------------------+---------------------------------+---------------------------------+---------------------------------+---------------------------------+
| Time|root.ln.wf02.wt02.temperature_max|root.ln.wf02.wt01.temperature_max|root.ln.wf01.wt02.temperature_max|root.ln.wf01.wt01.temperature_max|
+-----------------------------+---------------------------------+---------------------------------+---------------------------------+---------------------------------+
|2021-05-11T22:18:00.000+08:00| 100.0| 100.0| 100.0| 100.0|
|2021-05-11T22:18:10.000+08:00| 121.0| 72.0| 183.0| 115.0|
|2021-05-11T22:18:20.000+08:00| 122.0| 45.0| 59.0| 181.0|
|2021-05-11T22:18:30.000+08:00| 182.0| 113.0| 52.0| 180.0|
|2021-05-11T22:18:40.000+08:00| 137.0| 172.0| 135.0| 193.0|
|2021-05-11T22:18:50.000+08:00| 16.0| 124.0| 183.0| 18.0|
+-----------------------------+---------------------------------+---------------------------------+---------------------------------+---------------------------------+
Configuring end_time_offset for CQ time range
Use an EVERY
interval and RANGE
interval in the RESAMPLE clause to specify the CQ’s execution interval and the length of the CQ’s time range. And use fill()
to change the value reported for time intervals with no data.
CREATE CONTINUOUS QUERY cq4
RESAMPLE EVERY 20s RANGE 40s, 20s
BEGIN
SELECT max_value(temperature)
INTO root.ln.wf02.wt02(temperature_max), root.ln.wf02.wt01(temperature_max), root.ln.wf01.wt02(temperature_max), root.ln.wf01.wt01(temperature_max)
FROM root.ln.*.*
GROUP BY(10s)
FILL(100.0)
END
cq4
calculates the 10-second average of temperature
sensor under the root.ln
prefix path and stores the results in the temperature_max
sensor using the same prefix path as the corresponding sensor. Where possible, it writes the value 100.0
for time intervals with no results.
cq4
executes at 20-second intervals, the same interval as the EVERY
interval. Every 20 seconds, cq4
runs a single query that covers the time range between now()
minus the start_time_offset
and now()
minus the end_time_offset
, that is, the time range between 40 seconds prior to now()
and 20 seconds prior to now()
.
Supposing that the current time is 2021-05-11T22:18:40.000+08:00
, we can see annotated log output about cq4
running at DataNode if you set log level to DEBUG:
At **2021-05-11T22:18:40.000+08:00**, `cq4` executes a query within the time range `[2021-05-11T22:18:00, 2021-05-11T22:18:20)`.
`cq4` generate 2 lines:
>
+-----------------------------+---------------------------------+---------------------------------+---------------------------------+---------------------------------+
| Time|root.ln.wf02.wt02.temperature_max|root.ln.wf02.wt01.temperature_max|root.ln.wf01.wt02.temperature_max|root.ln.wf01.wt01.temperature_max|
+-----------------------------+---------------------------------+---------------------------------+---------------------------------+---------------------------------+
|2021-05-11T22:18:00.000+08:00| 100.0| 100.0| 100.0| 100.0|
|2021-05-11T22:18:10.000+08:00| 121.0| 72.0| 183.0| 115.0|
+-----------------------------+---------------------------------+---------------------------------+---------------------------------+---------------------------------+
>
At **2021-05-11T22:19:00.000+08:00**, `cq4` executes a query within the time range `[2021-05-11T22:18:20, 2021-05-11T22:18:40)`.
`cq4` generate 2 lines:
>
+-----------------------------+---------------------------------+---------------------------------+---------------------------------+---------------------------------+
| Time|root.ln.wf02.wt02.temperature_max|root.ln.wf02.wt01.temperature_max|root.ln.wf01.wt02.temperature_max|root.ln.wf01.wt01.temperature_max|
+-----------------------------+---------------------------------+---------------------------------+---------------------------------+---------------------------------+
|2021-05-11T22:18:20.000+08:00| 122.0| 45.0| 59.0| 181.0|
|2021-05-11T22:18:30.000+08:00| 182.0| 113.0| 52.0| 180.0|
+-----------------------------+---------------------------------+---------------------------------+---------------------------------+---------------------------------+
>
Notice that cq4
will calculate the results for all time intervals only once after a delay of 20 seconds, so here are the results:
> SELECT temperature_max from root.ln.*.*;
+-----------------------------+---------------------------------+---------------------------------+---------------------------------+---------------------------------+
| Time|root.ln.wf02.wt02.temperature_max|root.ln.wf02.wt01.temperature_max|root.ln.wf01.wt02.temperature_max|root.ln.wf01.wt01.temperature_max|
+-----------------------------+---------------------------------+---------------------------------+---------------------------------+---------------------------------+
|2021-05-11T22:18:00.000+08:00| 100.0| 100.0| 100.0| 100.0|
|2021-05-11T22:18:10.000+08:00| 121.0| 72.0| 183.0| 115.0|
|2021-05-11T22:18:20.000+08:00| 122.0| 45.0| 59.0| 181.0|
|2021-05-11T22:18:30.000+08:00| 182.0| 113.0| 52.0| 180.0|
+-----------------------------+---------------------------------+---------------------------------+---------------------------------+---------------------------------+
CQ without group by clause
Use an EVERY
interval in the RESAMPLE
clause to specify the CQ’s execution interval and the length of the CQ’s time range.
CREATE CONTINUOUS QUERY cq5
RESAMPLE EVERY 20s
BEGIN
SELECT temperature + 1
INTO root.precalculated_sg.::(temperature)
FROM root.ln.*.*
align by device
END
cq5
calculates the temperature + 1
under the root.ln
prefix path and stores the results in the root.precalculated_sg
database. Sensors use the same prefix path as the corresponding sensor.
cq5
executes at 20-second intervals, the same interval as the EVERY
interval. Every 20 seconds, cq5
runs a single query that covers the time range for the current time bucket, that is, the 20-second time bucket that intersects with now()
.
Supposing that the current time is 2021-05-11T22:18:40.000+08:00
, we can see annotated log output about cq5
running at DataNode if you set log level to DEBUG:
At **2021-05-11T22:18:40.000+08:00**, `cq5` executes a query within the time range `[2021-05-11T22:18:20, 2021-05-11T22:18:40)`.
`cq5` generate 16 lines:
>
+-----------------------------+-------------------------------+-----------+
| Time| Device|temperature|
+-----------------------------+-------------------------------+-----------+
|2021-05-11T22:18:24.949+08:00|root.precalculated_sg.wf02.wt02| 123.0|
|2021-05-11T22:18:29.967+08:00|root.precalculated_sg.wf02.wt02| 48.0|
|2021-05-11T22:18:34.979+08:00|root.precalculated_sg.wf02.wt02| 183.0|
|2021-05-11T22:18:39.990+08:00|root.precalculated_sg.wf02.wt02| 45.0|
|2021-05-11T22:18:24.949+08:00|root.precalculated_sg.wf02.wt01| 46.0|
|2021-05-11T22:18:29.967+08:00|root.precalculated_sg.wf02.wt01| 15.0|
|2021-05-11T22:18:34.979+08:00|root.precalculated_sg.wf02.wt01| 114.0|
|2021-05-11T22:18:39.990+08:00|root.precalculated_sg.wf02.wt01| 12.0|
|2021-05-11T22:18:24.949+08:00|root.precalculated_sg.wf01.wt02| 12.0|
|2021-05-11T22:18:29.967+08:00|root.precalculated_sg.wf01.wt02| 60.0|
|2021-05-11T22:18:34.979+08:00|root.precalculated_sg.wf01.wt02| 30.0|
|2021-05-11T22:18:39.990+08:00|root.precalculated_sg.wf01.wt02| 53.0|
|2021-05-11T22:18:24.949+08:00|root.precalculated_sg.wf01.wt01| 15.0|
|2021-05-11T22:18:29.967+08:00|root.precalculated_sg.wf01.wt01| 182.0|
|2021-05-11T22:18:34.979+08:00|root.precalculated_sg.wf01.wt01| 181.0|
|2021-05-11T22:18:39.990+08:00|root.precalculated_sg.wf01.wt01| 20.0|
+-----------------------------+-------------------------------+-----------+
>
At **2021-05-11T22:19:00.000+08:00**, `cq5` executes a query within the time range `[2021-05-11T22:18:40, 2021-05-11T22:19:00)`.
`cq5` generate 12 lines:
>
+-----------------------------+-------------------------------+-----------+
| Time| Device|temperature|
+-----------------------------+-------------------------------+-----------+
|2021-05-11T22:18:44.995+08:00|root.precalculated_sg.wf02.wt02| 79.0|
|2021-05-11T22:18:49.999+08:00|root.precalculated_sg.wf02.wt02| 138.0|
|2021-05-11T22:18:55.003+08:00|root.precalculated_sg.wf02.wt02| 17.0|
|2021-05-11T22:18:44.995+08:00|root.precalculated_sg.wf02.wt01| 39.0|
|2021-05-11T22:18:49.999+08:00|root.precalculated_sg.wf02.wt01| 173.0|
|2021-05-11T22:18:55.003+08:00|root.precalculated_sg.wf02.wt01| 125.0|
|2021-05-11T22:18:44.995+08:00|root.precalculated_sg.wf01.wt02| 124.0|
|2021-05-11T22:18:49.999+08:00|root.precalculated_sg.wf01.wt02| 136.0|
|2021-05-11T22:18:55.003+08:00|root.precalculated_sg.wf01.wt02| 184.0|
|2021-05-11T22:18:44.995+08:00|root.precalculated_sg.wf01.wt01| 53.0|
|2021-05-11T22:18:49.999+08:00|root.precalculated_sg.wf01.wt01| 194.0|
|2021-05-11T22:18:55.003+08:00|root.precalculated_sg.wf01.wt01| 19.0|
+-----------------------------+-------------------------------+-----------+
>
cq5
won't deal with data that is before the current time window which is 2021-05-11T22:18:20.000+08:00
, so here are the results:
> SELECT temperature from root.precalculated_sg.*.* align by device;
+-----------------------------+-------------------------------+-----------+
| Time| Device|temperature|
+-----------------------------+-------------------------------+-----------+
|2021-05-11T22:18:24.949+08:00|root.precalculated_sg.wf02.wt02| 123.0|
|2021-05-11T22:18:29.967+08:00|root.precalculated_sg.wf02.wt02| 48.0|
|2021-05-11T22:18:34.979+08:00|root.precalculated_sg.wf02.wt02| 183.0|
|2021-05-11T22:18:39.990+08:00|root.precalculated_sg.wf02.wt02| 45.0|
|2021-05-11T22:18:44.995+08:00|root.precalculated_sg.wf02.wt02| 79.0|
|2021-05-11T22:18:49.999+08:00|root.precalculated_sg.wf02.wt02| 138.0|
|2021-05-11T22:18:55.003+08:00|root.precalculated_sg.wf02.wt02| 17.0|
|2021-05-11T22:18:24.949+08:00|root.precalculated_sg.wf02.wt01| 46.0|
|2021-05-11T22:18:29.967+08:00|root.precalculated_sg.wf02.wt01| 15.0|
|2021-05-11T22:18:34.979+08:00|root.precalculated_sg.wf02.wt01| 114.0|
|2021-05-11T22:18:39.990+08:00|root.precalculated_sg.wf02.wt01| 12.0|
|2021-05-11T22:18:44.995+08:00|root.precalculated_sg.wf02.wt01| 39.0|
|2021-05-11T22:18:49.999+08:00|root.precalculated_sg.wf02.wt01| 173.0|
|2021-05-11T22:18:55.003+08:00|root.precalculated_sg.wf02.wt01| 125.0|
|2021-05-11T22:18:24.949+08:00|root.precalculated_sg.wf01.wt02| 12.0|
|2021-05-11T22:18:29.967+08:00|root.precalculated_sg.wf01.wt02| 60.0|
|2021-05-11T22:18:34.979+08:00|root.precalculated_sg.wf01.wt02| 30.0|
|2021-05-11T22:18:39.990+08:00|root.precalculated_sg.wf01.wt02| 53.0|
|2021-05-11T22:18:44.995+08:00|root.precalculated_sg.wf01.wt02| 124.0|
|2021-05-11T22:18:49.999+08:00|root.precalculated_sg.wf01.wt02| 136.0|
|2021-05-11T22:18:55.003+08:00|root.precalculated_sg.wf01.wt02| 184.0|
|2021-05-11T22:18:24.949+08:00|root.precalculated_sg.wf01.wt01| 15.0|
|2021-05-11T22:18:29.967+08:00|root.precalculated_sg.wf01.wt01| 182.0|
|2021-05-11T22:18:34.979+08:00|root.precalculated_sg.wf01.wt01| 181.0|
|2021-05-11T22:18:39.990+08:00|root.precalculated_sg.wf01.wt01| 20.0|
|2021-05-11T22:18:44.995+08:00|root.precalculated_sg.wf01.wt01| 53.0|
|2021-05-11T22:18:49.999+08:00|root.precalculated_sg.wf01.wt01| 194.0|
|2021-05-11T22:18:55.003+08:00|root.precalculated_sg.wf01.wt01| 19.0|
+-----------------------------+-------------------------------+-----------+
CQ Management
Listing continuous queries
List every CQ on the IoTDB Cluster with:
SHOW (CONTINUOUS QUERIES | CQS)
order results by cq_id
.
Examples
SHOW CONTINUOUS QUERIES;
we will get:
cq_id | query | state |
---|---|---|
s1_count_cq | CREATE CQ s1_count_cq BEGIN SELECT count(s1) INTO root.sg_count.d.count_s1 FROM root.sg.d GROUP BY(30m) END | active |
Dropping continuous queries
Drop a CQ with a specific cq_id
:
DROP (CONTINUOUS QUERY | CQ) <cq_id>
DROP CQ returns an empty result.
Examples
Drop the CQ named s1_count_cq
:
DROP CONTINUOUS QUERY s1_count_cq;
Altering continuous queries
CQs can't be altered once they're created. To change a CQ, you must DROP
and reCREATE
it with the updated settings.
CQ Use Cases
Downsampling and Data Retention
Use CQs with TTL
set on database in IoTDB to mitigate storage concerns. Combine CQs and TTL
to automatically downsample high precision data to a lower precision and remove the dispensable, high precision data from the database.
Recalculating expensive queries
Shorten query runtimes by pre-calculating expensive queries with CQs. Use a CQ to automatically downsample commonly-queried, high precision data to a lower precision. Queries on lower precision data require fewer resources and return faster.
Pre-calculate queries for your preferred graphing tool to accelerate the population of graphs and dashboards.
Substituting for sub-query
IoTDB does not support sub queries. We can get the same functionality by creating a CQ as a sub query and store its result into other time series and then querying from those time series again will be like doing nested sub query.
Example
IoTDB does not accept the following query with a nested sub query. The query calculates the average number of non-null values of s1
at 30 minute intervals:
SELECT avg(count_s1) from (select count(s1) as count_s1 from root.sg.d group by([0, now()), 30m));
To get the same results:
Create a CQ
This step performs the nested sub query in from clause of the query above. The following CQ automatically calculates the number of non-null values of s1
at 30 minute intervals and writes those counts into the new root.sg_count.d.count_s1
time series.
CREATE CQ s1_count_cq
BEGIN
SELECT count(s1)
INTO root.sg_count.d(count_s1)
FROM root.sg.d
GROUP BY(30m)
END
Query the CQ results
Next step performs the avg([...]) part of the outer query above.
Query the data in the time series root.sg_count.d.count_s1
to calculate the average of it:
SELECT avg(count_s1) from root.sg_count.d;
System Parameter Configuration
Name | Description | Data Type | Default Value |
---|---|---|---|
continuous_query_submit_thread | The number of threads in the scheduled thread pool that submit continuous query tasks periodically | int32 | 2 |
continuous_query_min_every_interval_in_ms | The minimum value of the continuous query execution time interval | duration | 1000 |
USER-DEFINED FUNCTION (UDF)
IoTDB provides a variety of built-in functions to meet your computing needs, and you can also create user defined functions to meet more computing needs.
This document describes how to write, register and use a UDF.
UDF Types
In IoTDB, you can expand two types of UDF:
UDF Class | Description |
---|---|
UDTF(User Defined Timeseries Generating Function) | This type of function can take multiple time series as input, and output one time series, which can have any number of data points. |
UDAF(User Defined Aggregation Function) | Custom Aggregation Functions. This type of function can take one time series as input, and output one aggregated data point for each group based on the GROUP BY type. |
UDF Development Dependencies
If you use Maven, you can search for the development dependencies listed below from the Maven repository . Please note that you must select the same dependency version as the target IoTDB server version for development.
<dependency>
<groupId>org.apache.iotdb</groupId>
<artifactId>udf-api</artifactId>
<version>1.0.0</version>
<scope>provided</scope>
</dependency>
UDTF(User Defined Timeseries Generating Function)
To write a UDTF, you need to inherit the org.apache.iotdb.udf.api.UDTF
class, and at least implement the beforeStart
method and a transform
method.
The following table shows all the interfaces available for user implementation.
Interface definition | Description | Required to Implement |
---|---|---|
void validate(UDFParameterValidator validator) throws Exception | This method is mainly used to validate UDFParameters and it is executed before beforeStart(UDFParameters, UDTFConfigurations) is called. | Optional |
void beforeStart(UDFParameters parameters, UDTFConfigurations configurations) throws Exception | The initialization method to call the user-defined initialization behavior before a UDTF processes the input data. Every time a user executes a UDTF query, the framework will construct a new UDF instance, and beforeStart will be called. | Required |
void transform(Row row, PointCollector collector) throws Exception | This method is called by the framework. This data processing method will be called when you choose to use the RowByRowAccessStrategy strategy (set in beforeStart ) to consume raw data. Input data is passed in by Row , and the transformation result should be output by PointCollector . You need to call the data collection method provided by collector to determine the output data. | Required to implement at least one transform method |
void transform(RowWindow rowWindow, PointCollector collector) throws Exception | This method is called by the framework. This data processing method will be called when you choose to use the SlidingSizeWindowAccessStrategy or SlidingTimeWindowAccessStrategy strategy (set in beforeStart ) to consume raw data. Input data is passed in by RowWindow , and the transformation result should be output by PointCollector . You need to call the data collection method provided by collector to determine the output data. | Required to implement at least one transform method |
void terminate(PointCollector collector) throws Exception | This method is called by the framework. This method will be called once after all transform calls have been executed. In a single UDF query, this method will and will only be called once. You need to call the data collection method provided by collector to determine the output data. | Optional |
void beforeDestroy() | This method is called by the framework after the last input data is processed, and will only be called once in the life cycle of each UDF instance. | Optional |
In the life cycle of a UDTF instance, the calling sequence of each method is as follows:
void validate(UDFParameterValidator validator) throws Exception
void beforeStart(UDFParameters parameters, UDTFConfigurations configurations) throws Exception
void transform(Row row, PointCollector collector) throws Exception
orvoid transform(RowWindow rowWindow, PointCollector collector) throws Exception
void terminate(PointCollector collector) throws Exception
void beforeDestroy()
Note that every time the framework executes a UDTF query, a new UDF instance will be constructed. When the query ends, the corresponding instance will be destroyed. Therefore, the internal data of the instances in different UDTF queries (even in the same SQL statement) are isolated. You can maintain some state data in the UDTF without considering the influence of concurrency and other factors.
The usage of each interface will be described in detail below.
void validate(UDFParameterValidator validator) throws Exception
The validate
method is used to validate the parameters entered by the user.
In this method, you can limit the number and types of input time series, check the attributes of user input, or perform any custom verification.
Please refer to the Javadoc for the usage of UDFParameterValidator
.
void beforeStart(UDFParameters parameters, UDTFConfigurations configurations) throws Exception
This method is mainly used to customize UDTF. In this method, the user can do the following things:
- Use UDFParameters to get the time series paths and parse key-value pair attributes entered by the user.
- Set the strategy to access the raw data and set the output data type in UDTFConfigurations.
- Create resources, such as establishing external connections, opening files, etc.
UDFParameters
UDFParameters
is used to parse UDF parameters in SQL statements (the part in parentheses after the UDF function name in SQL). The input parameters have two parts. The first part is data types of the time series that the UDF needs to process, and the second part is the key-value pair attributes for customization. Only the second part can be empty.
Example:
SELECT UDF(s1, s2, 'key1'='iotdb', 'key2'='123.45') FROM root.sg.d;
Usage:
void beforeStart(UDFParameters parameters, UDTFConfigurations configurations) throws Exception {
String stringValue = parameters.getString("key1"); // iotdb
Float floatValue = parameters.getFloat("key2"); // 123.45
Double doubleValue = parameters.getDouble("key3"); // null
int intValue = parameters.getIntOrDefault("key4", 678); // 678
// do something
// configurations
// ...
}
UDTFConfigurations
You must use UDTFConfigurations
to specify the strategy used by UDF to access raw data and the type of output sequence.
Usage:
void beforeStart(UDFParameters parameters, UDTFConfigurations configurations) throws Exception {
// parameters
// ...
// configurations
configurations
.setAccessStrategy(new RowByRowAccessStrategy())
.setOutputDataType(Type.INT32);
}
The setAccessStrategy
method is used to set the UDF's strategy for accessing the raw data, and the setOutputDataType
method is used to set the data type of the output sequence.
setAccessStrategy
Note that the raw data access strategy you set here determines which transform
method the framework will call. Please implement the transform
method corresponding to the raw data access strategy. Of course, you can also dynamically decide which strategy to set based on the attribute parameters parsed by UDFParameters
. Therefore, two transform
methods are also allowed to be implemented in one UDF.
The following are the strategies you can set:
Interface definition | Description | The transform Method to Call |
---|---|---|
RowByRowAccessStrategy | Process raw data row by row. The framework calls the transform method once for each row of raw data input. When UDF has only one input sequence, a row of input is one data point in the input sequence. When UDF has multiple input sequences, one row of input is a result record of the raw query (aligned by time) on these input sequences. (In a row, there may be a column with a value of null , but not all of them are null ) | void transform(Row row, PointCollector collector) throws Exception |
SlidingTimeWindowAccessStrategy | Process a batch of data in a fixed time interval each time. We call the container of a data batch a window. The framework calls the transform method once for each raw data input window. There may be multiple rows of data in a window, and each row is a result record of the raw query (aligned by time) on these input sequences. (In a row, there may be a column with a value of null , but not all of them are null ) | void transform(RowWindow rowWindow, PointCollector collector) throws Exception |
SlidingSizeWindowAccessStrategy | The raw data is processed batch by batch, and each batch contains a fixed number of raw data rows (except the last batch). We call the container of a data batch a window. The framework calls the transform method once for each raw data input window. There may be multiple rows of data in a window, and each row is a result record of the raw query (aligned by time) on these input sequences. (In a row, there may be a column with a value of null , but not all of them are null ) | void transform(RowWindow rowWindow, PointCollector collector) throws Exception |
SessionTimeWindowAccessStrategy | The raw data is processed batch by batch. We call the container of a data batch a window. The time interval between each two windows is greater than or equal to the sessionGap given by the user. The framework calls the transform method once for each raw data input window. There may be multiple rows of data in a window, and each row is a result record of the raw query (aligned by time) on these input sequences. (In a row, there may be a column with a value of null , but not all of them are null ) | void transform(RowWindow rowWindow, PointCollector collector) throws Exception |
StateWindowAccessStrategy | The raw data is processed batch by batch. We call the container of a data batch a window. In the state window, for text type or boolean type data, each value of the point in window is equal to the value of the first point in the window, and for numerical data, the distance between each value of the point in window and the value of the first point in the window is less than the threshold delta given by the user. The framework calls the transform method once for each raw data input window. There may be multiple rows of data in a window. Currently, we only support state window for one measurement, that is, a column of data. | void transform(RowWindow rowWindow, PointCollector collector) throws Exception |
RowByRowAccessStrategy
: The construction of RowByRowAccessStrategy
does not require any parameters.
The SlidingTimeWindowAccessStrategy
is shown schematically below.
SlidingTimeWindowAccessStrategy
: SlidingTimeWindowAccessStrategy
has many constructors, you can pass 3 types of parameters to them:
- Parameter 1: The display window on the time axis
- Parameter 2: Time interval for dividing the time axis (should be positive)
- Parameter 3: Time sliding step (not required to be greater than or equal to the time interval, but must be a positive number)
The first type of parameters are optional. If the parameters are not provided, the beginning time of the display window will be set to the same as the minimum timestamp of the query result set, and the ending time of the display window will be set to the same as the maximum timestamp of the query result set.
The sliding step parameter is also optional. If the parameter is not provided, the sliding step will be set to the same as the time interval for dividing the time axis.
The relationship between the three types of parameters can be seen in the figure below. Please see the Javadoc for more details.
Note that the actual time interval of some of the last time windows may be less than the specified time interval parameter. In addition, there may be cases where the number of data rows in some time windows is 0. In these cases, the framework will also call the transform
method for the empty windows.
The SlidingSizeWindowAccessStrategy
is shown schematically below.
SlidingSizeWindowAccessStrategy
: SlidingSizeWindowAccessStrategy
has many constructors, you can pass 2 types of parameters to them:
- Parameter 1: Window size. This parameter specifies the number of data rows contained in a data processing window. Note that the number of data rows in some of the last time windows may be less than the specified number of data rows.
- Parameter 2: Sliding step. This parameter means the number of rows between the first point of the next window and the first point of the current window. (This parameter is not required to be greater than or equal to the window size, but must be a positive number)
The sliding step parameter is optional. If the parameter is not provided, the sliding step will be set to the same as the window size.
The SessionTimeWindowAccessStrategy
is shown schematically below. Time intervals less than or equal to the given minimum time interval sessionGap
are assigned in one group
SessionTimeWindowAccessStrategy
: SessionTimeWindowAccessStrategy
has many constructors, you can pass 2 types of parameters to them:
- Parameter 1: The display window on the time axis.
- Parameter 2: The minimum time interval
sessionGap
of two adjacent windows.
The StateWindowAccessStrategy
is shown schematically below. **For numerical data, if the state difference is less than or equal to the given threshold delta
, it will be assigned in one group. **
StateWindowAccessStrategy
has four constructors.
- Constructor 1: For numerical data, there are 3 parameters: the time axis can display the start and end time of the time window and the threshold
delta
for the allowable change within a single window. - Constructor 2: For text data and boolean data, there are 3 parameters: the time axis can be provided to display the start and end time of the time window. For both data types, the data within a single window is same, and there is no need to provide an allowable change threshold.
- Constructor 3: For numerical data, there are 1 parameters: you can only provide the threshold delta that is allowed to change within a single window. The start time of the time axis display time window will be defined as the smallest timestamp in the entire query result set, and the time axis display time window end time will be defined as The largest timestamp in the entire query result set.
- Constructor 4: For text data and boolean data, you can provide no parameter. The start and end timestamps are explained in Constructor 3.
StateWindowAccessStrategy can only take one column as input for now.
Please see the Javadoc for more details.
setOutputDataType
Note that the type of output sequence you set here determines the type of data that the PointCollector
can actually receive in the transform
method. The relationship between the output data type set in setOutputDataType
and the actual data output type that PointCollector
can receive is as follows:
Output Data Type Set in setOutputDataType | Data Type that PointCollector Can Receive |
---|---|
INT32 | int |
INT64 | long |
FLOAT | float |
DOUBLE | double |
BOOLEAN | boolean |
TEXT | java.lang.String and org.apache.iotdb.udf.api.type.Binary |
The type of output time series of a UDTF is determined at runtime, which means that a UDTF can dynamically determine the type of output time series according to the type of input time series.
Here is a simple example:
void beforeStart(UDFParameters parameters, UDTFConfigurations configurations) throws Exception {
// do something
// ...
configurations
.setAccessStrategy(new RowByRowAccessStrategy())
.setOutputDataType(parameters.getDataType(0));
}
void transform(Row row, PointCollector collector) throws Exception
You need to implement this method when you specify the strategy of UDF to read the original data as RowByRowAccessStrategy
.
This method processes the raw data one row at a time. The raw data is input from Row
and output by PointCollector
. You can output any number of data points in one transform
method call. It should be noted that the type of output data points must be the same as you set in the beforeStart
method, and the timestamps of output data points must be strictly monotonically increasing.
The following is a complete UDF example that implements the void transform(Row row, PointCollector collector) throws Exception
method. It is an adder that receives two columns of time series as input. When two data points in a row are not null
, this UDF will output the algebraic sum of these two data points.
import org.apache.iotdb.udf.api.UDTF;
import org.apache.iotdb.udf.api.access.Row;
import org.apache.iotdb.udf.api.collector.PointCollector;
import org.apache.iotdb.udf.api.customizer.config.UDTFConfigurations;
import org.apache.iotdb.udf.api.customizer.parameter.UDFParameters;
import org.apache.iotdb.udf.api.customizer.strategy.RowByRowAccessStrategy;
import org.apache.iotdb.udf.api.type.Type;
public class Adder implements UDTF {
@Override
public void beforeStart(UDFParameters parameters, UDTFConfigurations configurations) {
configurations
.setOutputDataType(TSDataType.INT64)
.setAccessStrategy(new RowByRowAccessStrategy());
}
@Override
public void transform(Row row, PointCollector collector) throws Exception {
if (row.isNull(0) || row.isNull(1)) {
return;
}
collector.putLong(row.getTime(), row.getLong(0) + row.getLong(1));
}
}
void transform(RowWindow rowWindow, PointCollector collector) throws Exception
You need to implement this method when you specify the strategy of UDF to read the original data as SlidingTimeWindowAccessStrategy
or SlidingSizeWindowAccessStrategy
.
This method processes a batch of data in a fixed number of rows or a fixed time interval each time, and we call the container containing this batch of data a window. The raw data is input from RowWindow
and output by PointCollector
. RowWindow
can help you access a batch of Row
, it provides a set of interfaces for random access and iterative access to this batch of Row
. You can output any number of data points in one transform
method call. It should be noted that the type of output data points must be the same as you set in the beforeStart
method, and the timestamps of output data points must be strictly monotonically increasing.
Below is a complete UDF example that implements the void transform(RowWindow rowWindow, PointCollector collector) throws Exception
method. It is a counter that receives any number of time series as input, and its function is to count and output the number of data rows in each time window within a specified time range.
import java.io.IOException;
import org.apache.iotdb.udf.api.UDTF;
import org.apache.iotdb.udf.api.access.Row;
import org.apache.iotdb.udf.api.access.RowWindow;
import org.apache.iotdb.udf.api.collector.PointCollector;
import org.apache.iotdb.udf.api.customizer.config.UDTFConfigurations;
import org.apache.iotdb.udf.api.customizer.parameter.UDFParameters;
import org.apache.iotdb.udf.api.customizer.strategy.SlidingTimeWindowAccessStrategy;
import org.apache.iotdb.udf.api.type.Type;
public class Counter implements UDTF {
@Override
public void beforeStart(UDFParameters parameters, UDTFConfigurations configurations) {
configurations
.setOutputDataType(TSDataType.INT32)
.setAccessStrategy(new SlidingTimeWindowAccessStrategy(
parameters.getLong("time_interval"),
parameters.getLong("sliding_step"),
parameters.getLong("display_window_begin"),
parameters.getLong("display_window_end")));
}
@Override
public void transform(RowWindow rowWindow, PointCollector collector) {
if (rowWindow.windowSize() != 0) {
collector.putInt(rowWindow.windowStartTime(), rowWindow.windowSize());
}
}
}
void terminate(PointCollector collector) throws Exception
In some scenarios, a UDF needs to traverse all the original data to calculate the final output data points. The terminate
interface provides support for those scenarios.
This method is called after all transform
calls are executed and before the beforeDestory
method is executed. You can implement the transform
method to perform pure data processing (without outputting any data points), and implement the terminate
method to output the processing results.
The processing results need to be output by the PointCollector
. You can output any number of data points in one terminate
method call. It should be noted that the type of output data points must be the same as you set in the beforeStart
method, and the timestamps of output data points must be strictly monotonically increasing.
Below is a complete UDF example that implements the void terminate(PointCollector collector) throws Exception
method. It takes one time series whose data type is INT32
as input, and outputs the maximum value point of the series.
import java.io.IOException;
import org.apache.iotdb.udf.api.UDTF;
import org.apache.iotdb.udf.api.access.Row;
import org.apache.iotdb.udf.api.collector.PointCollector;
import org.apache.iotdb.udf.api.customizer.config.UDTFConfigurations;
import org.apache.iotdb.udf.api.customizer.parameter.UDFParameters;
import org.apache.iotdb.udf.api.customizer.strategy.RowByRowAccessStrategy;
import org.apache.iotdb.udf.api.type.Type;
public class Max implements UDTF {
private Long time;
private int value;
@Override
public void beforeStart(UDFParameters parameters, UDTFConfigurations configurations) {
configurations
.setOutputDataType(TSDataType.INT32)
.setAccessStrategy(new RowByRowAccessStrategy());
}
@Override
public void transform(Row row, PointCollector collector) {
if (row.isNull(0)) {
return;
}
int candidateValue = row.getInt(0);
if (time == null || value < candidateValue) {
time = row.getTime();
value = candidateValue;
}
}
@Override
public void terminate(PointCollector collector) throws IOException {
if (time != null) {
collector.putInt(time, value);
}
}
}
void beforeDestroy()
The method for terminating a UDF.
This method is called by the framework. For a UDF instance, beforeDestroy
will be called after the last record is processed. In the entire life cycle of the instance, beforeDestroy
will only be called once.
UDAF (User Defined Aggregation Function)
A complete definition of UDAF involves two classes, State
and UDAF
.
State Class
To write your own State
, you need to implement the org.apache.iotdb.udf.api.State
interface.
The following table shows all the interfaces available for user implementation.
Interface Definition | Description | Required to Implement |
---|---|---|
void reset() | To reset the State object to its initial state, you need to fill in the initial values of the fields in the State class within this method as if you were writing a constructor. | Required |
byte[] serialize() | Serializes State to binary data. This method is used for IoTDB internal State passing. Note that the order of serialization must be consistent with the following deserialization methods. | Required |
void deserialize(byte[] bytes) | Deserializes binary data to State . This method is used for IoTDB internal State passing. Note that the order of deserialization must be consistent with the serialization method above. | Required |
The following section describes the usage of each interface in detail.
void reset()
This method resets the State
to its initial state, you need to fill in the initial values of the fields in the State
object in this method. For optimization reasons, IoTDB reuses State
as much as possible internally, rather than creating a new State
for each group, which would introduce unnecessary overhead. When State
has finished updating the data in a group, this method is called to reset to the initial state as a way to process the next group.
In the case of State
for averaging (aka avg
), for example, you would need the sum of the data, sum
, and the number of entries in the data, count
, and initialize both to 0 in the reset()
method.
class AvgState implements State {
double sum;
long count;
@Override
public void reset() {
sum = 0;
count = 0;
}
// other methods
}
byte[] serialize()/void deserialize(byte[] bytes)
These methods serialize the State
into binary data, and deserialize the State
from the binary data. IoTDB, as a distributed database, involves passing data among different nodes, so you need to write these two methods to enable the passing of the State among different nodes. Note that the order of serialization and deserialization must be the consistent.
In the case of State
for averaging (aka avg
), for example, you can convert the content of State to byte[]
array and read out the content of State from byte[]
array in any way you want, the following shows the code for serialization/deserialization using ByteBuffer
introduced by Java8:
@Override
public byte[] serialize() {
ByteBuffer buffer = ByteBuffer.allocate(Double.BYTES + Long.BYTES);
buffer.putDouble(sum);
buffer.putLong(count);
return buffer.array();
}
@Override
public void deserialize(byte[] bytes) {
ByteBuffer buffer = ByteBuffer.wrap(bytes);
sum = buffer.getDouble();
count = buffer.getLong();
}
UDAF Classes
To write a UDAF, you need to implement the org.apache.iotdb.udf.api.UDAF
interface.
The following table shows all the interfaces available for user implementation.
Interface definition | Description | Required to Implement |
---|---|---|
void validate(UDFParameterValidator validator) throws Exception | This method is mainly used to validate UDFParameters and it is executed before beforeStart(UDFParameters, UDTFConfigurations) is called. | Optional |
void beforeStart(UDFParameters parameters, UDAFConfigurations configurations) throws Exception | Initialization method that invokes user-defined initialization behavior before UDAF processes the input data. Unlike UDTF, configuration is of type UDAFConfiguration . | Required |
State createState() | To create a State object, usually just call the default constructor and modify the default initial value as needed. | Required |
void addInput(State state, Column[] columns, BitMap bitMap) | Update State object according to the incoming data Column[] in batch, note that column[0] always represents the time column. In addition, BitMap represents the data that has been filtered out before, you need to manually determine whether the corresponding data has been filtered out when writing this method. | Required |
void combineState(State state, State rhs) | Merge rhs state into state state. In a distributed scenario, the same set of data may be distributed on different nodes, IoTDB generates a State object for the partial data on each node, and then calls this method to merge it into the complete State . | Required |
void outputFinal(State state, ResultValue resultValue) | Computes the final aggregated result based on the data in State . Note that according to the semantics of the aggregation, only one value can be output per group. | Required |
void beforeDestroy() | This method is called by the framework after the last input data is processed, and will only be called once in the life cycle of each UDF instance. | Optional |
In the life cycle of a UDAF instance, the calling sequence of each method is as follows:
State createState()
void validate(UDFParameterValidator validator) throws Exception
void beforeStart(UDFParameters parameters, UDAFConfigurations configurations) throws Exception
void addInput(State state, Column[] columns, BitMap bitMap)
void combineState(State state, State rhs)
void outputFinal(State state, ResultValue resultValue)
void beforeDestroy()
Similar to UDTF, every time the framework executes a UDAF query, a new UDF instance will be constructed. When the query ends, the corresponding instance will be destroyed. Therefore, the internal data of the instances in different UDAF queries (even in the same SQL statement) are isolated. You can maintain some state data in the UDAF without considering the influence of concurrency and other factors.
The usage of each interface will be described in detail below.
void validate(UDFParameterValidator validator) throws Exception
Same as UDTF, the validate
method is used to validate the parameters entered by the user.
In this method, you can limit the number and types of input time series, check the attributes of user input, or perform any custom verification.
void beforeStart(UDFParameters parameters, UDAFConfigurations configurations) throws Exception
The beforeStart
method does the same thing as the UDAF:
- Use UDFParameters to get the time series paths and parse key-value pair attributes entered by the user.
- Set the strategy to access the raw data and set the output data type in UDAFConfigurations.
- Create resources, such as establishing external connections, opening files, etc.
The role of the UDFParameters
type can be seen above.
UDAFConfigurations
The difference from UDTF is that UDAF uses UDAFConfigurations
as the type of configuration
object.
Currently, this class only supports setting the type of output data.
void beforeStart(UDFParameters parameters, UDAFConfigurations configurations) throws Exception {
// parameters
// ...
// configurations
configurations
.setOutputDataType(Type.INT32); }
}
The relationship between the output type set in setOutputDataType
and the type of data output that ResultValue
can actually receive is as follows:
The output type set in setOutputDataType | The output type that ResultValue can actually receive |
---|---|
INT32 | int |
INT64 | long |
FLOAT | float |
DOUBLE | double |
BOOLEAN | boolean |
TEXT | org.apache.iotdb.udf.api.type.Binary |
The output type of the UDAF is determined at runtime. You can dynamically determine the output sequence type based on the input type.
Here is a simple example:
void beforeStart(UDFParameters parameters, UDAFConfigurations configurations) throws Exception {
// do something
// ...
configurations
.setOutputDataType(parameters.getDataType(0));
}
State createState()
This method creates and initializes a State
object for UDAF. Due to the limitations of the Java language, you can only call the default constructor for the State
class. The default constructor assigns a default initial value to all the fields in the class, and if that initial value does not meet your requirements, you need to initialize them manually within this method.
The following is an example that includes manual initialization. Suppose you want to implement an aggregate function that multiply all numbers in the group, then your initial State
value should be set to 1, but the default constructor initializes it to 0, so you need to initialize State
manually after calling the default constructor:
public State createState() {
MultiplyState state = new MultiplyState();
state.result = 1;
return state;
}
void addInput(State state, Column[] columns, BitMap bitMap)
This method updates the State
object with the raw input data. For performance reasons, also to align with the IoTDB vectorized query engine, the raw input data is no longer a data point, but an array of columns Column[]
. Note that the first column (i.e. column[0]
) is always the time column, so you can also do different operations in UDAF depending on the time.
Since the input parameter is not of a single data point type, but of multiple columns, you need to manually filter some of the data in the columns, which is why the third parameter, BitMap
, exists. It identifies which of these columns have been filtered out, so you don't have to think about the filtered data in any case.
Here's an example of addInput()
that counts the number of items (aka count). It shows how you can use BitMap
to ignore data that has been filtered out. Note that due to the limitations of the Java language, you need to do the explicit cast the State
object from type defined in the interface to a custom State
type at the beginning of the method, otherwise you won't be able to use the State
object.
public void addInput(State state, Column[] column, BitMap bitMap) {
CountState countState = (CountState) state;
int count = column[0].getPositionCount();
for (int i = 0; i < count; i++) {
if (bitMap != null && !bitMap.isMarked(i)) {
continue;
}
if (!column[1].isNull(i)) {
countState.count++;
}
}
}
void combineState(State state, State rhs)
This method combines two State
s, or more precisely, updates the first State
object with the second State
object. IoTDB is a distributed database, and the data of the same group may be distributed on different nodes. For performance reasons, IoTDB will first aggregate some of the data on each node into State
, and then merge the State
s on different nodes that belong to the same group, which is what combineState
does.
Here's an example of combineState()
for averaging (aka avg). Similar to addInput
, you need to do an explicit type conversion for the two State
s at the beginning. Also note that you are updating the value of the first State
with the contents of the second State
.
public void combineState(State state, State rhs) {
AvgState avgState = (AvgState) state;
AvgState avgRhs = (AvgState) rhs;
avgState.count += avgRhs.count;
avgState.sum += avgRhs.sum;
}
void outputFinal(State state, ResultValue resultValue)
This method works by calculating the final result from State
. You need to access the various fields in State
, derive the final result, and set the final result into the ResultValue
object.IoTDB internally calls this method once at the end for each group. Note that according to the semantics of aggregation, the final result can only be one value.
Here is another outputFinal
example for averaging (aka avg). In addition to the forced type conversion at the beginning, you will also see a specific use of the ResultValue
object, where the final result is set by setXXX
(where XXX
is the type name).
public void outputFinal(State state, ResultValue resultValue) {
AvgState avgState = (AvgState) state;
if (avgState.count != 0) {
resultValue.setDouble(avgState.sum / avgState.count);
} else {
resultValue.setNull();
}
}
void beforeDestroy()
The method for terminating a UDF.
This method is called by the framework. For a UDF instance, beforeDestroy
will be called after the last record is processed. In the entire life cycle of the instance, beforeDestroy
will only be called once.
Maven Project Example
If you use Maven, you can build your own UDF project referring to our udf-example module. You can find the project here.
UDF Registration
The process of registering a UDF in IoTDB is as follows:
- Implement a complete UDF class, assuming the full class name of this class is
org.apache.iotdb.udf.ExampleUDTF
. - Package your project into a JAR. If you use Maven to manage your project, you can refer to the Maven project example above.
- Make preparations for registration according to the registration mode. For details, see the following example.
- You can use following SQL to register UDF.
CREATE FUNCTION <UDF-NAME> AS <UDF-CLASS-FULL-PATHNAME> (USING URI URI-STRING)?
Example: register UDF named example
, you can choose either of the following two registration methods
No URI
Prepare:
When use this method to register,you should put JAR to directory iotdb-server-1.0.0-all-bin/ext/udf
(directory can config).
Note,you should put JAR to this directory of all DataNodes if using Cluster
SQL:
CREATE FUNCTION example AS 'org.apache.iotdb.udf.UDTFExample'
Using URI
Prepare:
When use this method to register,you need to upload the JAR to URI server and ensure the IoTDB instance executing this registration statement has access to the URI server.
Note,you needn't place JAR manually,IoTDB will download the JAR and sync it.
SQL:
CREATE FUNCTION example AS 'org.apache.iotdb.udf.UDTFExample' USING URI 'http://jar/example.jar'
Note
Since UDF instances are dynamically loaded through reflection technology, you do not need to restart the server during the UDF registration process.
UDF function names are not case-sensitive.
Please ensure that the function name given to the UDF is different from all built-in function names. A UDF with the same name as a built-in function cannot be registered.
We recommend that you do not use classes that have the same class name but different function logic in different JAR packages. For example, in UDF(UDAF/UDTF): udf1, udf2
, the JAR package of udf1 is udf1.jar
and the JAR package of udf2 is udf2.jar
. Assume that both JAR packages contain the org.apache.iotdb.udf.ExampleUDTF
class. If you use two UDFs in the same SQL statement at the same time, the system will randomly load either of them and may cause inconsistency in UDF execution behavior.
UDF Deregistration
The following shows the SQL syntax of how to deregister a UDF.
DROP FUNCTION <UDF-NAME>
Here is an example:
DROP FUNCTION example
UDF Queries
The usage of UDF is similar to that of built-in aggregation functions.
Basic SQL syntax support
- Support
SLIMIT
/SOFFSET
- Support
LIMIT
/OFFSET
- Support queries with time filters
- Support queries with value filters
Queries with * in SELECT Clauses
Assume that there are 2 time series (root.sg.d1.s1
and root.sg.d1.s2
) in the system.
SELECT example(*) from root.sg.d1
Then the result set will include the results of example (root.sg.d1.s1)
and example (root.sg.d1.s2)
.
SELECT example(s1, *) from root.sg.d1
Then the result set will include the results of example(root.sg.d1.s1, root.sg.d1.s1)
and example(root.sg.d1.s1, root.sg.d1.s2)
.
SELECT example(*, *) from root.sg.d1
Then the result set will include the results of example(root.sg.d1.s1, root.sg.d1.s1)
, example(root.sg.d1.s2, root.sg.d1.s1)
, example(root.sg.d1.s1, root.sg.d1.s2)
and example(root.sg.d1.s2, root.sg.d1.s2)
.
Queries with Key-value Attributes in UDF Parameters
You can pass any number of key-value pair parameters to the UDF when constructing a UDF query. The key and value in the key-value pair need to be enclosed in single or double quotes. Note that key-value pair parameters can only be passed in after all time series have been passed in. Here is a set of examples:
SELECT example(s1, 'key1'='value1', 'key2'='value2'), example(*, 'key3'='value3') FROM root.sg.d1;
SELECT example(s1, s2, 'key1'='value1', 'key2'='value2') FROM root.sg.d1;
Nested Queries
SELECT s1, s2, example(s1, s2) FROM root.sg.d1;
SELECT *, example(*) FROM root.sg.d1 DISABLE ALIGN;
SELECT s1 * example(* / s1 + s2) FROM root.sg.d1;
SELECT s1, s2, s1 + example(s1, s2), s1 - example(s1 + example(s1, s2) / s2) FROM root.sg.d1;
Show All Registered UDFs
SHOW FUNCTIONS
User Permission Management
There are 1 types of user permissions related to UDF: USE_UDF
- Only users with this permission are allowed to register UDFs
- Only users with this permission are allowed to deregister UDFs
- Only users with this permission are allowed to use UDFs for queries
For more user permissions related content, please refer to Account Management Statements.
Configurable Properties
You can use udf_lib_dir
to config udf lib directory.
When querying by a UDF, IoTDB may prompt that there is insufficient memory. You can resolve the issue by configuring udf_initial_byte_array_length_for_memory_control
, udf_memory_budget_in_mb
and udf_reader_transformer_collector_memory_proportion
in iotdb-datanode.properties
and restarting the server.
Contribute UDF
This part mainly introduces how external users can contribute their own UDFs to the IoTDB community.
Prerequisites
UDFs must be universal.
The "universal" mentioned here refers to: UDFs can be widely used in some scenarios. In other words, the UDF function must have reuse value and may be directly used by other users in the community.
If you are not sure whether the UDF you want to contribute is universal, you can send an email to
dev@iotdb.apache.org
or create an issue to initiate a discussion.The UDF you are going to contribute has been well tested and can run normally in the production environment.
What you need to prepare
- UDF source code
- Test cases
- Instructions
UDF Source Code
- Create the UDF main class and related classes in
iotdb-core/node-commons/src/main/java/org/apache/iotdb/commons/udf/builtin
or in its subfolders. - Register your UDF in
iotdb-core/node-commons/src/main/java/org/apache/iotdb/commons/udf/builtin/BuiltinTimeSeriesGeneratingFunction.java
.
Test Cases
At a minimum, you need to write integration tests for the UDF.
You can add a test class in integration-test/src/test/java/org/apache/iotdb/db/it/udf
.
Instructions
The instructions need to include: the name and the function of the UDF, the attribute parameters that must be provided when the UDF is executed, the applicable scenarios, and the usage examples, etc.
The instructions should be added in docs/UserGuide/Operation Manual/DML Data Manipulation Language.md
.
Submit a PR
When you have prepared the UDF source code, test cases, and instructions, you are ready to submit a Pull Request (PR) on Github. You can refer to our code contribution guide to submit a PR: Development Guide.
Known Implementations
Built-in UDF
- Aggregate Functions, such as
SUM
. For details and examples, see the document Aggregate Functions. - Arithmetic Functions, such as
SIN
. For details and examples, see the document Arithmetic Operators and Functions. - Comparison Functions, such as
ON_OFF
. For details and examples, see the document Comparison Operators and Functions. - String Processing Functions, such as
STRING_CONTAINS
. For details and examples, see the document String Processing. - Data Type Conversion Function, such as
CAST
. For details and examples, see the document Data Type Conversion Function. - Constant Timeseries Generating Functions, such as
CONST
. For details and examples, see the document Constant Timeseries Generating Functions. - Selector Functions, such as
TOP_K
. For details and examples, see the document Selector Functions. - Continuous Interval Functions, such as
ZERO_DURATION
. For details and examples, see the document Continuous Interval Functions. - Variation Trend Calculation Functions, such as
TIME_DIFFERENCE
. For details and examples, see the document Variation Trend Calculation Functions. - Sample Functions, such as
M4
. For details and examples, see the document Sample Functions. - Change Points Function, such as
CHANGE_POINTS
. For details and examples, see the document Time-Series.
Data Quality Function Library
About
For applications based on time series data, data quality is vital. UDF Library is IoTDB User Defined Functions (UDF) about data quality, including data profiling, data quality evalution and data repairing. It effectively meets the demand for data quality in the industrial field.
Quick Start
The functions in this function library are not built-in functions, and must be loaded into the system before use.
- Download the JAR with all dependencies and the script of registering UDF.
- Copy the JAR package to
ext\udf
under the directory of IoTDB system (Please put JAR to this directory of all DataNodes if you use Cluster). - Run
sbin\start-server.bat
(for Windows) orsbin\start-server.sh
(for Linux or MacOS) to start IoTDB server. - Copy the script to the directory of IoTDB system (under the root directory, at the same level as
sbin
), modify the parameters in the script if needed and run it to register UDF.
Implemented Functions
- Data Quality related functions, such as
Completeness
. For details and examples, see the document Data-Quality. - Data Profiling related functions, such as
ACF
. For details and examples, see the document Data-Profiling. - Anomaly Detection related functions, such as
IQR
. For details and examples, see the document Anomaly-Detection. - Frequency Domain Analysis related functions, such as
Conv
. For details and examples, see the document Frequency-Domain. - Data Matching related functions, such as
DTW
. For details and examples, see the document Data-Matching. - Data Repairing related functions, such as
TimestampRepair
. For details and examples, see the document Data-Repairing. - Series Discovery related functions, such as
ConsecutiveSequences
. For details and examples, see the document Series-Discovery. - Machine Learning related functions, such as
AR
. For details and examples, see the document Machine-Learning.
Q&A
Q1: How to modify the registered UDF?
A1: Assume that the name of the UDF is example
and the full class name is org.apache.iotdb.udf.ExampleUDTF
, which is introduced by example.jar
.
- Unload the registered function by executing
DROP FUNCTION example
. - Delete
example.jar
underiotdb-server-1.0.0-all-bin/ext/udf
. - Modify the logic in
org.apache.iotdb.udf.ExampleUDTF
and repackage it. The name of the JAR package can still beexample.jar
. - Upload the new JAR package to
iotdb-server-1.0.0-all-bin/ext/udf
. - Load the new UDF by executing
CREATE FUNCTION example AS "org.apache.iotdb.udf.ExampleUDTF"
.