AINode Deployment
AINode Deployment
1. AINode Introduction
1.1 Capability Introduction
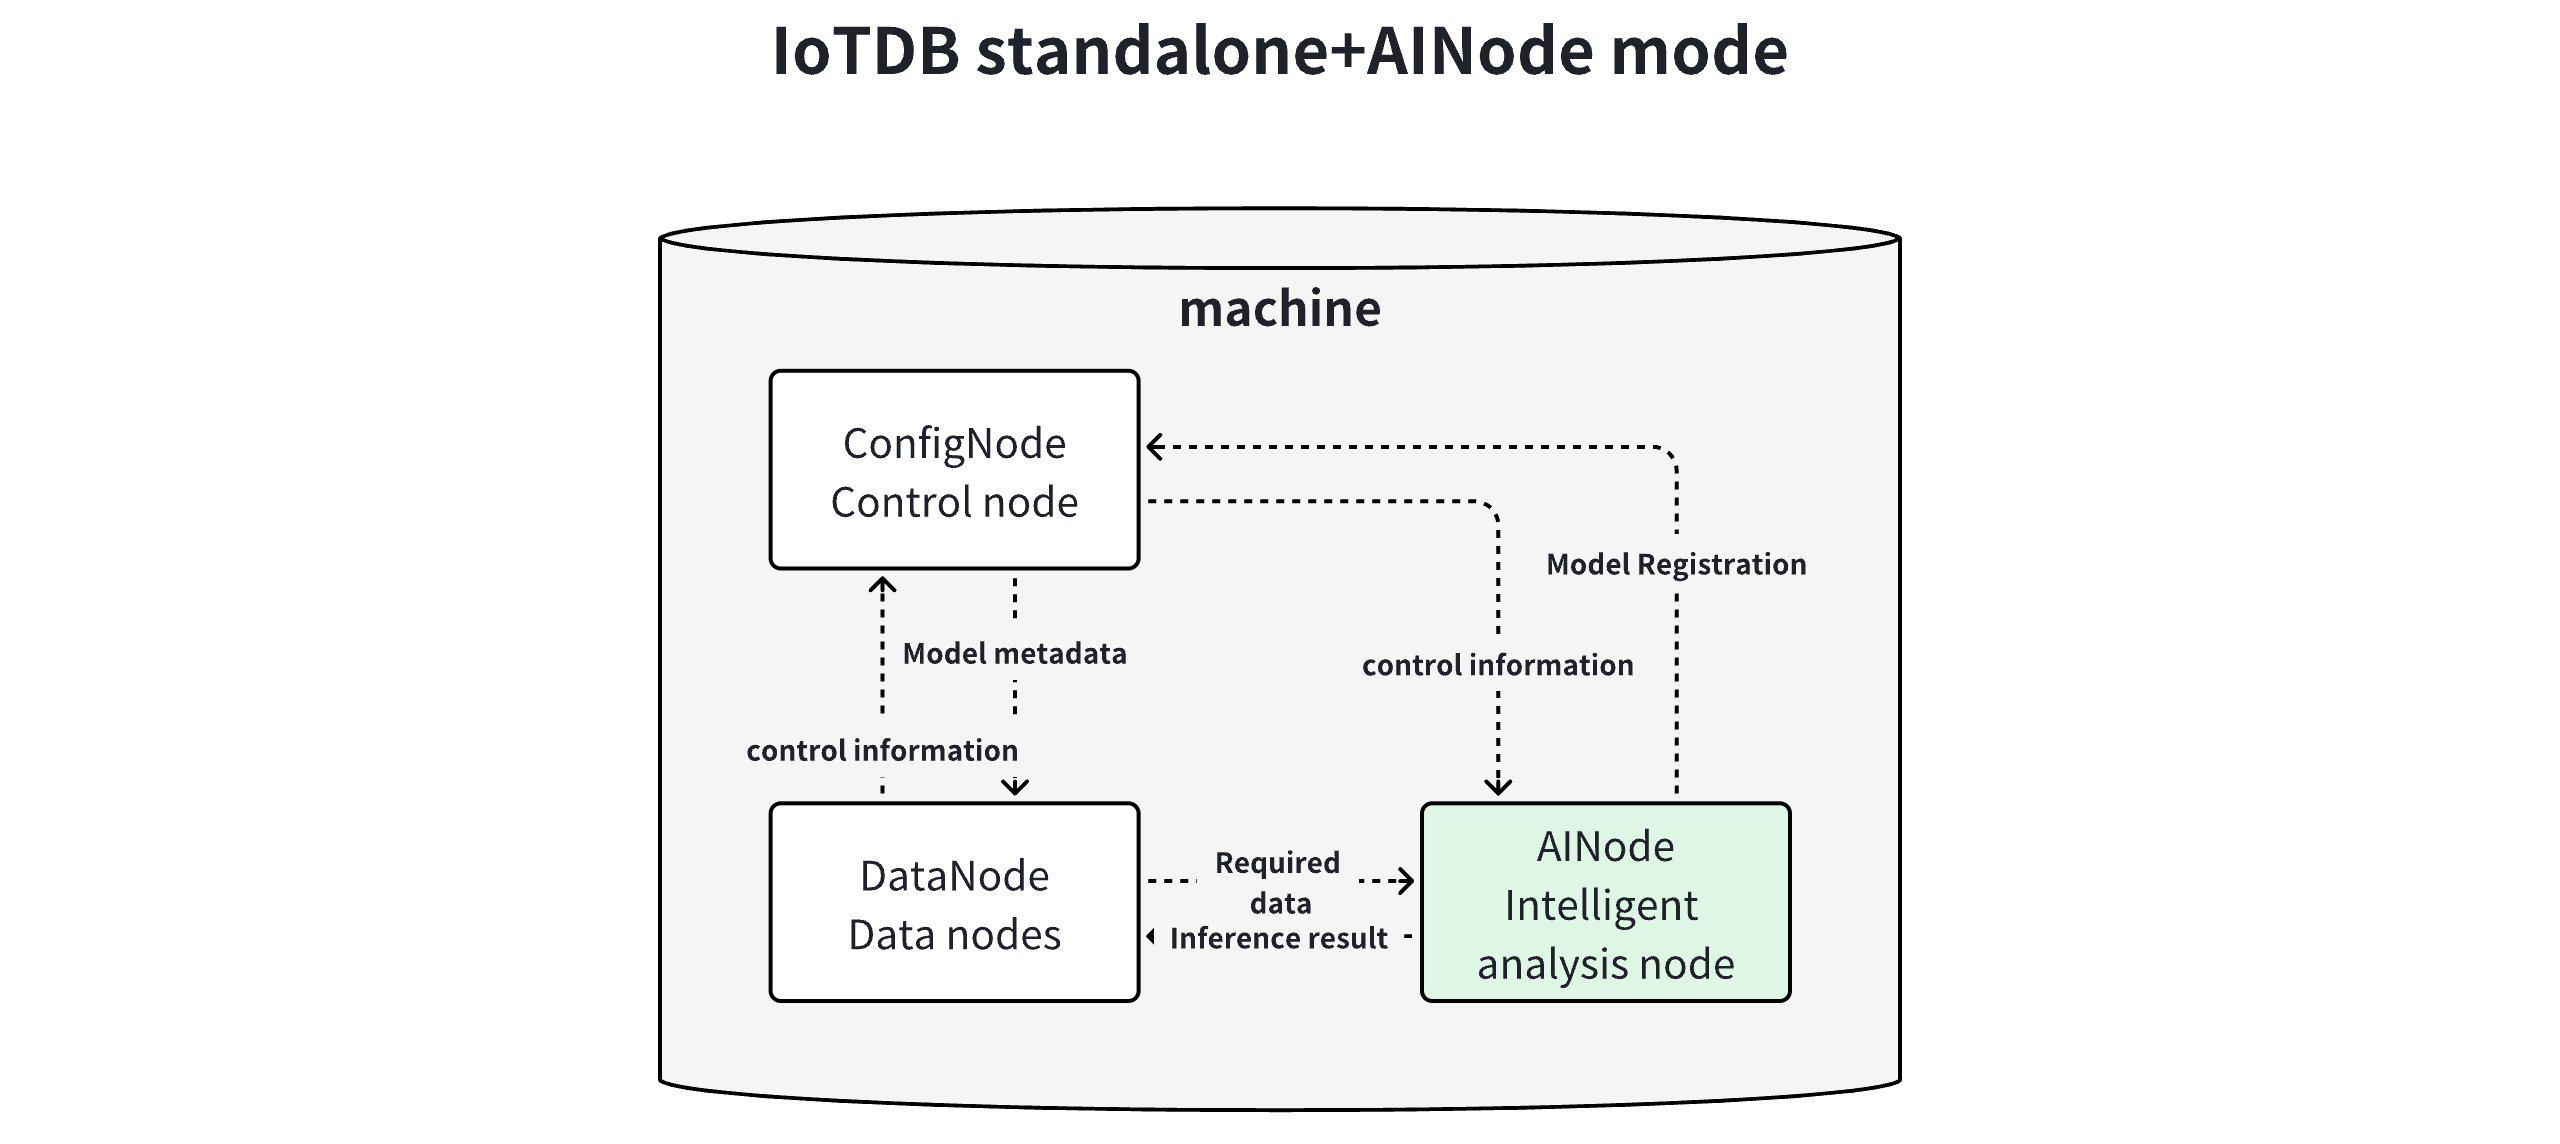
AINode is the third type of endogenous node provided by IoTDB after the Configurable Node and DataNode. This node extends its ability to perform machine learning analysis on time series by interacting with the DataNode and Configurable Node of the IoTDB cluster. It supports the introduction of existing machine learning models from external sources for registration and the use of registered models to complete time series analysis tasks on specified time series data through simple SQL statements. The creation, management, and inference of models are integrated into the database engine. Currently, machine learning algorithms or self-developed models are available for common time series analysis scenarios, such as prediction and anomaly detection.
1.2 Delivery Method
AINode is an additional package outside the IoTDB cluster, with independent installation.
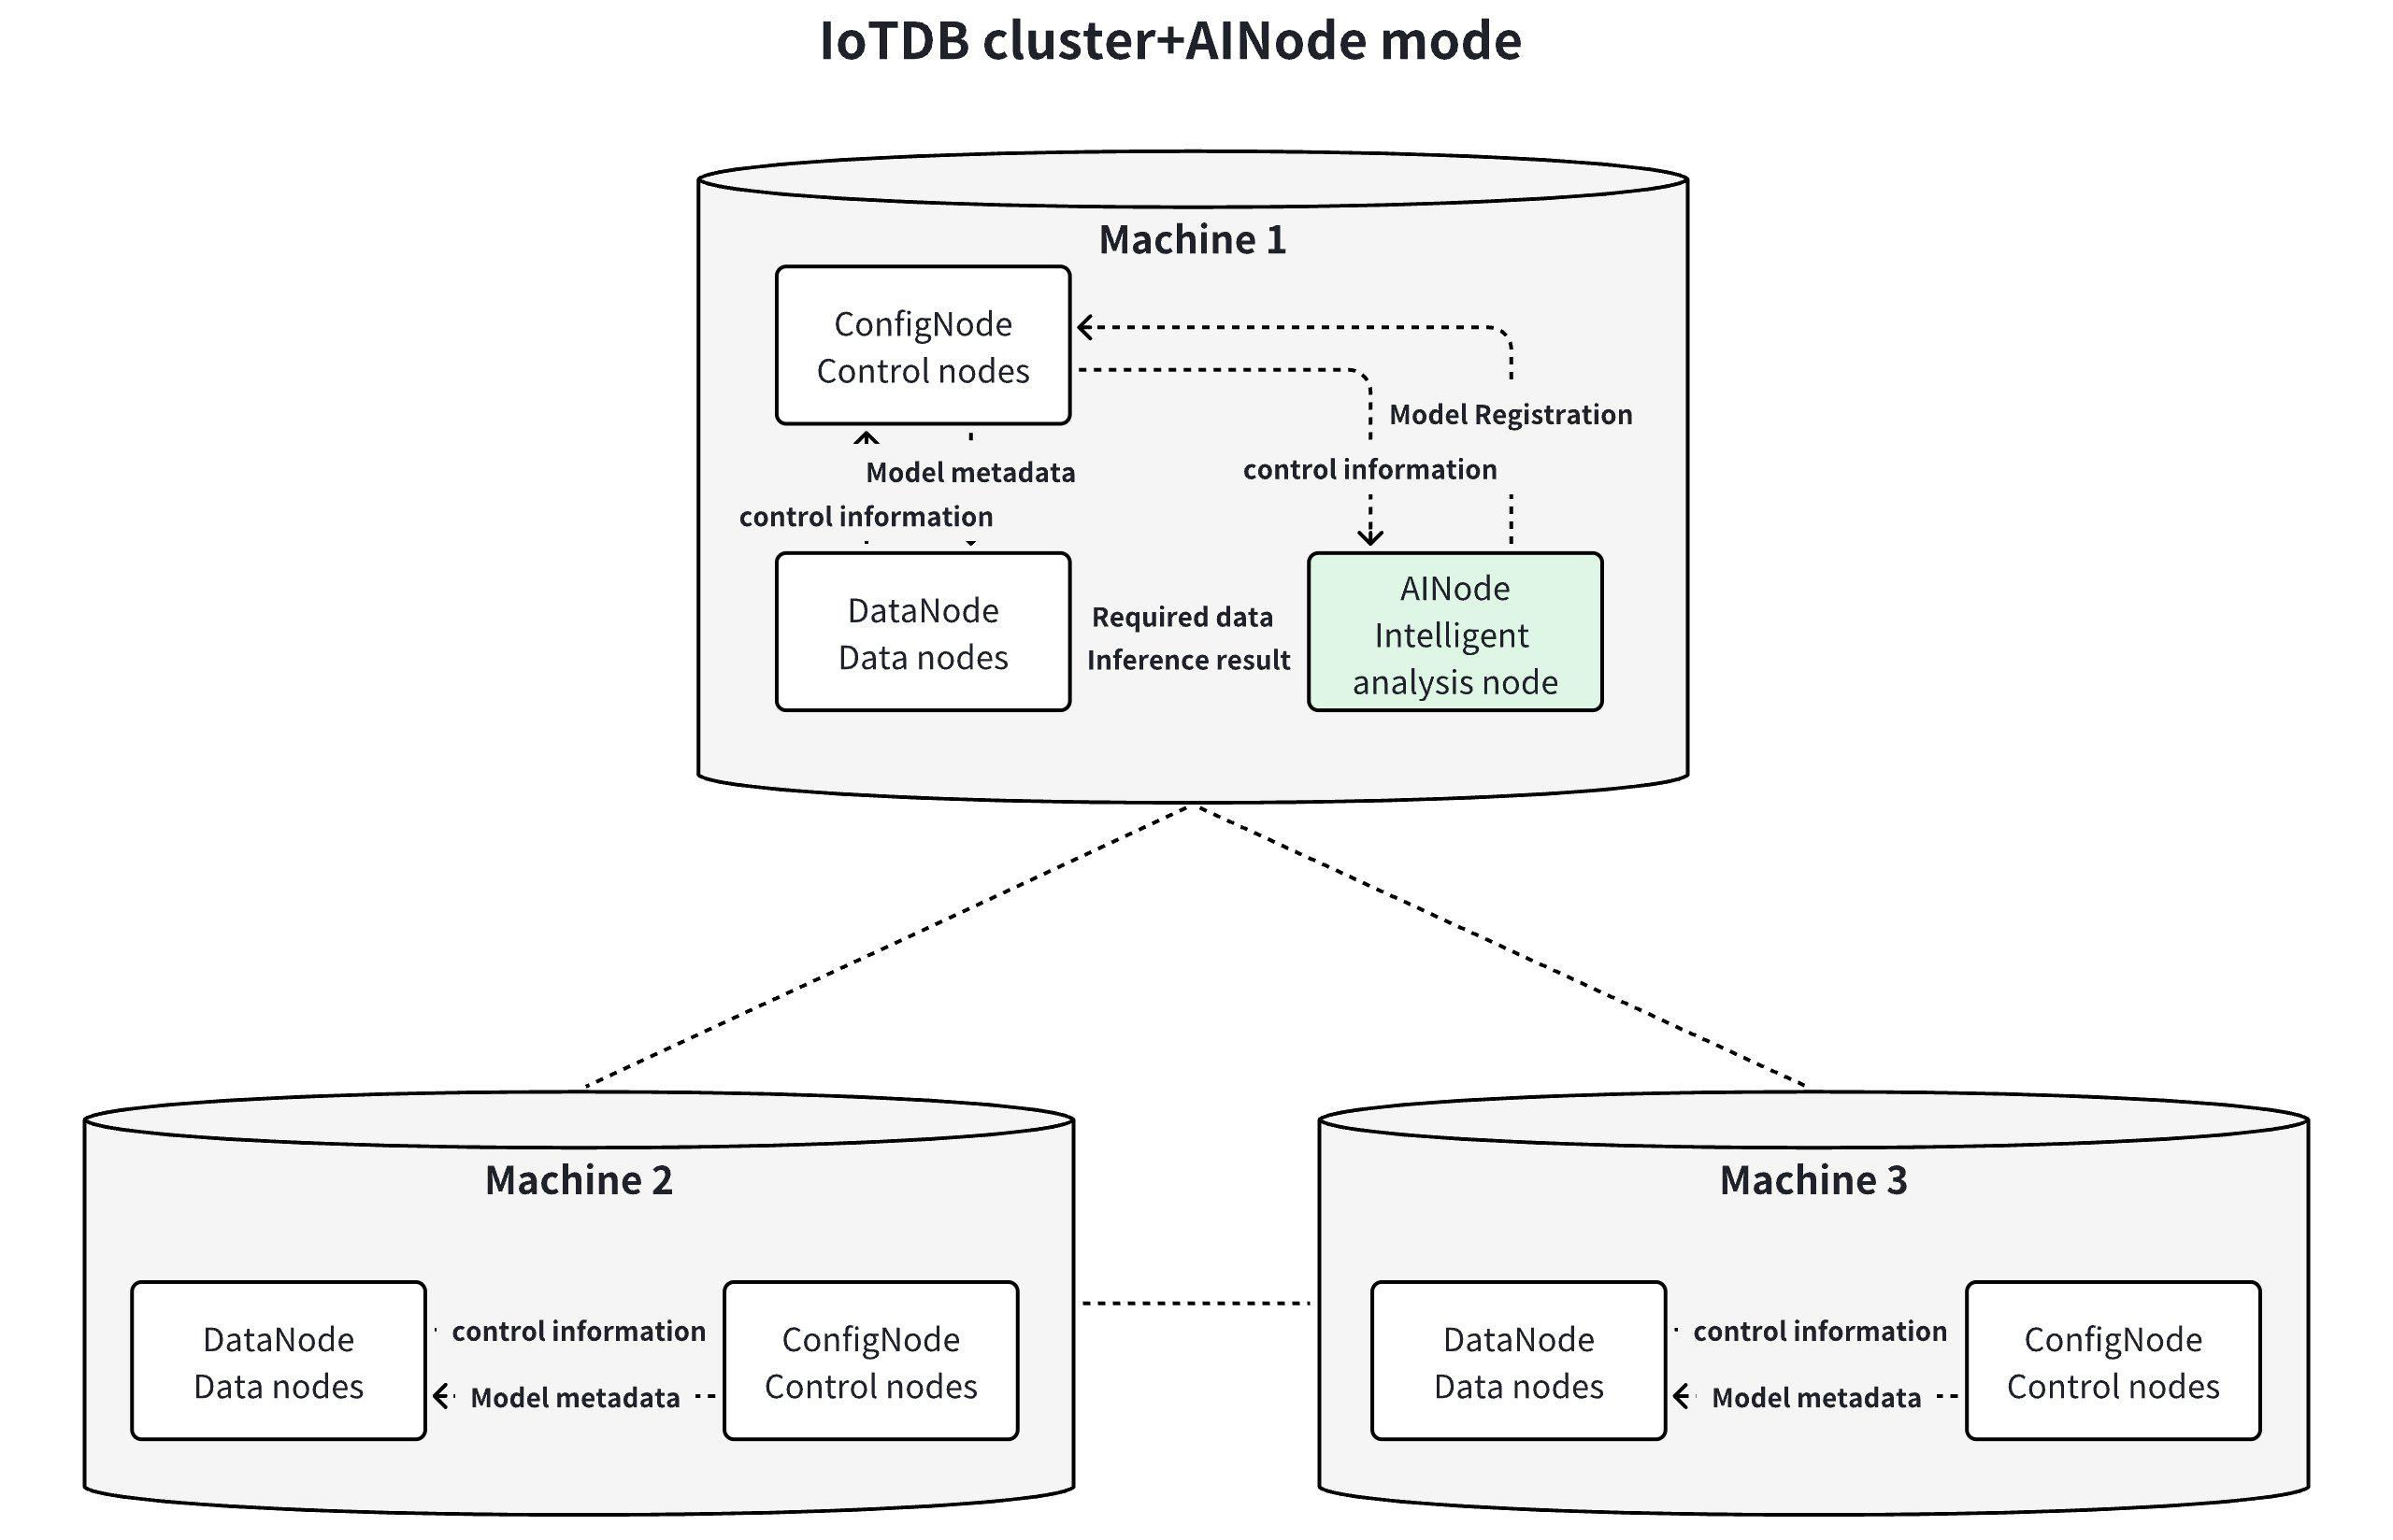
1.3 Deployment mode
2. Installation preparation
2.1 Get installation package
Unzip and install the package(apache-iotdb-<version>-ainode-bin.zip), The directory structure after unpacking the installation package is as follows:
| Catalogue | Type | Explain |
|---|---|---|
| lib | folder | Python package files for AINode |
| sbin | folder | The running script of AINode can start, remove, and stop AINode |
| conf | folder | Configuration files for AINode, and runtime environment setup scripts |
| LICENSE | file | Certificate |
| NOTICE | file | Tips |
| README_ZH.md | file | Explanation of the Chinese version of the markdown format |
| README.md | file | Instructions |
2.2 Pre-installation Check
To ensure the AINode installation package you obtained is complete and valid, we recommend performing an SHA512 verification before proceeding with the installation and deployment.
Preparation:
- Obtain the officially released SHA512 checksum: Visit the Release Versions page on the IoTDB open-source official website to get it.
Verification Steps (Linux as an Example):
- Open the terminal and navigate to the directory where the installation package is stored (e.g., /data/ainode):
cd /data/ainode - Execute the following command to calculate the hash value:
sha512sum apache-iotdb-{version}-ainode-bin.zip - The terminal will output a result (the left part is the SHA512 checksum, and the right part is the file name):

- Compare the output result with the official SHA512 checksum. Once confirmed that they match, you can proceed with the installation and deployment of AINode as per the procedures below.
Notes:
- If the verification results do not match, please re-obtain the installation package.
- If a "file not found" prompt appears during verification, check whether the file path is correct or if the installation package has been fully downloaded.
2.3 Environmental Preparation
- Recommended operating systems: Ubuntu, MacOS
- IoTDB version: >= V 2.0.5.1
- Runtime environment
- Python version between 3.9 and 3.12, with pip and venv tools installed;
3. Installation steps
3.1 Install AINode
- Ensure Python version is between 3.9 and 3.12:
python --version
# or
python3 --version- Download and import AINode into a dedicated folder, switch to the folder, and unzip the package:
unzip apache-iotdb-<version>-ainode-bin.zip3.2 Configuration item modification
AINode supports modifying some necessary parameters. You can find the following parameters in the conf/iotdb-ainode.properties file and make persistent modifications to them:
| Name | Description | Type | Default Value |
|---|---|---|---|
| cluster_name | Identifier of the cluster AINode joins | string | defaultCluster |
| ain_seed_config_node | Address of the ConfigNode registered when AINode starts | String | 127.0.0.1:10710 |
| ain_cluster_ingress_address | RPC address of the DataNode for AINode to pull data | String | 127.0.0.1 |
| ain_cluster_ingress_port | RPC port of the DataNode for AINode to pull data | Integer | 6667 |
| ain_cluster_ingress_username | Client username for AINode to pull data from the DataNode | String | root |
| ain_cluster_ingress_password | Client password for AINode to pull data from the DataNode | String | root |
| ain_cluster_ingress_time_zone | Client time zone for AINode to pull data from the DataNode | String | UTC+8 |
| ain_inference_rpc_address | Address for AINode to provide services and communication (internal interface) | String | 127.0.0.1 |
| ain_inference_rpc_port | Port for AINode to provide services and communication | String | 10810 |
| ain_system_dir | Metadata storage path for AINode (relative path starts from OS-dependent directory; absolute path is recommended) | String | data/AINode/system |
| ain_models_dir | Path to store model files for AINode (relative path starts from OS-dependent directory; absolute path is recommended) | String | data/AINode/models |
| ain_thrift_compression_enabled | Whether to enable Thrift compression for AINode (0=disabled, 1=enabled) | Boolean | 0 |
3.3 Importing Weight Files
Offline environment only (Online environments can skip this step)
Prepare the model weight files in advance, then place them in the /IOTDB_AINODE_HOME/data/ainode/models/weights/ directory.
3.4 Start AINode
After completing the deployment of Seed Config Node, the registration and inference functions of the model can be supported by adding AINode nodes. After specifying the information of the IoTDB cluster in the configuration file, the corresponding instruction can be executed to start AINode and join the IoTDB cluster。
- Networking environment startup
Start command
  # Start command
  # Linux and MacOS systems
  bash sbin/start-ainode.sh

  # Windows systems
  sbin\start-ainode.bat

  # Backend startup command (recommended for long-term running)
  # Linux and MacOS systems
  nohup bash sbin/start-ainode.sh  > myout.file 2>& 1 &

  # Windows systems
  nohup bash sbin\start-ainode.bat  > myout.file 2>& 1 &
3.5 Detecting the status of AINode nodes
During the startup process of AINode, the new AINode will be automatically added to the IoTDB cluster. After starting AINode, you can enter SQL in the command line to query. If you see an AINode node in the cluster and its running status is Running (as shown below), it indicates successful joining.
IoTDB> show cluster
+------+----------+-------+---------------+------------+-------+-----------+
|NodeID|  NodeType| Status|InternalAddress|InternalPort|Version|  BuildInfo|
+------+----------+-------+---------------+------------+-------+-----------+
|     0|ConfigNode|Running|      127.0.0.1|       10710|UNKNOWN|190e303-dev|
|     1|  DataNode|Running|      127.0.0.1|       10730|UNKNOWN|190e303-dev|
|     2|    AINode|Running|      127.0.0.1|       10810|UNKNOWN|190e303-dev|
+------+----------+-------+---------------+------------+-------+-----------+
3.6 Stop AINode
If you need to stop a running AINode node, execute the corresponding shutdown script.
Stop command
  # Linux / MacOS
  bash sbin/stop-ainode.sh

  #Windows
  sbin\stop-ainode.bat
After stopping AINode, you can still see AINode nodes in the cluster, whose running status is UNKNOWN (as shown below), and the AINode function cannot be used at this time.
IoTDB> show cluster
+------+----------+-------+---------------+------------+-------+-----------+
|NodeID|  NodeType| Status|InternalAddress|InternalPort|Version|  BuildInfo|
+------+----------+-------+---------------+------------+-------+-----------+
|     0|ConfigNode|Running|      127.0.0.1|       10710|UNKNOWN|190e303-dev|
|     1|  DataNode|Running|      127.0.0.1|       10730|UNKNOWN|190e303-dev|
|     2|    AINode|UNKNOWN|      127.0.0.1|       10790|UNKNOWN|190e303-dev|
+------+----------+-------+---------------+------------+-------+-----------+
If you need to restart the node, you need to execute the startup script again.
4. common problem
4.1 An error occurs when starting AINode stating that the venv module cannot be found
When starting AINode using the default method, a Python virtual environment will be created in the installation package directory and dependencies will be installed, so it is required to install the venv module. Generally speaking, Python 3.10 and above versions come with built-in VenV, but for some systems with built-in Python environments, this requirement may not be met. There are two solutions when this error occurs (choose one or the other):
To install the Venv module locally, taking Ubuntu as an example, you can run the following command to install the built-in Venv module in Python. Or install a Python version with built-in Venv from the Python official website.
apt-get install python3.10-venvInstall version 3.10.0 of venv into AINode in the AINode path.
../Python-3.10.0/python -m venv venv(Folder Name)When running the startup script, use -i to specify an existing Python interpreter path as the running environment for AINode, eliminating the need to create a new virtual environment.
4.2 The SSL module in Python is not properly installed and configured to handle HTTPS resources
WARNING: pip is configured with locations that require TLS/SSL, however the ssl module in Python is not available.
You can install OpenSSLS and then rebuild Python to solve this problem
Currently Python versions 3.6 to 3.9 are compatible with OpenSSL 1.0.2, 1.1.0, and 1.1.1.
Python requires OpenSSL to be installed on our system, the specific installation method can be found in link
sudo apt-get install build-essential libssl-dev zlib1g-dev libbz2-dev libreadline-dev libsqlite3-dev wget curl llvm libncurses5-dev libncursesw5-dev xz-utils tk-dev libffi-dev liblzma-dev uuid-dev lzma-dev liblzma-dev
sudo -E ./configure --with-ssl
make
sudo make install
4.3 Pip version is lower
A compilation issue similar to "error: Microsoft Visual C++14.0 or greater is required..." appears on Windows
The corresponding error occurs during installation and compilation, usually due to insufficient C++version or Setup tools version. You can check it in
./python -m pip install --upgrade pip
./python -m pip install --upgrade setuptools
4.4 Install and compile Python
Use the following instructions to download the installation package from the official website and extract it:
.wget https://www.python.org/ftp/python/3.10.0/Python-3.10.0.tar.xz
tar Jxf Python-3.10.0.tar.xz
Compile and install the corresponding Python package:
cd Python-3.10.0
./configure prefix=/usr/local/python3
make
sudo make install
python3 --version