Docker部署
Docker部署
环境准备
Docker安装
#以ubuntu为例,其他操作系统可以自行搜索安装方法
#step1: 安装一些必要的系统工具
sudo apt-get update
sudo apt-get -y install apt-transport-https ca-certificates curl software-properties-common
#step2: 安装GPG证书
curl -fsSL https://mirrors.aliyun.com/docker-ce/linux/ubuntu/gpg | sudo apt-key add -
#step3: 写入软件源信息
sudo add-apt-repository "deb [arch=amd64] https://mirrors.aliyun.com/docker-ce/linux/ubuntu $(lsb_release -cs) stable"
#step4: 更新并安装Docker-CE
sudo apt-get -y update
sudo apt-get -y install docker-ce
#step5: 设置docker开机自启动
sudo systemctl enable docker
#step6: 验证docker是否安装成功
docker --version  #显示版本信息,即安装成功
docker-compose安装
#安装命令
curl -L "https://github.com/docker/compose/releases/download/v2.20.0/docker-compose-$(uname -s)-$(uname -m)" -o /usr/local/bin/docker-compose
chmod +x /usr/local/bin/docker-compose
ln -s  /usr/local/bin/docker-compose  /usr/bin/docker-compose
#验证是否安装成功
docker-compose --version  #显示版本信息即安装成功
单机版
本节演示如何部署1C1D的docker单机版。
拉取镜像文件
Apache IoTDB的Docker镜像已经上传至 https://hub.docker.com/r/apache/iotdb 。
以获取1.3.2版本为例,拉取镜像命令:
docker pull apache/iotdb:1.3.2-standalone查看镜像:
docker images
创建docker bridge网络
docker network create --driver=bridge --subnet=172.18.0.0/16 --gateway=172.18.0.1 iotdb编写docker-compose的yml文件
这里我们以把IoTDB安装目录和yml文件统一放在/docker-iotdb文件夹下为例:
文件目录结构为:/docker-iotdb/iotdb, /docker-iotdb/docker-compose-standalone.yml
docker-iotdb:
├── iotdb  #iotdb安装目录
│── docker-compose-standalone.yml #单机版docker-compose的yml文件
完整的docker-compose-standalone.yml 内容如下:
version: "3"
services:
  iotdb-service:
    image: apache/iotdb:1.3.2-standalone #使用的镜像
    hostname: iotdb
    container_name: iotdb
    restart: always
    ports:
      - "6667:6667"
    environment:
      - cn_internal_address=iotdb
      - cn_internal_port=10710
      - cn_consensus_port=10720
      - cn_seed_config_node=iotdb:10710
      - dn_rpc_address=iotdb
      - dn_internal_address=iotdb
      - dn_rpc_port=6667
      - dn_internal_port=10730
      - dn_mpp_data_exchange_port=10740
      - dn_schema_region_consensus_port=10750
      - dn_data_region_consensus_port=10760
      - dn_seed_config_node=iotdb:10710
    privileged: true
    volumes:
        - ./iotdb/data:/iotdb/data
        - ./iotdb/logs:/iotdb/logs
    networks:
      iotdb:
        ipv4_address: 172.18.0.6
    # Note: Some environments set an extremely high container nofile limit (~2^30 = 1073741824).
    # This can make the startup step "Checking whether the ports are already occupied..." appear to hang (lsof slow).
    # If you see that line for a long time, lower the nofile limit by uncommenting below:
    # ulimits:
    #   nofile:
    #     soft: 1048576
    #     hard: 1048576
networks:
  iotdb:
    external: true
启动IoTDB
使用下面的命令启动:
cd /docker-iotdb
docker-compose -f docker-compose-standalone.yml up  -d  #后台启动
验证部署
查看日志,有如下字样,表示启动成功
docker logs -f iotdb-datanode #查看日志命令
2024-07-21 08:22:38,457 [main] INFO  o.a.i.db.service.DataNode:227 - Congratulations, IoTDB DataNode is set up successfully. Now, enjoy yourself!
进入容器,查看服务运行状态
查看启动的容器
docker ps
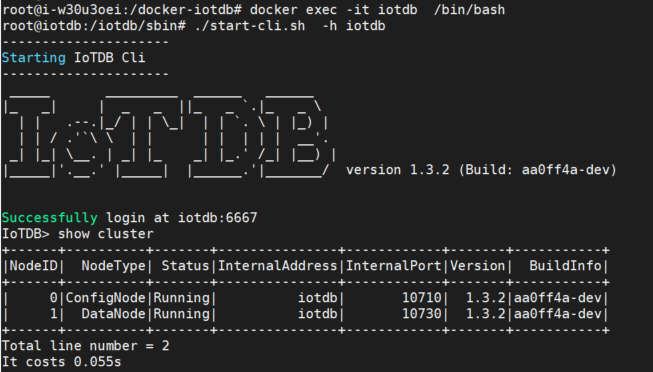
进入容器, 通过cli登录数据库, 使用show cluster命令查看服务状态
docker exec -it iotdb  /bin/bash         #进入容器
./start-cli.sh -h iotdb                  #登录数据库
IoTDB> show cluster                      #查看服务状态
可以看到服务状态都是running, 说明IoTDB部署成功。
映射/conf目录(可选)
后续如果想在物理机中直接修改配置文件,可以把容器中的/conf文件夹映射出来,分三步:
步骤一:拷贝容器中的/conf目录到/docker-iotdb/iotdb/conf
docker cp iotdb:/iotdb/conf /docker-iotdb/iotdb/conf步骤二:在docker-compose-standalone.yml中添加映射
    volumes:
        - ./iotdb/conf:/iotdb/conf   #增加这个/conf文件夹的映射
        - ./iotdb/data:/iotdb/data
        - ./iotdb/logs:/iotdb/logs
步骤三:重新启动IoTDB
docker-compose -f docker-compose-standalone.yml up -d集群版
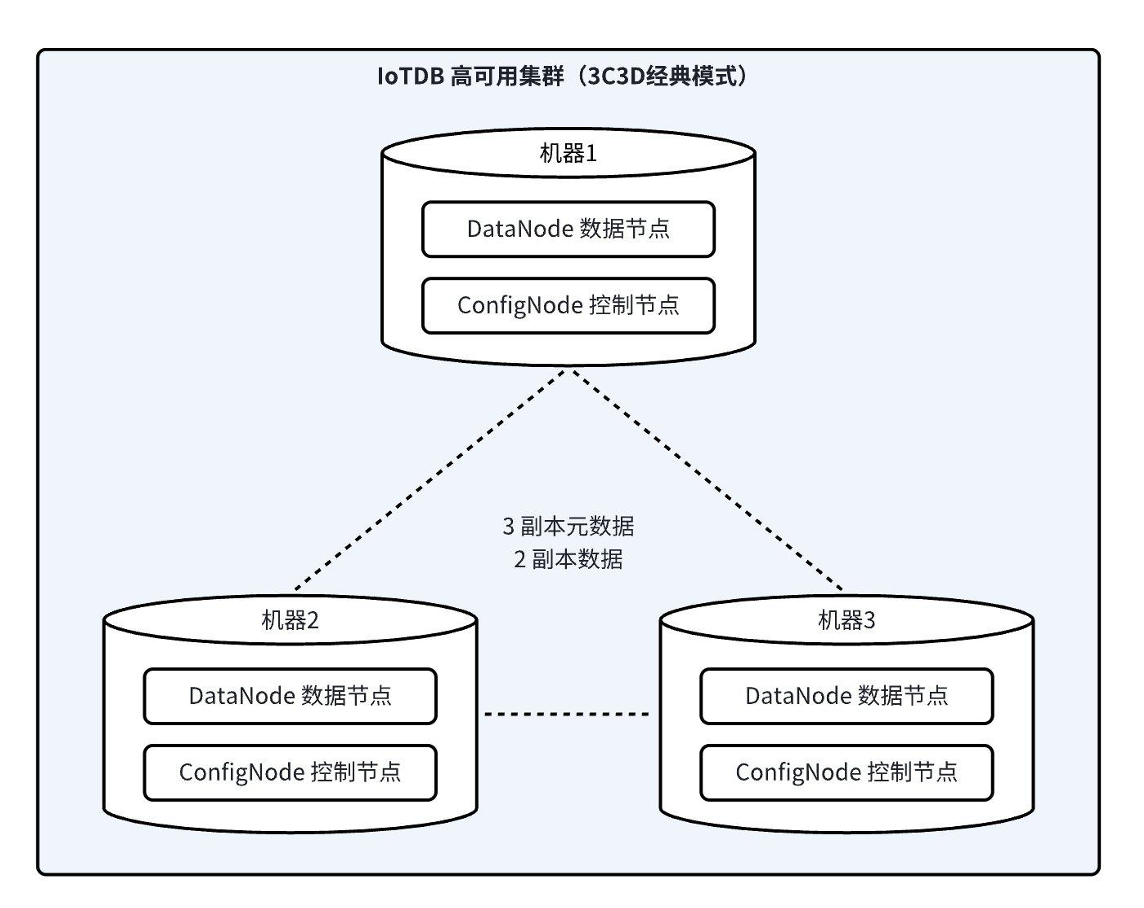
本小节描述如何手动部署包括3个ConfigNode和3个DataNode的实例,即通常所说的3C3D集群。
注意:集群版目前只支持host网络和overlay 网络,不支持bridge网络。
下面以host网络为例演示如何部署3C3D集群。
设置主机名
假设现在有3台linux服务器,IP地址和服务角色分配如下:
| 节点ip | 主机名 | 服务 |
|---|---|---|
| 192.168.1.3 | iotdb-1 | ConfigNode、DataNode |
| 192.168.1.4 | iotdb-2 | ConfigNode、DataNode |
| 192.168.1.5 | iotdb-3 | ConfigNode、DataNode |
在3台机器上分别配置主机名,设置主机名需要在目标服务器上配置/etc/hosts,使用如下命令:
echo "192.168.1.3  iotdb-1"  >> /etc/hosts
echo "192.168.1.4  iotdb-2"  >> /etc/hosts
echo "192.168.1.5  iotdb-3"  >> /etc/hosts
拉取镜像文件
Apache IoTDB的Docker镜像已经上传至https://hub.docker.com/r/apache/iotdb。
在3台服务器上分别拉取IoTDB镜像,以获取1.3.2版本为例,拉取镜像命令:
docker pull apache/iotdb:1.3.2-standalone查看镜像:
docker images
编写docker-compose的yml文件
这里我们以把IoTDB安装目录和yml文件统一放在/docker-iotdb文件夹下为例:
文件目录结构为:/docker-iotdb/iotdb, /docker-iotdb/confignode.yml,/docker-iotdb/datanode.yml
docker-iotdb:
├── confignode.yml #confignode的yml文件
├── datanode.yml   #datanode的yml文件
└── iotdb          #IoTDB安装目录
在每台服务器上都要编写2个yml文件,即confignode.yml和datanode.yml,yml示例如下:
confignode.yml:
#confignode.yml
version: "3"
services:
  iotdb-confignode:
    image: apache/iotdb:1.3.2-standalone #使用的镜像
    hostname: iotdb-1|iotdb-2|iotdb-3    #根据实际情况选择,三选一
    container_name: iotdb-confignode
    command: ["bash", "-c", "entrypoint.sh confignode"]
    restart: always
    environment:
      - cn_internal_address=iotdb-1|iotdb-2|iotdb-3 #根据实际情况选择,三选一
      - cn_internal_port=10710
      - cn_consensus_port=10720
      - cn_seed_config_node=iotdb-1:10710   #默认第一台为seed节点
      - schema_replication_factor=3         #元数据副本数
      - data_replication_factor=2           #数据副本数
    privileged: true
    volumes:
      - ./iotdb/data:/iotdb/data
      - ./iotdb/logs:/iotdb/logs
    network_mode: "host"    #使用host网络
    # Note: Some environments set an extremely high container nofile limit (~2^30 = 1073741824).
    # This can make the startup step "Checking whether the ports are already occupied..." appear to hang (lsof slow).
    # If you see that line for a long time, lower the nofile limit by uncommenting below:
    # ulimits:
    #   nofile:
    #     soft: 1048576
    #     hard: 1048576
datanode.yml:
#datanode.yml
version: "3"
services:
  iotdb-datanode:
    image: apache/iotdb:1.3.x-standalone #使用的镜像
    hostname: iotdb-1|iotdb-2|iotdb-3 #根据实际情况选择,三选一
    container_name: iotdb-datanode
    command: ["bash", "-c", "entrypoint.sh datanode"]
    restart: always
    ports:
      - "6667:6667"
    privileged: true
    environment:
      - dn_rpc_address=iotdb-1|iotdb-2|iotdb-3  #根据实际情况选择,三选一
      - dn_internal_address=iotdb-1|iotdb-2|iotdb-3 #根据实际情况选择,三选一
      - dn_seed_config_node=iotdb-1:10710      #默认第1台为seed节点
      - dn_rpc_port=6667
      - dn_internal_port=10730
      - dn_mpp_data_exchange_port=10740
      - dn_schema_region_consensus_port=10750
      - dn_data_region_consensus_port=10760
      - schema_replication_factor=3         #元数据副本数
      - data_replication_factor=2           #数据副本数
    volumes:
      - ./iotdb/data:/iotdb/data
      - ./iotdb/logs:/iotdb/logs
    network_mode: "host"      #使用host网络
    # Note: Some environments set an extremely high container nofile limit (~2^30 = 1073741824).
    # This can make the startup step "Checking whether the ports are already occupied..." appear to hang (lsof slow).
    # If you see that line for a long time, lower the nofile limit by uncommenting below:
    # ulimits:
    #   nofile:
    #     soft: 1048576
    #     hard: 1048576
首次启动confignode
先在3台服务器上分别启动confignode, 注意启动顺序,先启动第1台iotdb-1,再启动iotdb-2和iotdb-3。
cd /docker-iotdb
docker-compose -f confignode.yml up  -d #后台启动
启动datanode
在3台服务器上分别启动datanode
cd /docker-iotdb
docker-compose  -f  datanode.yml  up -d #后台启动
验证部署
查看日志,有如下字样,表示datanode启动成功
docker logs -f iotdb-datanode #查看日志命令
2024-07-21 09:40:58,120 [main] INFO  o.a.i.db.service.DataNode:227 - Congratulations, IoTDB DataNode is set up successfully. Now, enjoy yourself!
进入容器,查看服务运行状态
查看启动的容器
docker ps
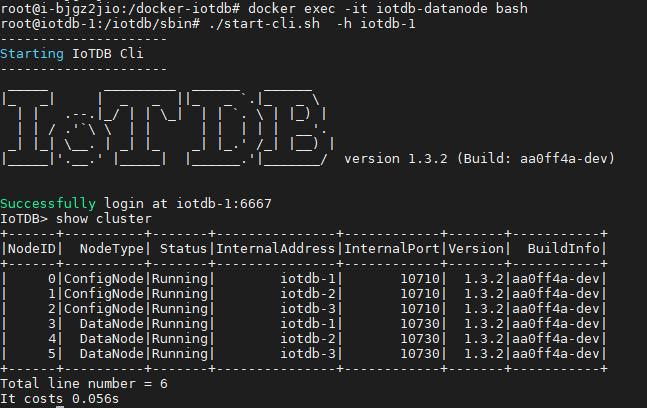
进入任意一个容器, 通过cli登录数据库, 使用show cluster命令查看服务状态
docker exec -it iotdb-datanode /bin/bash     #进入容器
./start-cli.sh -h iotdb-1                    #登录数据库
IoTDB> show cluster                          #查看服务状态
可以看到服务状态都是running, 说明IoTDB部署成功。
映射/conf目录(可选)
后续如果想在物理机中直接修改配置文件,可以把容器中的/conf文件夹映射出来,分三步:
步骤一:在3台服务器中分别拷贝容器中的/conf目录到/docker-iotdb/iotdb/conf
docker cp iotdb-confignode:/iotdb/conf /docker-iotdb/iotdb/conf
或者
docker cp iotdb-datanode:/iotdb/conf   /docker-iotdb/iotdb/conf
步骤二:在3台服务器的confignode.yml和datanode.yml中添加/conf目录映射
#confignode.yml
    volumes:
      - ./iotdb/conf:/iotdb/conf  #增加这个/conf文件夹的映射
      - ./iotdb/data:/iotdb/data
      - ./iotdb/logs:/iotdb/logs

#datanode.yml
    volumes:
      - ./iotdb/conf:/iotdb/conf   #增加这个/conf文件夹的映射
      - ./iotdb/data:/iotdb/data
      - ./iotdb/logs:/iotdb/logs
步骤三:在3台服务器上重新启动IoTDB
cd /docker-iotdb
docker-compose  -f confignode.yml  up  -d
docker-compose  -f datanode.yml    up  -d